A new Iterate List action introduced in version 6.0.0.98 allows for iterating a collection of items and calling a designated Action List once for each item in the collection.
The action will iterate any IList<object> collection. The collections to iterate can come from the results of other Actions, such as the Find Files and the Find Services actions. The Set Shared Property action has been extended to include a new Text List type of Shared Property, which can be iterated. And finally, the Iterate List action can be used in conjunction with the C#/VB.Net action, which exposes programmatic access to the entire Shared Properties dictionary, to perform complex repetitive operations during package execution.
Example Usage
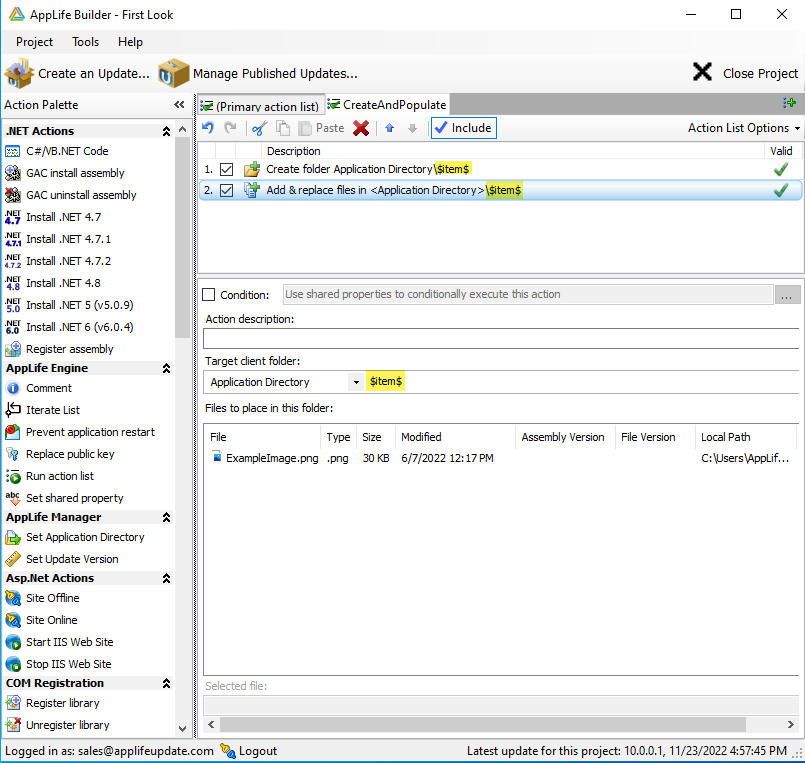
To demonstrate the usage of this action, we’ll add 10 sub-directories to our Application Install Directory and add an image file to each one. We’ll start by creating the Action List that will add the files to the designated directory. Note the use of the item Shared Property.
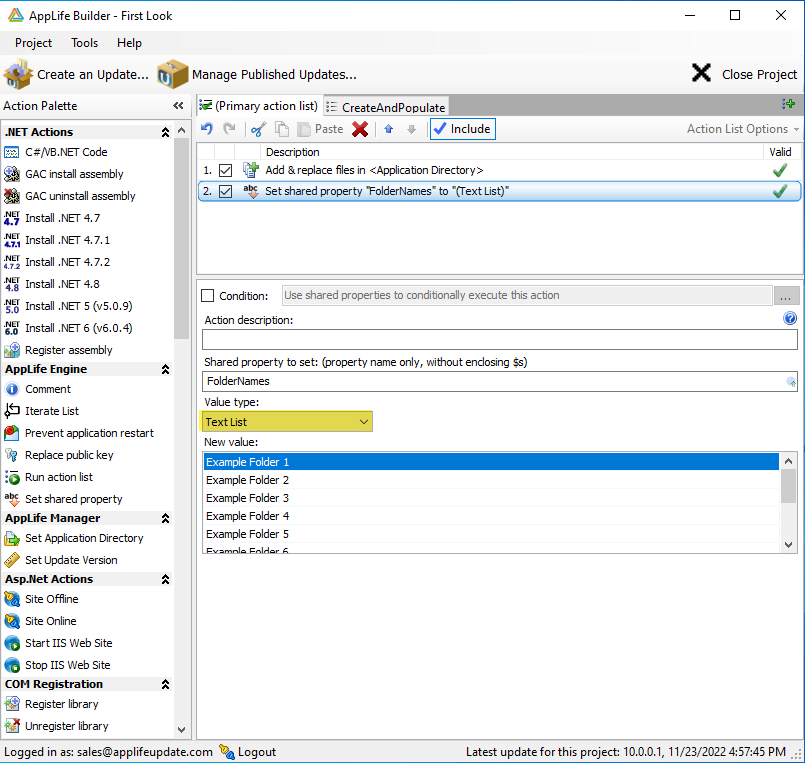
Next, we’ll create the List to iterate. This list will contain the Directory Names for each of the new directories. The Action List will use the current value of the list item to define the directory name. The value is provided to the Action List in the form of a Shared Property (item), who’s key value is defined by the Iterate List action settings.
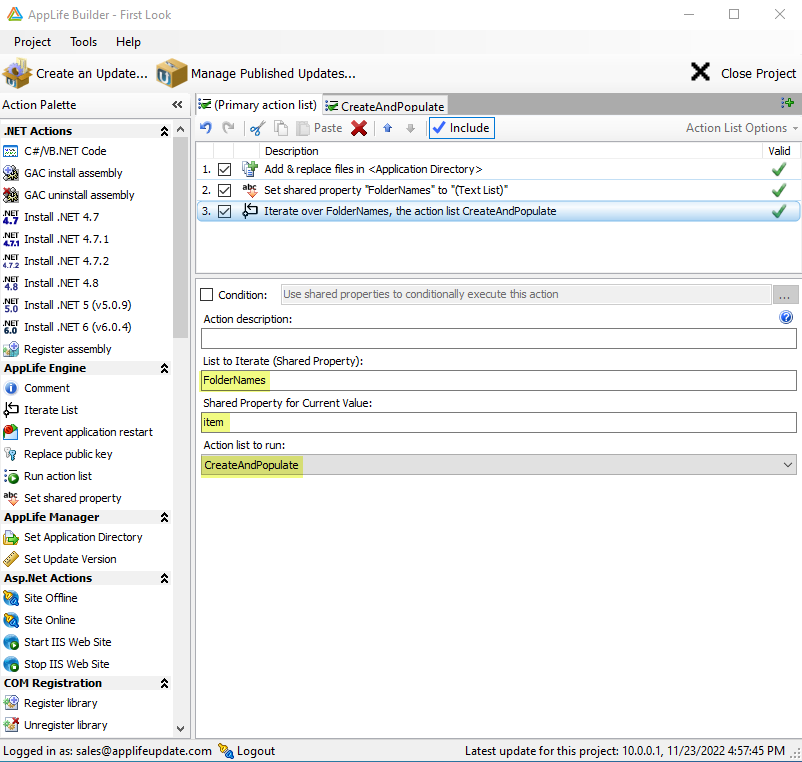
Finally, we’ll add the Iterate List action to the Primary Action List. Configure it to iterate our list created by the Set Shared Property action and call our specific CreateAndPopulate Action List once for each item.
While the example provided is quite trivial, the demonstrated usage of the Iterate List action will hopefully trigger thoughts on how the action can improve the installation and maintenance of your AppLife managed applications.
AppLife Cloud provides an excellent channel to distribute custom software applications to Windows desktops and servers. For many subscribers, they publish their packages using the default anonymous access settings and it works great for them. But there are many scenarios where it becomes important to filter access to specific applications and packages. The most common scenario is for limiting new versions to testing and QA installations and then opening them up later for wider distribution. Whatever the scenario, when applications require limited access, AppLife Cloud provides a simple method that works well. Our method works like this…
A string token is assigned to each installation, called a Client Access Key (CAK). Client Access Keys do not have to be unique. Through your dashboard you can create lists of Client Access Keys. These lists are assigned to Applications and AppLife Packages which determine their visibility to installations checking for packages. It’s that simple. In this post, we’ll review how to work with Client Access Keys and Access Lists in AppLife Cloud.
Assigning Client Access Keys
Client Access Keys can be any string value and are specific to the applications domain. While individual installations don’t require unique Client Access Keys, we recommend creating unique keys for each application installation. This not only provides the most flexibility in controlling access to Applications and Packages, but it allows for better monitoring your install base throughout the life of your application within your AppLife online dashboard.
AppLife Manager
When using AppLife Manager on deployed clients, the Client Access Key is set when AppLife Manager is connected (registered) to your AppLife subscription. When installed independently on a computer, the Register Subscription command is used.
Setting Client Access Key through AppLife Manager
When AppLife Manager is installed through automation, a subscription is added through a Command Line Action.
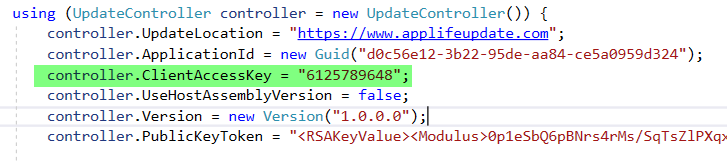
When the AppLife API is used through NuGet to integrate an update process directly into your application, the Client Access Key is set as a property value of the Update Controller object.
Using an Update Controller to set Client Access Key
Creating Access Lists
Access Lists are collections of Client Access Keys that can be assigned to Applications and AppLife packages to control visibility of these assets.
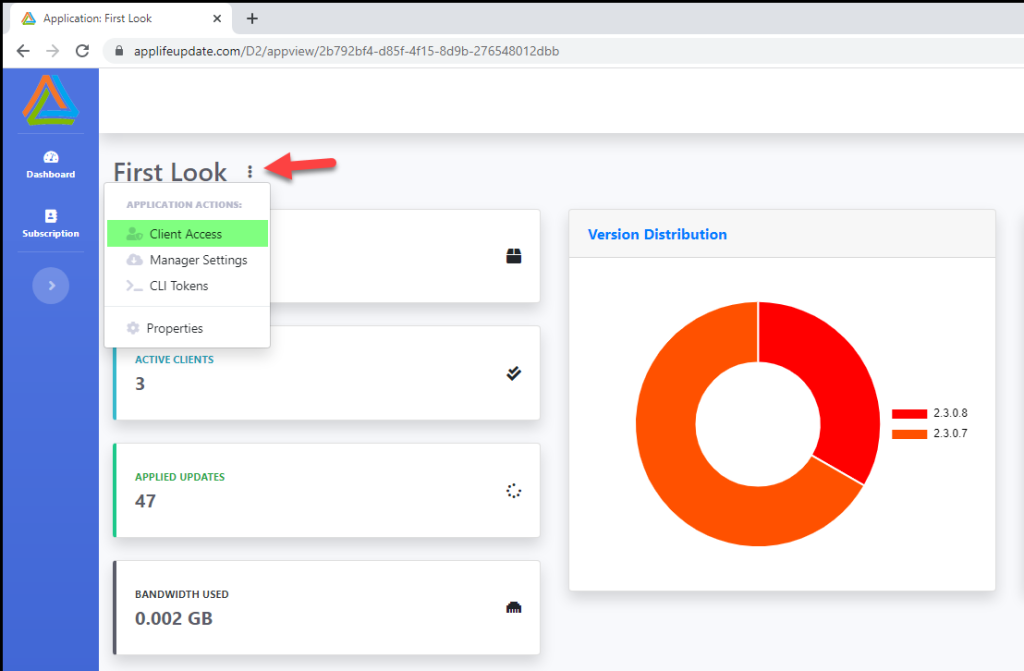
Individual Access Lists are “owned” by an application and the editor is opened through the dashboard Application view. When viewing any application in your dashboard, the Client Access view can be opened through the Application Menu.
Client Access Menu Option
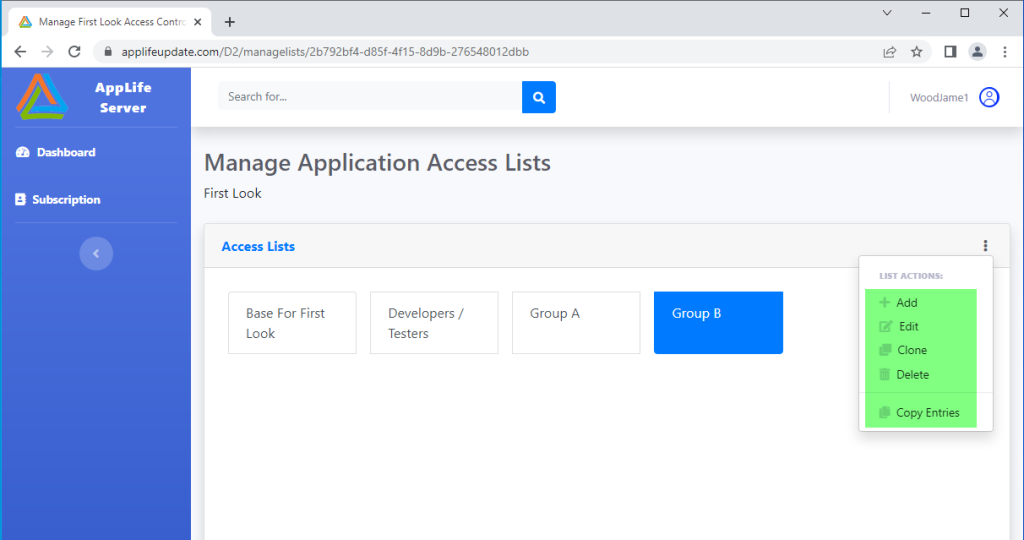
From there you can control most of the features of Access Control. Clicking to Manage Access Lists displays all of the applications Access Lists. By selecting a list, you can edit that list, clone the list into a new one, delete it or copy the entries onto the clipboard. You can also add a new list from here.
Access List Actions
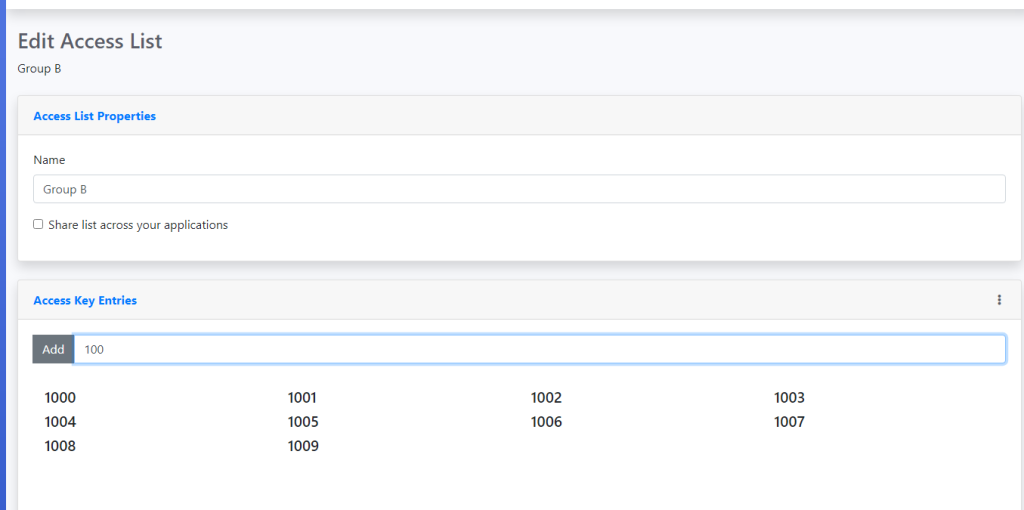
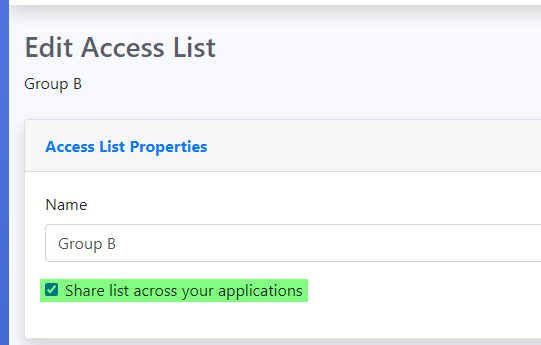
When adding/editing a list, the list name is editable and a list of the Client Access Keys included in the list is displayed. When adding a Client Access Key, the list of existing keys that don’t match the current entry are hidden from view. This helps find an existing Client Access Key in a list and also prevents entering duplicates.
Editing an Access List
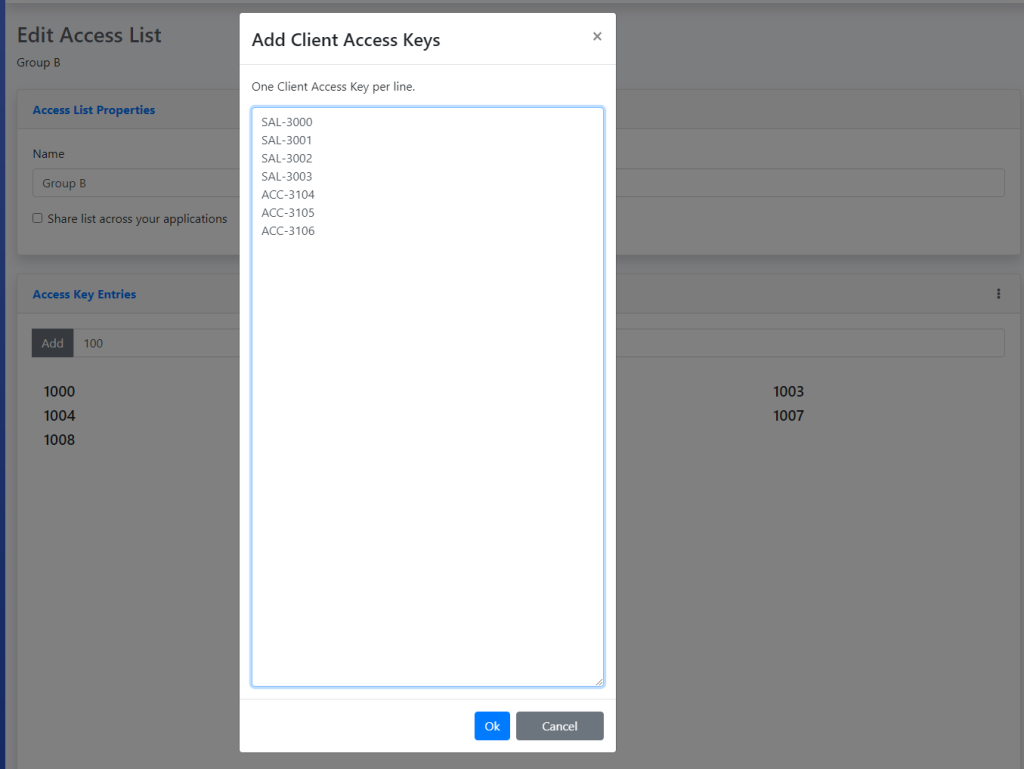
Bulk Add
To assist in adding an existing list of Client Access Keys, there is a Bulk Add option. Using Bulk Add, multiple Client Access Keys can be added at the same time, one per line. This supports using the clipboard to paste from spreadsheets or query results.
Bulk Add Operation
Client Access API
In situations where Client Access Keys are managed from a separate supervisory system, Access Lists can be manipulated through the Client Access API. This will allow lists to be created, removed and entries added and removed. To use the Client Access API, it must be enabled per application and a token must be generated. The different API actions are called through HTTP Post to the respective addresses. More information is available in the AppLife Cloud documentation.
Sharing Lists
Access Lists are created and maintained for individual applications, however lists can be shared across all applications within an AppLife Subscription. This allows a single set of lists to be maintained for subscribers with multiple applications that use some or all the same Access Lists. To share an Access List, the list must be selected as shared.
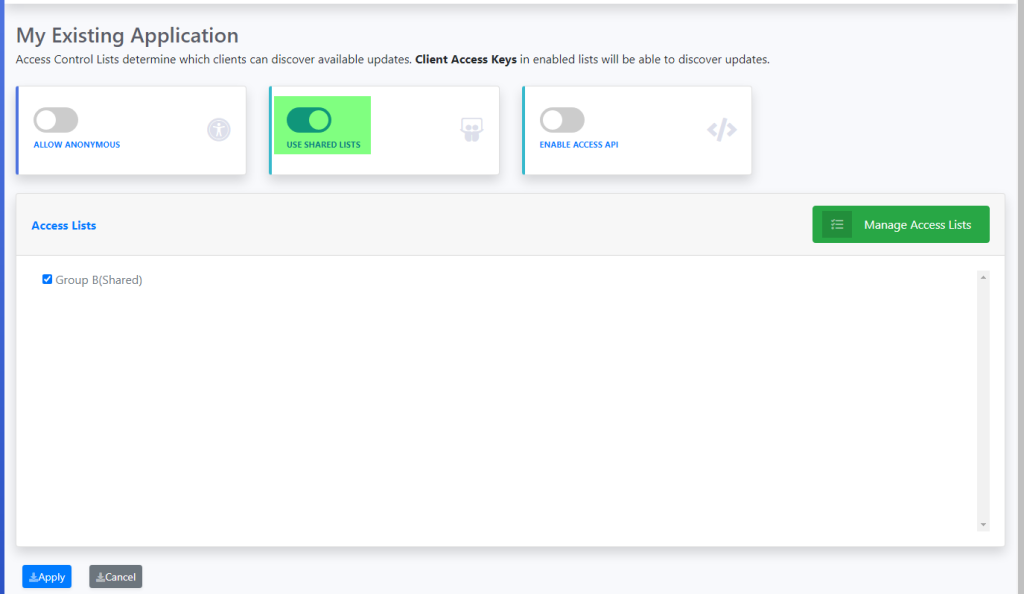
On applications where this shared list is to be used, toggle the option to Use Shared Lists. Any lists shared through any subscription application will be available for selection.
Share an Access List
Use a Shared List
Assigning Access Lists
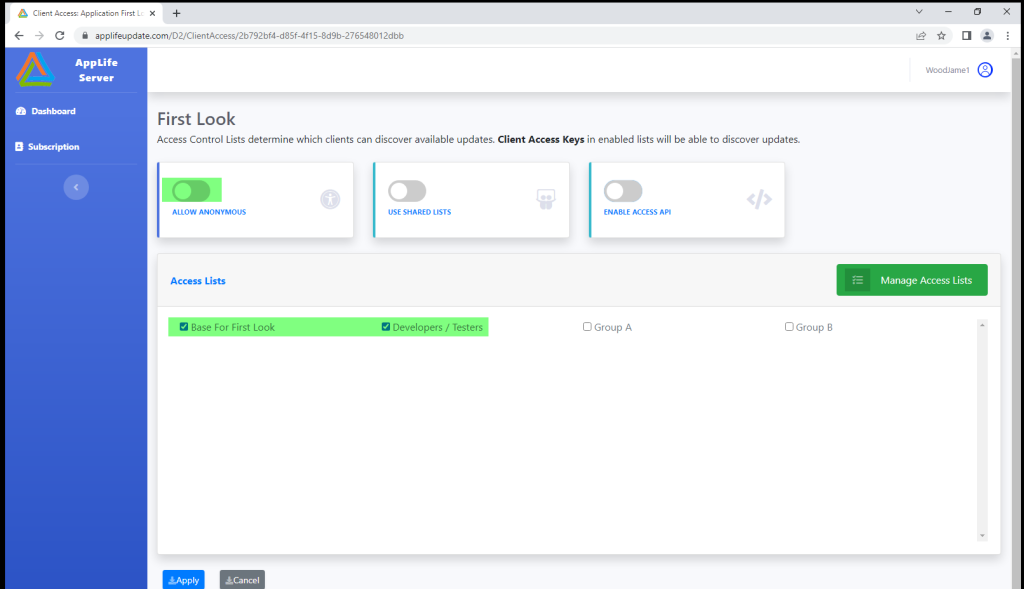
With Access Lists created and shared as necessary, they can be assigned to Applications and Individual AppLife packages to control exposure to clients. By default, new applications are configured for Anonymous access. To filter access based on Client Access Keys, disable the Allow Anonymous Access setting, and then check the appropriate access lists that should be able to see the application.
Assigning Access Lists to an Application
Assign Lists to Individual Packages
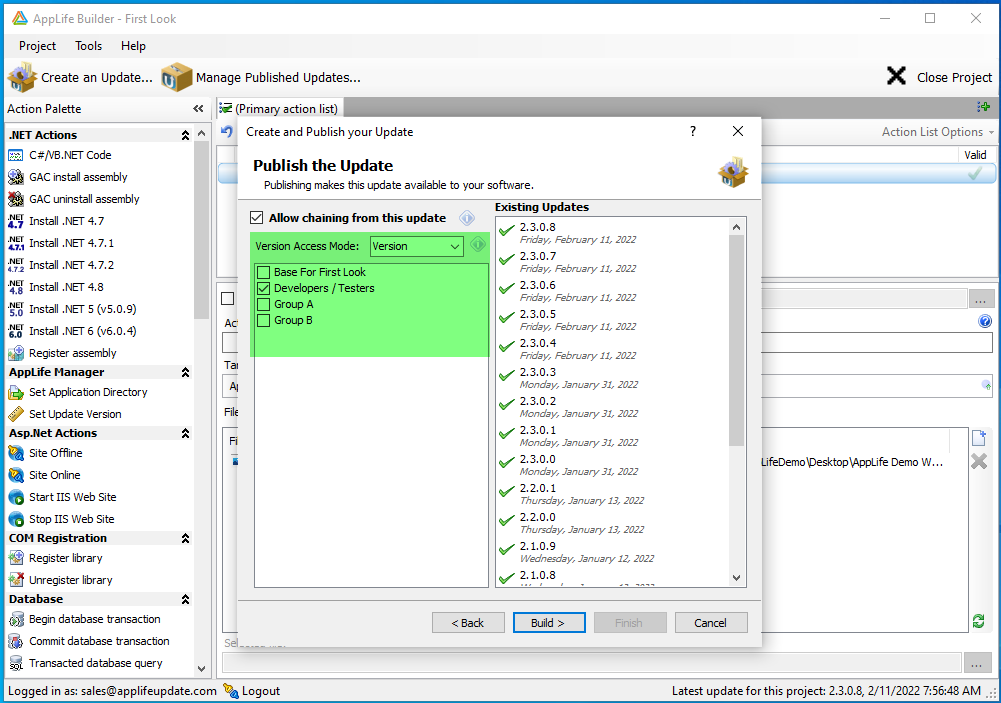
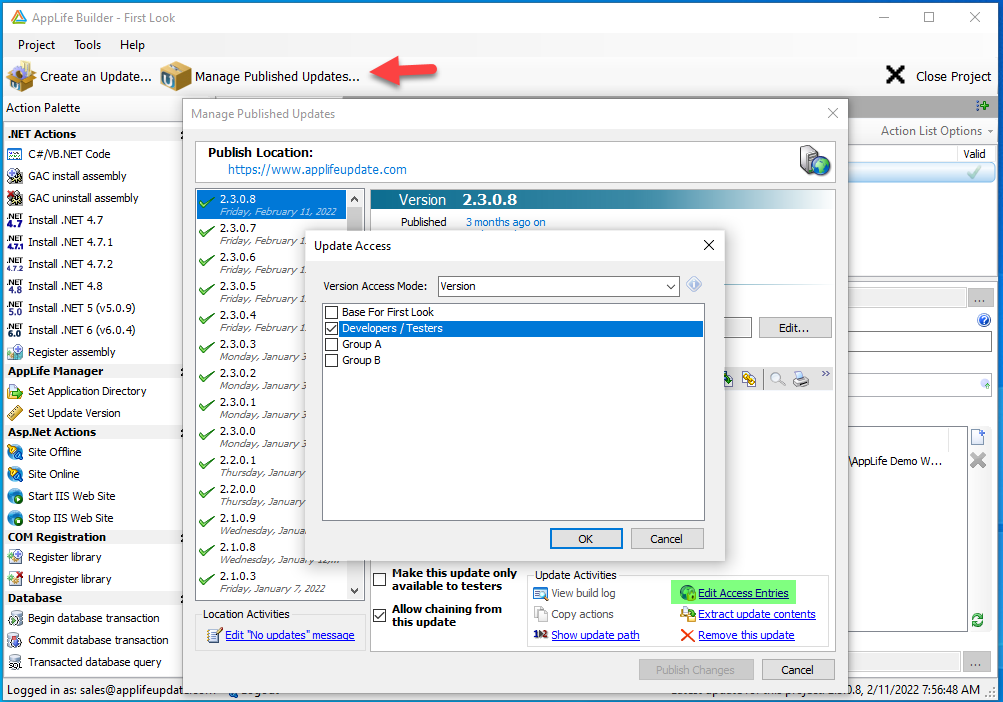
Access to individual AppLife packages can be set during publishing and can be modified afterwards through the dashboard or through the AppLife Builder application. A common use-case is to publish packages initially for testers, and then open it up for wider distribution through the dashboard later. When publishing, the Version Access Mode options are Application, Version, and None. When Version is selected, the Access List selections will override the application level selections.
Set Access Lists when publishing
Version Mode Access Entries can also be modified through AppLife Builder.
Modifying Version Access through AppLife Builder
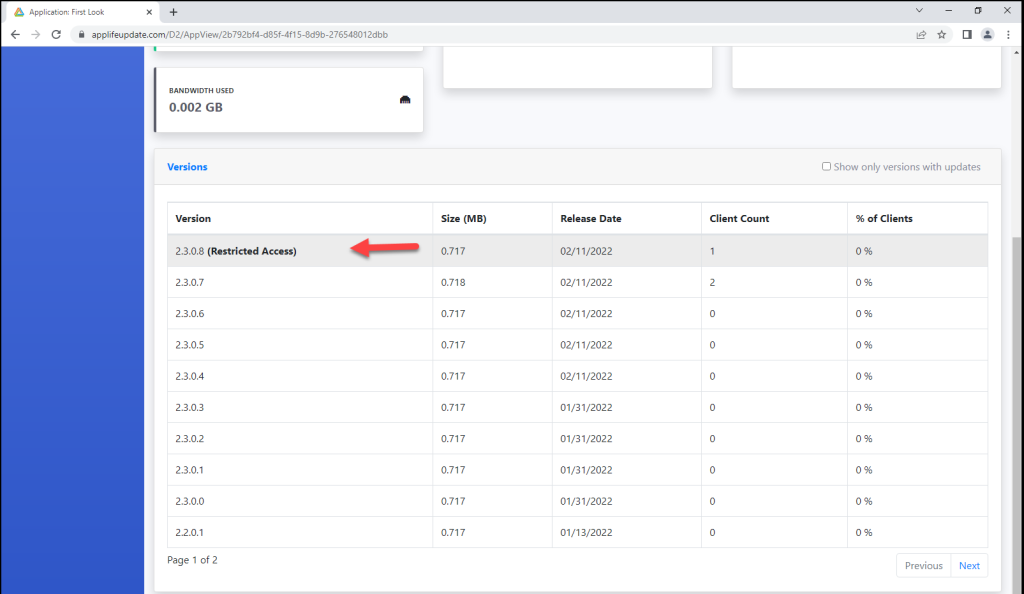
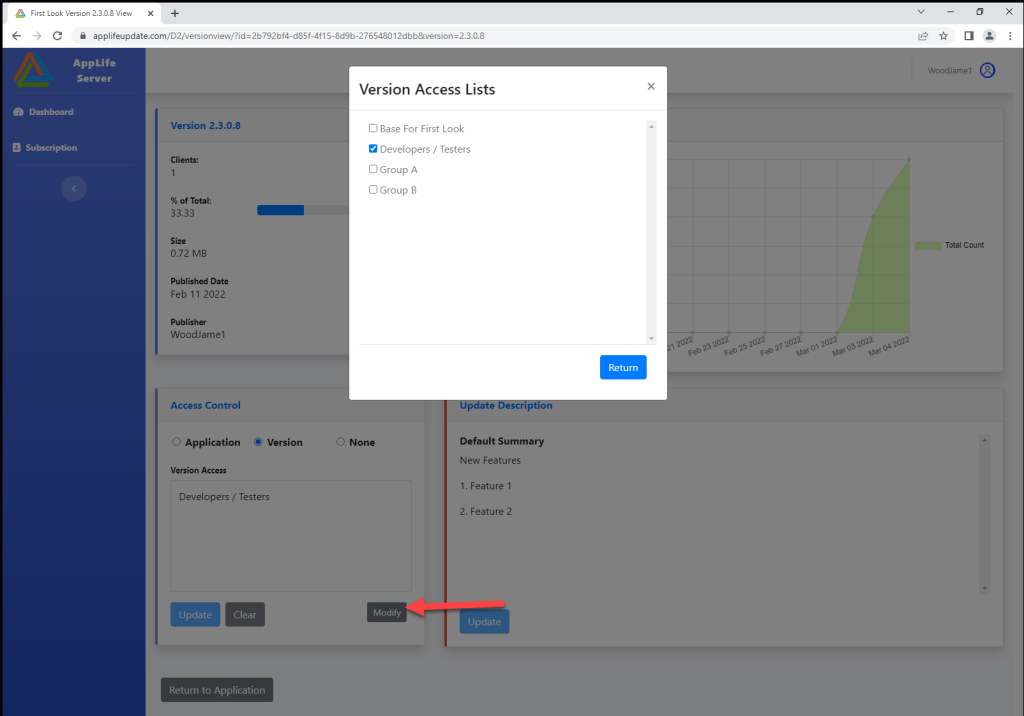
Version Access Lists can also be assigned through the dashboard. Select to edit the individual AppLife package properties by clicking on the row in the Application Versions table.
Versions Table. Click to Edit.
Modify Version Access List Assignment
Conclusion
Visibility of your Applications and AppLife packages published to your AppLife Cloud can be controlled by setting Client Access Keys on each installation and then assigning lists of your Client Access Keys to your Applications and packages.
The AppLife tooling provides the ability to easily integrate Access Control into your dev ops routine. This article provides instruction on how to accomplish access control using AppLife.
We’ve written about deploying and maintaining new applications using AppLife, but what about picking up existing applications that have been deployed over the years? Maybe the application started small, has grown over time but never had a maintenance process built into it. Or maybe it had a maintenance process from the beginning but is no longer working very well. Maybe it’s deployed through XCopy deployment or maybe an MSI installed it. Regardless of circumstance, we’ll show you how to use AppLife to start maintaining that previously deployed application with absolutely no source code integration required.
The Big Picture
In a nutshell, we’re going to use AppLife Manager, which is a Windows Service application that has been or will be installed on your deployed systems, to orchestrate the discovery, delivery, and execution of AppLife packages that will maintain your installed application. For AppLife Manager to perform this maintenance duty, it needs to know where the application is installed and what version is locally present. When AppLife is used in an original deployment, your configuration settings define where and what version gets installed. When picking up an application that has already been deployed through some other method, AppLife just needs to figure out where the application of interest is installed and what version exists there. Once we accomplish this, maintaining the existing application is pretty much the same as any other AppLife maintained application.
We’re going to create an initial AppLife package that will search for the existing application installation and if it finds it, identify what version is present. In the example, we’re using the .Net Assembly version of the primary executable to identify the current version stamp. If the application is not present, we’ll set the version to a value that indicates that the application is not present. That’s all that this first package will do. Then we’ll create another package that installs the current version of the application. At this point, you’ll be able to publish AppLife packages that maintain your deployed application as future versions are created.
Implementing a New Maintenance Process
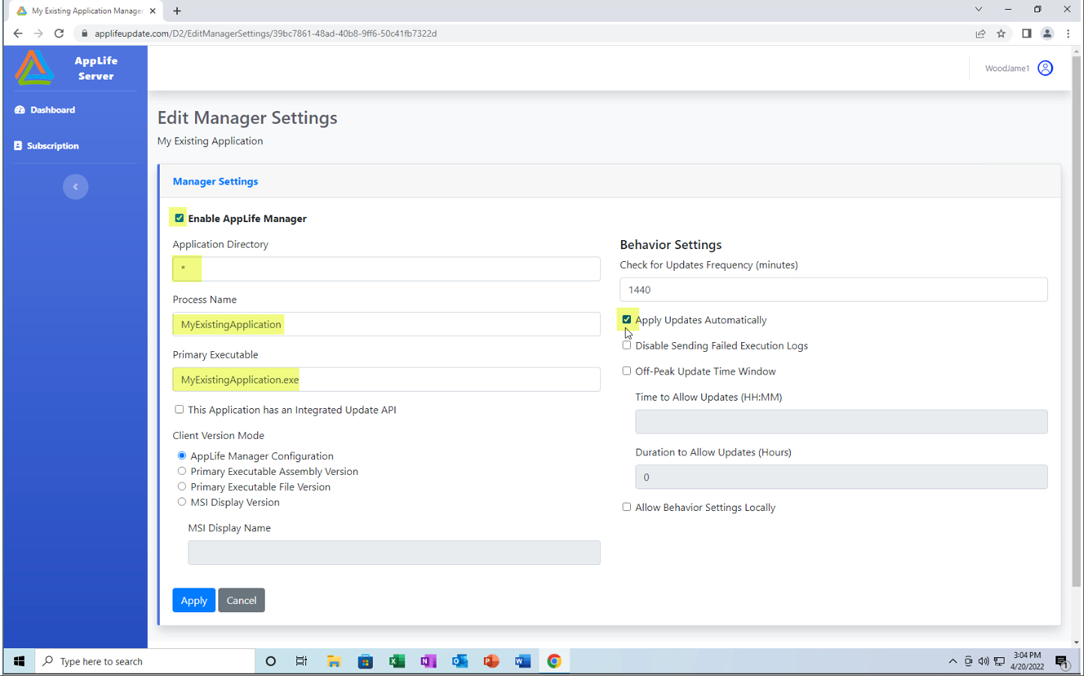
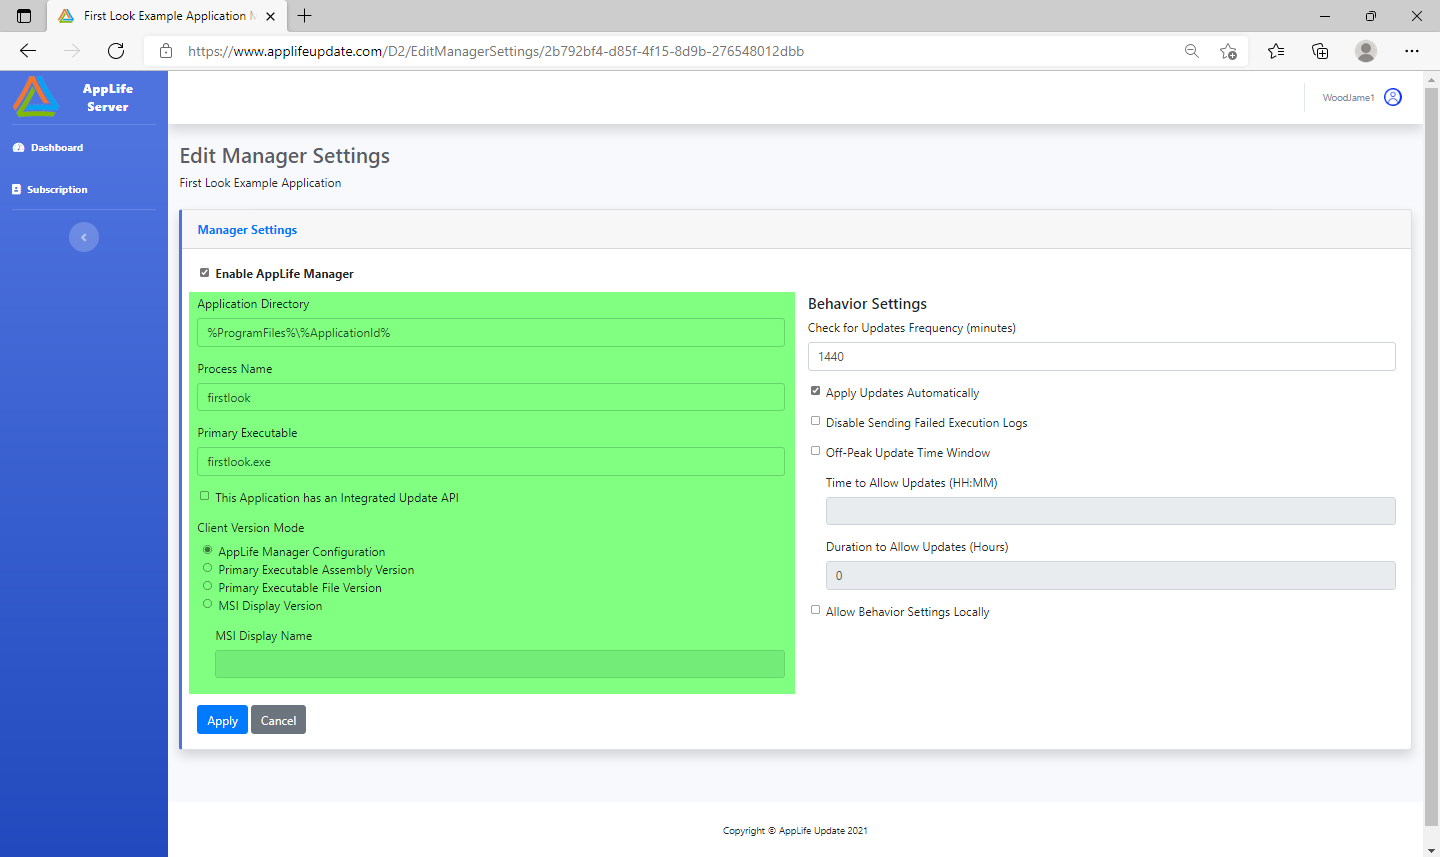
The first thing we’ll do is create an AppLife Cloud application and configure it as necessary to support the use of AppLife Manager for orchestrating the application maintenance process. You can create a new application through your AppLife Dashboard Subscription view. If you are a new subscriber to AppLife, an application is created for you. To set up the application for maintaining an existing application, we’ll set the Manager Settings like this:
Manager Settings
The key setting is the * value for the Application Directory. This instructs AppLife Manager to ignore the server-based setting and rely on an update process to identify the appropriate application directory. We’ll set up that update process in the next step. Here, we’ll also check the box to apply updates automatically and fil in the appropriate process name and primary executable.
Create the Update Package that Searches for Existing Installations
When a new application is created, AppLife Manager sets its version to 0.0.0.0. The plan is to create an initial update package with a version stamp of 0.1 so that when AppLife Manager initiates this application, it will discover only this update package to 0.1. Future updates will target version 0.1 and greater. This 0.1 package will search for the installation that we expect to find and start maintaining. If the application is not found, we’ll assume its not present and we’ll set up a default installation directory that future updates will use to install the application. In any event, after the version 0.1 update package executes, AppLife Manager will know the location and version of the existing application installation and be able to maintain it going forward.
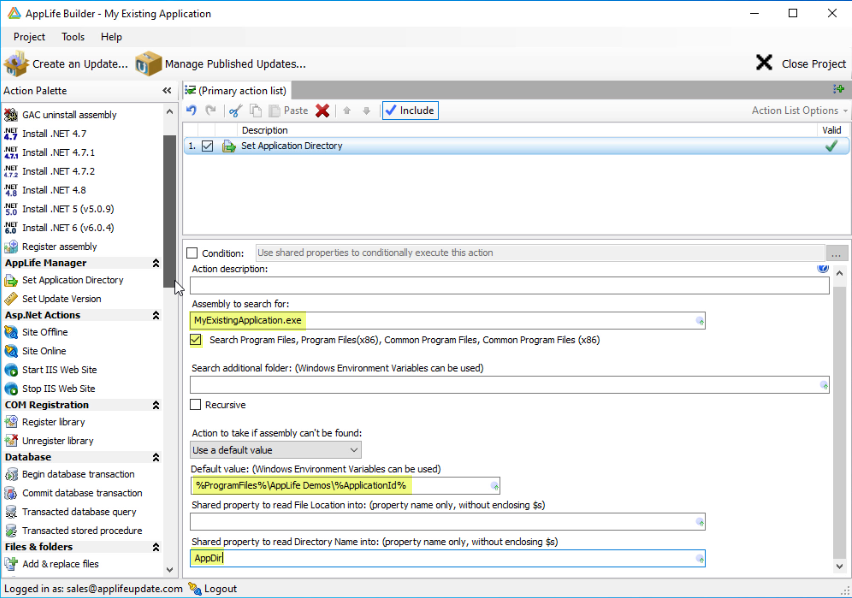
First Action – Set Application Directory
The first action we’ll use is the Set Application Directory action. This action will search the machine for a designated assembly that will identify the current installation directory. The action has some configuration options available and should be configured based on where the existing application is expected to be found. For this example we’ll assume that if we don’t find it in the program files directories it’s not present. We set the assembly’s name that we’re searching for. If the file is not found, we’ll set a default path to be used as this applications installation directory. We’ll use the %ProgramFiles% environment variable. Whatever directory is set will then be placed into a Shared Property that will be used in following actions.
Search for Existing Application Directory
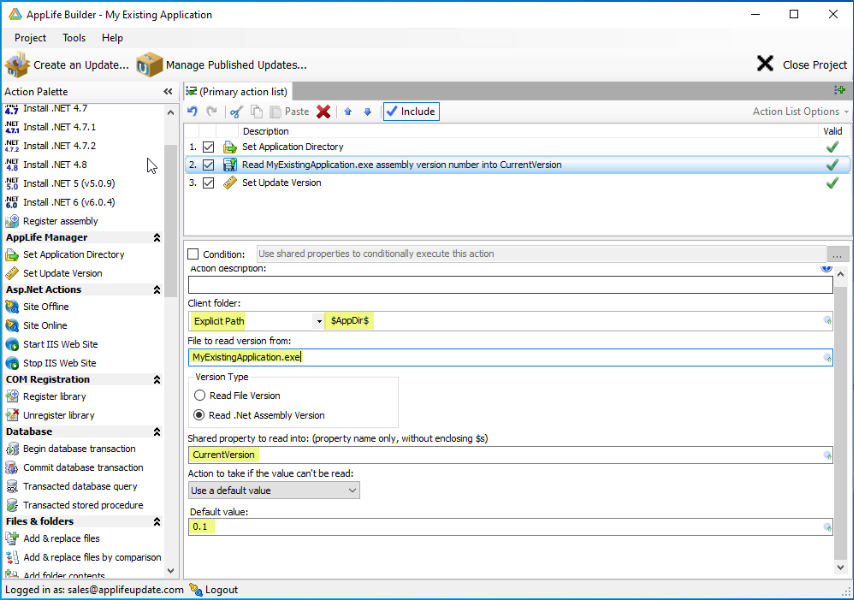
Second Action – Read Version Number
Now that we know where the application is installed, the next step is to determine what application version is installed. This example will use the .Net assembly version, but its possible that determining the existing version might require something else. This action will read the assembly version of the defined assembly, and if the assembly can’t be found, we’ll set a default value of 0.1. The determined version will then be placed in a CurrentVersion Shared Property that will be used in the final action of this update.
Read Existing Version Number
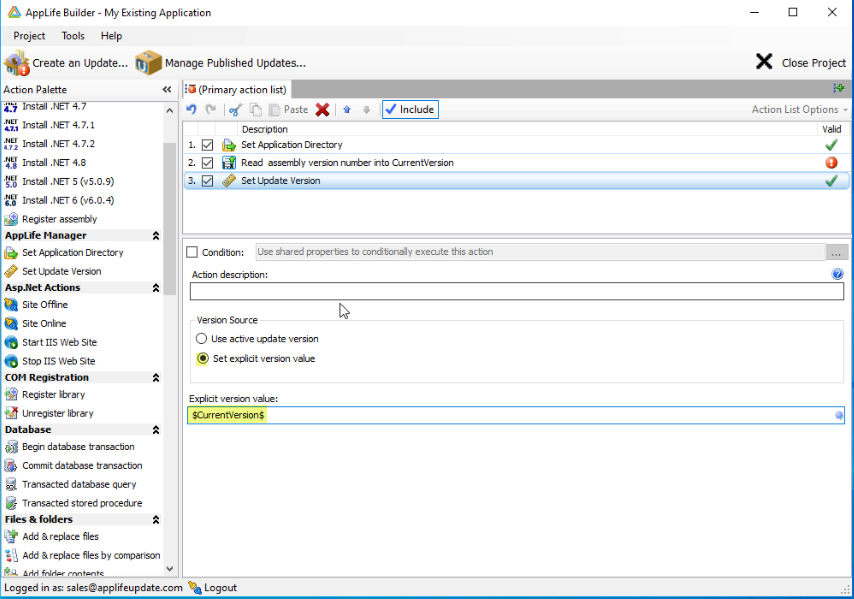
Third Action – Set Update Version
The final action will use the CurrentVersion Shared Property to set the AppLife Manager version stamp for the application. Set the action to use an explicit version, and then use the shared property determined in the previous action. When this update gets executed, the version value written here should match the actual version number of the currently installed software.
Set the Version Stamp
Create the Update Package that will install the Current Version
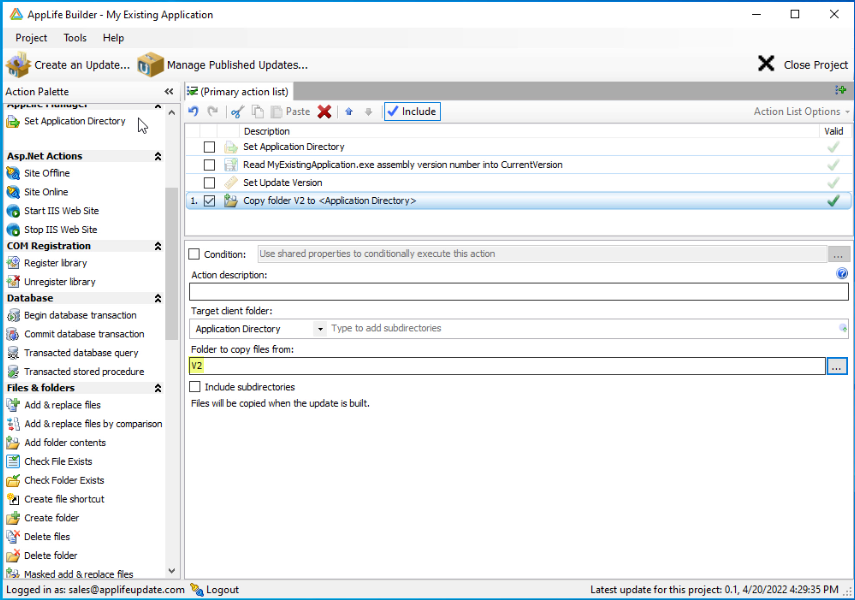
For the machines that had the existing software installed, we’re ready to create update packages that will deploy future versions. But for the machines that didn’t have the existing application installed, the next update package should perform a full installation, and target version 0.1 and higher. We’ll create an update package to version 2.0 of My Existing Application. This package will simply package up the entire installation directory and place it in the designated installation directory. Non-trivial applications might require more actions, but just about anything is possible.
Install the Latest Version
Note that the path to the folder to copy files from is relative to the local working directory that is set up when first creating the application builder profile. The working directory can be changed in the project settings dialog.
This action simply packages every file in the local directory and places them in the defined target client folder when the update is executed. This is the application directory discovered or set in the 0.1 update.
In Conclusion
This is the recommended method to start maintaining an application that is already deployed using AppLife. By using AppLife Manger we avoid any source code integration into the application being maintained. The flexibility that using AppLife packages provides in maintaining deployed software opens the opportunity to use AppLife for application that doesn’t currently have a maintenance process built into it. AppLife Manager needs only be deployed once on deployed clients and once deployed, can maintain many applications.
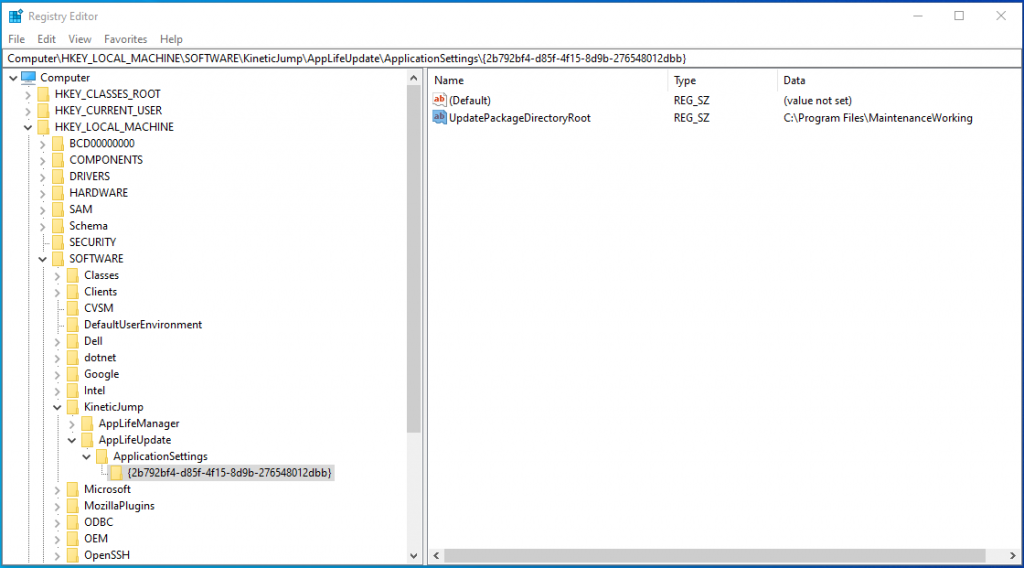
When AppLife downloads and executes a maintenance package, a working directory is created in a designated location on a deployed client. Depending on the configuration, this is usually in a user’s temp directory. Sometimes it is necessary to define a specific working directory for a machine. AppLife provides a mechanism to accomplish this.
Add a key to the 64 bit registry. HKLM\SOFTWARE\KineticJump\AppLifeUpdate\ApplicationSettings\{Your Application ID GUID}
Add an UpdatePackageDirectoryRoot string value.
If a value exists for an application, the AppLife Engine and Launcher will utilize the specified directory. The Windows Identity of the host process will need to have both write and execute permissions to the directory.
The AppLife Cloud solution provides a turn-key custom software management system, enabling deployment and maintenance of your software that targets the Windows operating system. On your deployed clients, the AppLife Manager provides the significant task of orchestrating the discovery, download and execution of AppLife packages. In this post we’ll dive into AppLife Manager, looking at it’s options and features.
Visual Branding
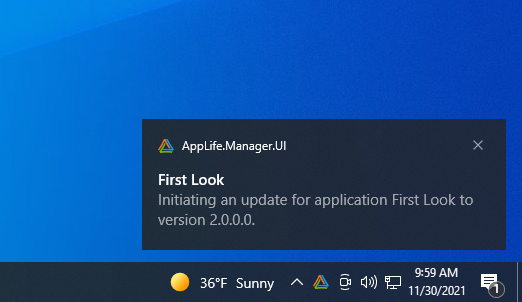
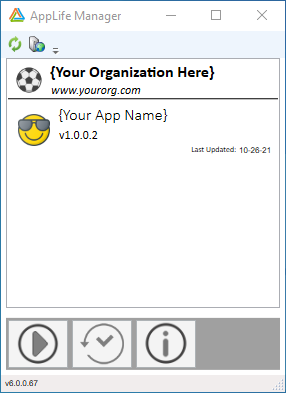
AppLife Manager is a Windows Service that performs most of it’s work behind the scenes. Your users won’t often interact with Manager at all, but when they do we want them to know what they are interacting with. Namely your software and your company. AppLife Manager sits in the System Tray and pops up messages from time to time.
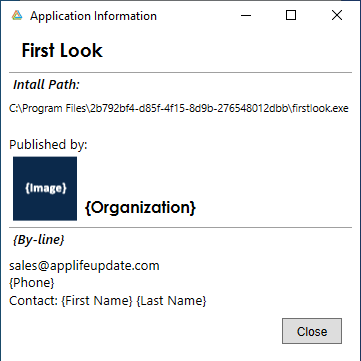
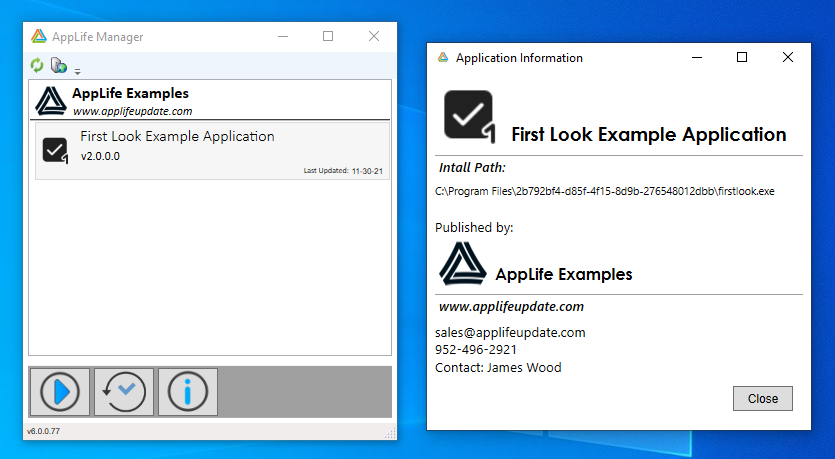
When the user does open the AppLife Manager user interface, there are options to adorn it with your company and your application visuals.
Publisher Settings
Your AppLife Subscription has settings that determine how your AppLife Manager header looks, as well as what is shown on the information form within AppLife Manager.
Organization
By-line
Publisher Image
First Name
Last Name
Phone
Email
By settings these values, your company information is displayed to the Applife Manager user.
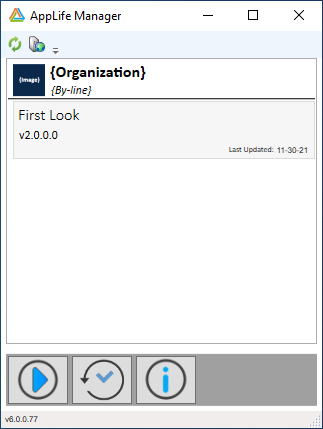
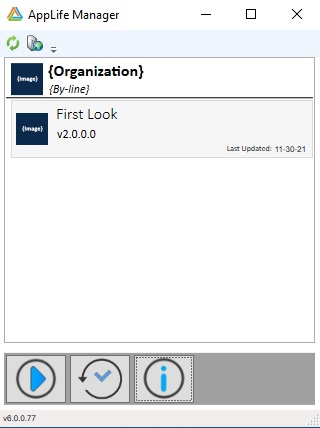
Application Settings
For each application you can define a name and an image. We’ve already set the name of the application to First Lookin the last post, where we created and published an installer for the application. You can also set an image setting that can be defined in the application properties view.
Putting this together, by changing a few properties in the AppLife Dashboard, we can transform the visual representation of our company and our applications within AppLife Manager.
Application Behavior
The behavior of AppLife Manager applications is customizable as well.
How often does an application check for new packages?
What happens when a new package is discovered. Apply automatically or prompt a user?
Restrict applying packages to off-peak times?
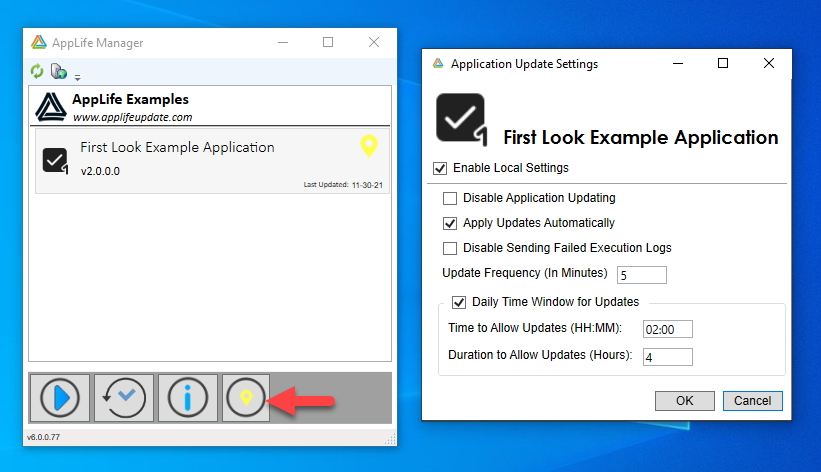
These behavior settings can be set globally for all clients, or you can allow these settings to be modified locally. Or, you can allow only specific clients to modify locally.
Check for Updates Frequency – Sets the number of minutes between checks. The default is 1440 (once a day), and can be set as low as every 5 minutes.
Apply Updates Automatically – When checked, updates will be applied automatically. If the application is running at the time of initiation, a prompt will be presented to any logged in user that is running the application. If any decline the update, it is postponed. If the application is not running, the update is applied immediately, unless an Off-Peak Time Windows is defined and the current time is not in the time window. In this case, the update is postponed until the start of the off-peak time window.
Disable Sending Failed Execution Logs – When an update fails, the execution log is posted back to the AppLife Cloud for troubleshooting and can be viewed in the dashboard. This post can be disabled.
Off-Peak Updating Time Window – It’s often advantageous to apply updates during off peak hours so as not to disturb daily operations. You can set a beginning time and number of hours to allow updates to be applied. When set, package installations will be be initiated in that time window. AppLife Manager will still check for, and download packages based on the frequency settings, but will not apply a package outside of your defined time window.
Allow Behavior Settings Locally – Checking this option allows local users to define their own application behaviors.
The example above shows a local setting that overrides the update frequency to check every 5 minutes and sets a daily off-peak time window from 02:00 AM to 06:00 AM.
Note the Disable Application Updating option available in the local settings window. When local settings are enabled, users can disable updating completely on their machine. Also note that local settings are application specific, so local settings can be allowed on one subscription application, but not others.
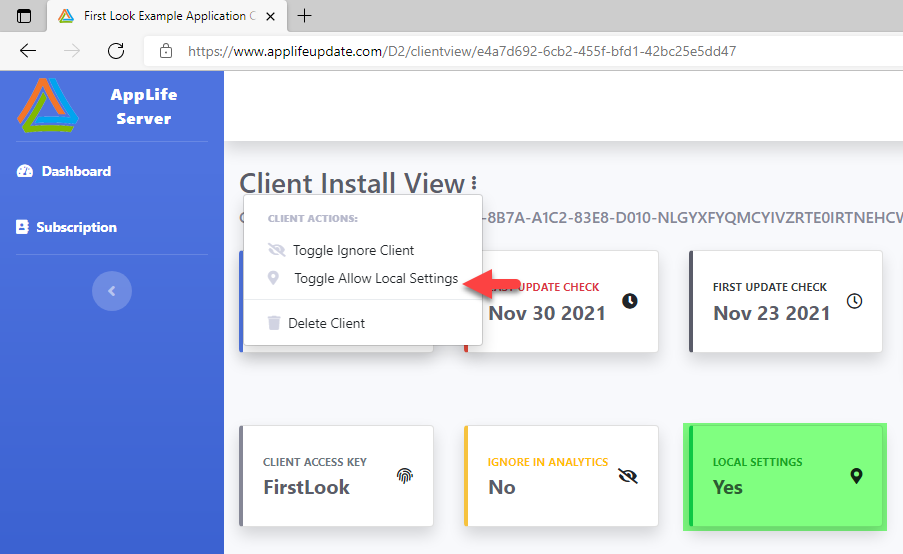
Allow Local Settings on Specific Clients
In circumstances where overriding application behavior isn’t desirable for every client, this setting can be toggled for specific clients through the AppLife Dashboard Client View.
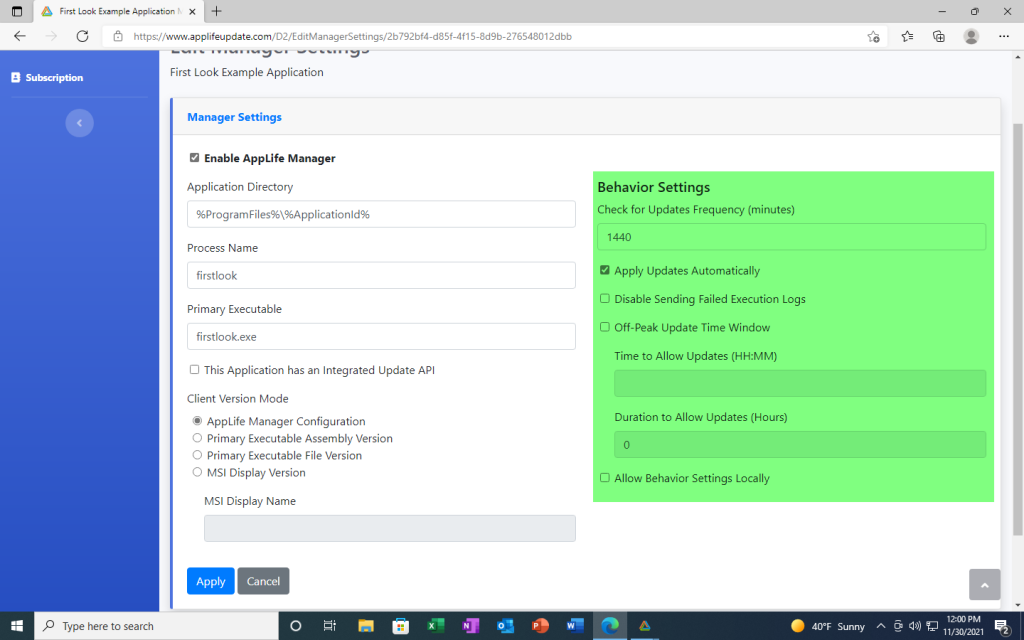
Installation and Process Settings
Beyond behavior settings, there are settings that affect the installation and operation of an application within AppLife Manager.
Application Directory
Process Name
Primary Executable
This Application has an integrated Update API
Client Version Mode
Application Directory – Defines the directory on the local client that will be used as the application’s directory. Actions within AppLife Packages can target this directory for file placement. Windows environment path variables can be used in this setting. The default value is %ProgramFiles%\%ApplicationId%.
* – * is a special value in the application directory settings and can be used in coordination with an AppLife Action that will set the application directory during a package execution. The action will search specified directories for a designated executable and use the discovered directory, or use a defined directory if the executable is not found. In the scenario where an application is already deployed, but you would like to start using AppLife Manager to maintain existing installations, you can use an AppLife Action to set the Application Directory to the discovered existing installation directory.
Process Name – The defined process name is the process that AppLife Manager looks for to determine if the application is running. This value is usually in coordination with the Primary Executable, and is defaulted based on the defined Primary Executable, but it does not have to be. It can be set independently.
Primary Executable – The primary executable is used for multiple functions. It is used by the Start button in AppLife Manager. It can be used to determine the current version of the application that is installed, and it’s used to re-launch the application if it was running when the package installation started. One caveat is when Windows Services are being maintained. In this case Manager does not shutdown or restart directly. Instead you will need to use Update Actions in your package, which use the Windows Service Manager to stop and subsequently restart your Windows Service processes.
Integrated API – When an update controller is integrated into the application being maintained by AppLife Manager, the inter-process communications that occur between controllers will initiate the shutdown of the application being maintained. Events are triggered that you can integrate with and use to perform customized tasks within your application code during the update process. Integration is not necessary for AppLife Manager to maintain your applications, but the integration hook is available for advanced or more technically challenging scenarios.
Client Version Mode – An important determination in the software maintenance process is identifying what version is actually installed on the deployed client. The simplest method to use is to let AppLife Manager maintain this value for you. This is the default method. The local version is based entirely on the version stamp of the last update package installed. No explicit action is necessary to use this versioning mode. You have additional options which might be better suited for your applications. You can use the configured primary executable’s assembly version or file version. This is advantageous when you start maintaining an application that was previously deployed. Another option is to use the MSI display version. This is best suited for applications that are using AppLife Manager solely for deploying and initiating Windows Installer packages. In this case, AppLife Manager can use the Windows Installer display version, which is maintained by the MSI process itself, to determine the locally installed version of the application.
Summary
Using AppLife you can easily deploy and maintain one or more applications over your fleet of Windows based client systems. In this post, we reviewed many of the options available to you, out of the box, when you use AppLife Manager on deployed systems. With no source code integration whatsoever, AppLife Manager can completely automate your maintenance processes. In the next post, we’ll explore what can be accomplished by the AppLife Engine during the execution of AppLife packages, whether discovered and initiated by AppLife Manager or through a direct integration with your application source code using the AppLife API.
AppLife provides the ability to easily deploy and maintain many applications on your Windows clients and servers. By installing AppLife Manager on your deployed systems a channel is created with which one or more applications can be deployed and maintained using AppLife packages. This is the first of a series of posts that will discuss and demonstrate the use of AppLife tools to deploy software. This series will include:
Deploying an application with AppLife Using mostly default settings, we’ll start from a brand new AppLife subscription and deploy a .NET WPF application through AppLife Manager.
Explore Manager Deployment Options After looking at a default deployment in the first post, we’ll demonstrate the different configuration options available with AppLife Manager.
Explore the AppLife Engine The deployment package in the first post added two files to the installation directory. In this post, we’ll look at other actions and demonstrate the features of the AppLife Update engine.
Using the Dashboard The AppLife Dashboard provides the ability to control which of your deployed systems get applications and updates. It can help in troubleshoot defective packages, can identify which clients are running what version of your applications and more. The final post in the series will look at how the dashboard enhances your AppLife deployment model.
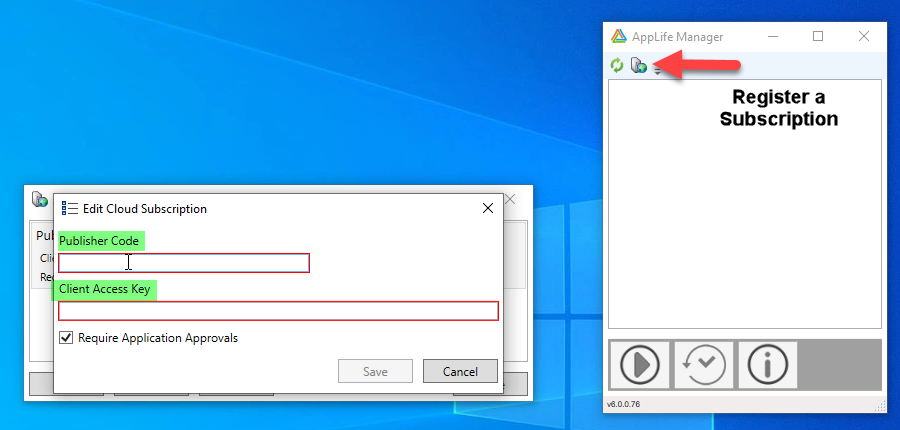
Connecting AppLife Manager to your Subscription
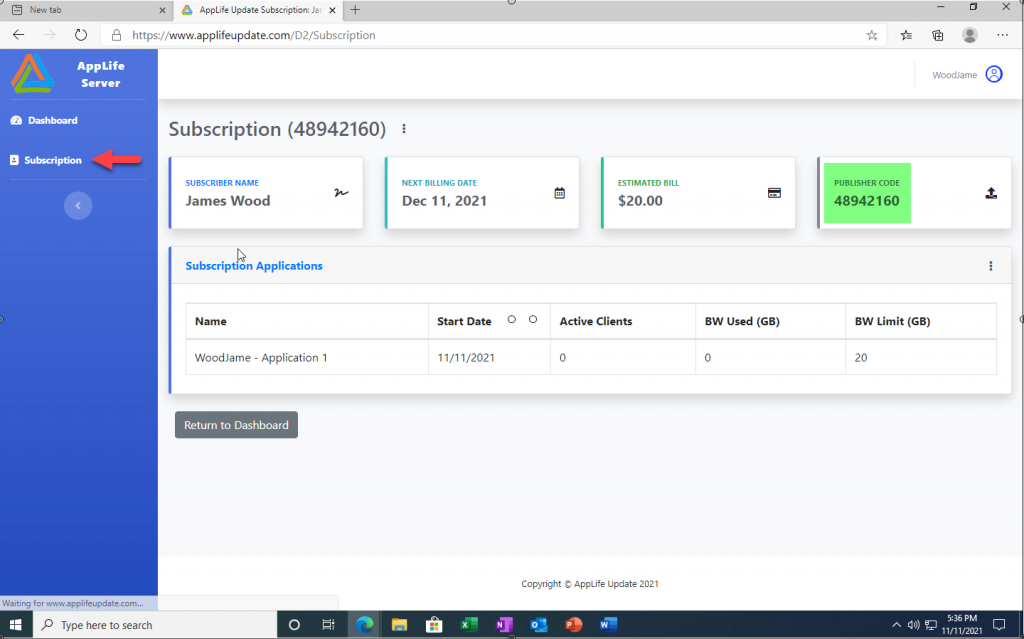
The AppLife Manager application gets installed on all of the systems that will run your software and connects your deployed clients to your AppLife subscription. AppLife Manager is downloaded from AppLife Update home page (www.applifeupdate.com). Once installed, you’ll connect Manager to your subscription through a registration process. To register AppLife Manager, you’ll need your Publisher Code. You’ll also need to define a Client Access Key. The Client Access Key will be a value that identifies an individual client, or perhaps a group of clients.
Your publisher code can be found on the Subscription view of your dashboard and can be replaced with a custom value.
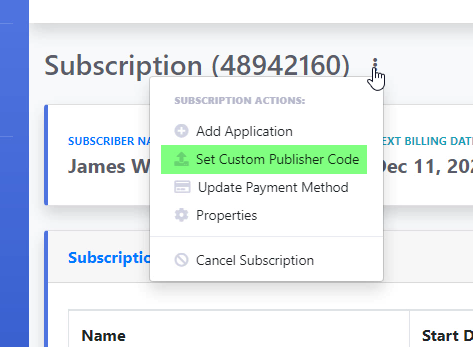
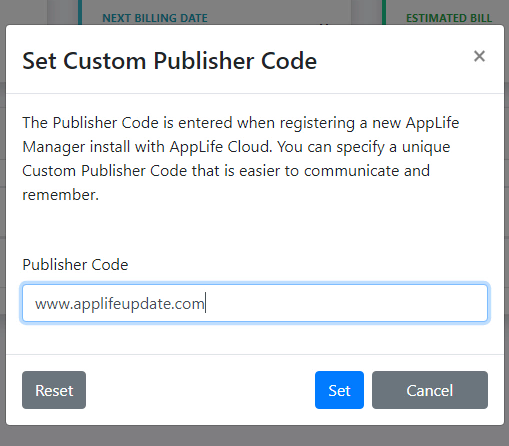
Defining a Custom Publisher Code
You can set a custom publisher code for your subscription. One that is more meaningful and easier to remember, such as your domain name. A custom publisher code is set from the Subscription view on your dashboard.
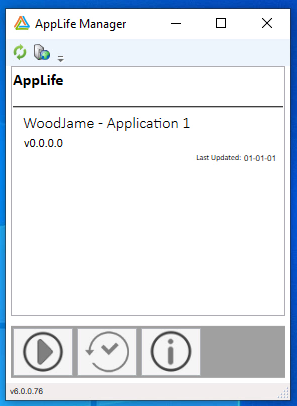
With your publisher code entered, the default settings of your initial application will allow it to be discovered. It’ll be displayed within AppLife Manager. Nothing is actually installed on this deployed client yet, as there are no AppLife packages published for the application.
Deploying an Application
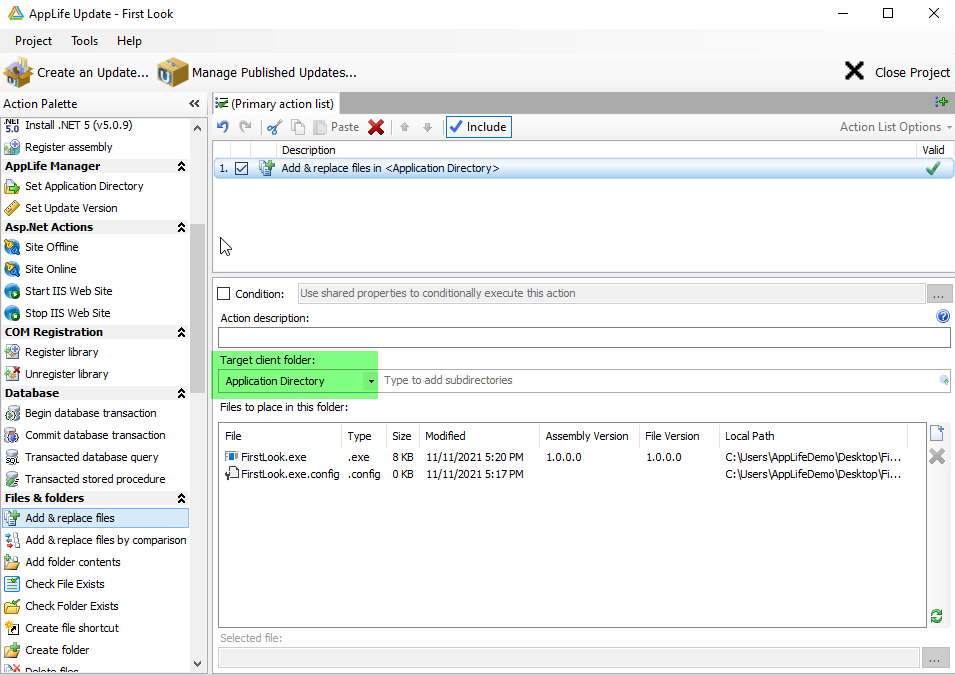
We have an application, called First Look that we want to deploy. We are going to effectively XCopy deploy our First Look application to our client machines through AppLife Manager. To accomplish this, we’ll create and publish an AppLife package that, when executed, will place our application on the deployed client. Once published, AppLife Manager will automatically discover and apply the package.
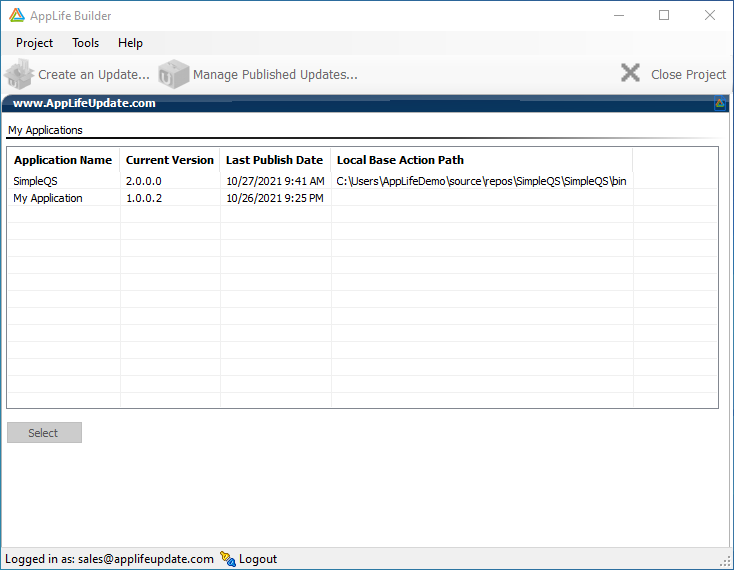
To create the package, we’ll use the AppLife Builder application. Like AppLife Manager, this can be downloaded from the AppLife Update home page. Once downloaded and installed, log into AppLife using your credentials. Select your subscription application. You’ll be prompted for the basic information about your application.
Application Name Set this to your application’s name. In this case, First Look. Note that this will change the name displayed in AppLife Manager.
Executable Name Set this to the name of the primary executable of your application. FirstLook.exe.
Local Working Directory This is a local value that defines the local directory for your application and will be used for relative paths later. For custom software, this is usually a bin directory or an output directory of your build process.
AppLife Actions
An AppLife Package consists of a series of Actions that will take place when the package is executed on a deployed client. There are many actions available. This first package is going to include only one action. An Add & Replace Files action, which will copy two files to the designated Application Directory. When AppLife Manager discovers and applies this package, these two files will be copied.
By default, AppLife Manager applications will check for new versions every 24 hours. After having published this package, any connected clients will install First Look on their next check. AppLife Manager can also be refreshed manually, which will find the application immediately.
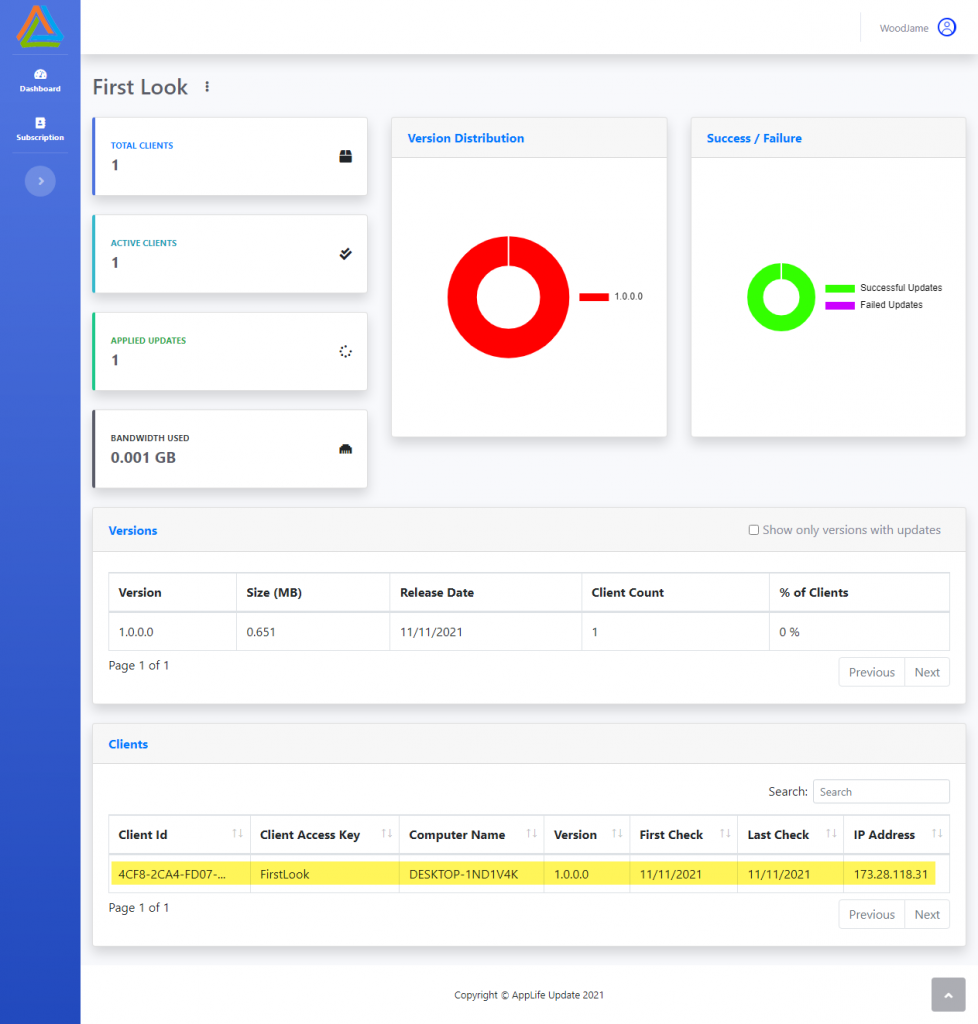
Deployments in the Dashboard
When a client applies an AppLife Package, the results are reported to your dashboard and can be reviewed there.
Summary
Using a new AppLife Subscription, we just built an AppLife Package that deploys our existing application through AppLife Manager. With the exception of setting a custom Publisher Code and changing the application name, we used entirely default settings. In the next post, we’ll explore the configuration options available through AppLife Manager that will let you customize the deployment and maintenance model to better fit different scenarios.
We’re excited to announce the release of the next version of AppLife Cloud. It’s never been easier to publish and maintain deployed Windows software with AppLife! Along with a new look and feel, version 6 strengthens the integration of the cloud dashboard, builder tools and AppLife Manager software. On the backend, we’ve increased performance, reliability and extensibility of the platform, which will lead to a better experience and more frequent feature additions going forward.
Here’s a summary of what’s new…
Dashboard
New Identity/Authorization System
Two Factor Authorization
Email
Authenticator App
Hardware Key
More strict password requirements
Email usernames
Responsive Layout
View Failed Client Execution Logs in Dashboard
Persisted Sorting, Paging, Filtering Navigation
Performance and Scalability improvements
IP Based Publishing Filter
AppLife Builder
Formerly called Make Update, AppLife Builder has been completely integrated with AppLife Cloud. You’ll notice the changes upon launching AppLife Builder, as your prompted to log on. All of your build configuration information is now centrally managed within AppLife Cloud. AppLife Builder makes it easier to build and publish update packages for your cloud applications.
Integrates directly with AppLife Dashboard
Simplified, per-user installation without licensing
Key Pair Encryption using local password
Edit published update Access Control configuration
New Install .Net 5 Action
New Install .Net 4.8 Action
AppLife Manager
We’ve added many features to AppLife Manager that makes it a compelling option over direct AppLife integration. Completely manage the distribution and maintenance of your applications without any source code integration. Your maintenance process can be as automated or manual as you prefer, based on simple dashboard configuration. In version 6, deploying applications with AppLife Manager has never been easier.
Organization Information in UI
More visual feedback during update process
Application Update History dialog
Publisher and Application Information dialog
Failed Update Execution Log Reporting to Cloud
Local Behavior Settings Options
Globally for all deployed clients
Enable for specific clients
Optionally require admin authorization for new applications
Custom Publisher Code option
API Changes
There is a new .NET 5 (Core) integration assembly. The .Net 4.x integration assemblies are now built on .NET 4.5 and include new TAP based asynchronous integration. The biggest change is that the AppLife integration API is now deployed through NuGet and integrated directly into your Visual Studio projects. You can find them here…
AppLife.Api is for .NET 5 applications and includes the primary AppLife Update controller and visual controls for the .NET 5 Windows Client extension (WinForms and WPF)
This NuGet package is for applications targeting .NET 4.5 thru 4.8. It includes the primary AppLife Update controller and visual controls for WinForms.
This NuGet package extends and depends on the Kjs.AppLife.Update.Controller package and includes visual controls for .Net 4.5 thru 4.8 WPF applications.
In the Future…
We plan for frequent feature additions on the new platform. The next release is already in development and will add user management for subscription owners, allowing for adding and removing subscription users and modifying the application privilege’s of subscription users. We’re localizing AppLife Manager to German, Spanish, French, Italian, and Dutch with more languages to follow. Were adding more Update Actions too.
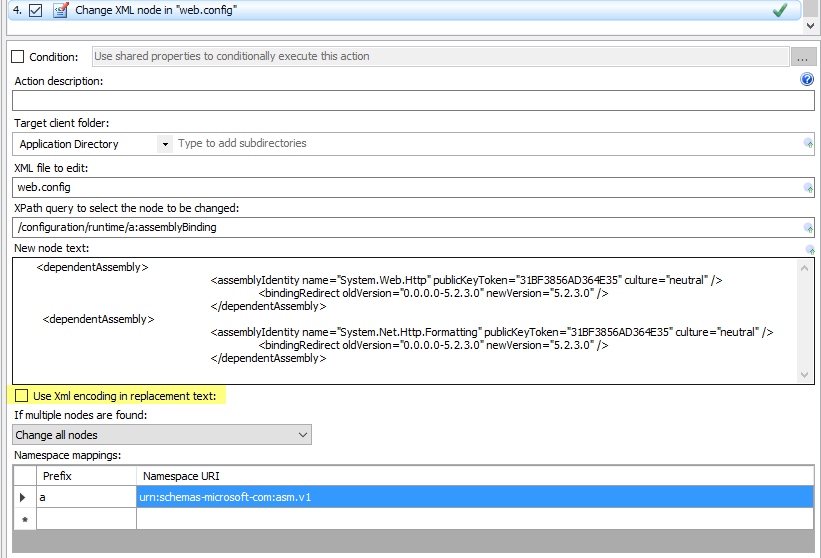
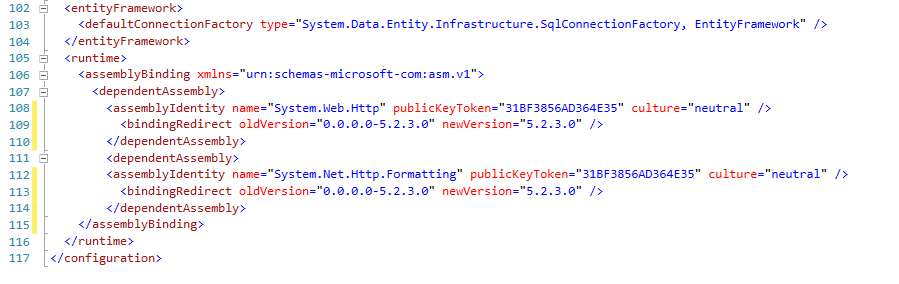
The Change Xml Node action can be used to add content to an Xml Node, and it can also insert additional, or raw Xml into a file. To insert raw Xml, uncheck the option to Use Xml encoding in replacement text.
Here’s an example of when this feature comes in handy. The objective is to insert two new entries into the web.config assemblyBinding node. We can replace the entire content of the target node as raw Xml. After an update, we end up with:
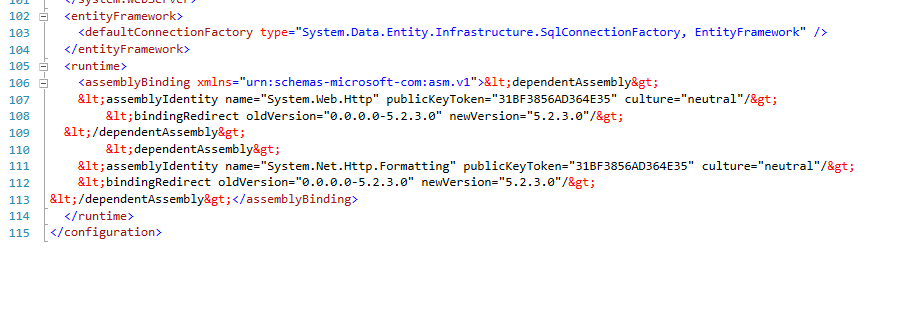
Here’s what is inserted if we do not uncheck the box:
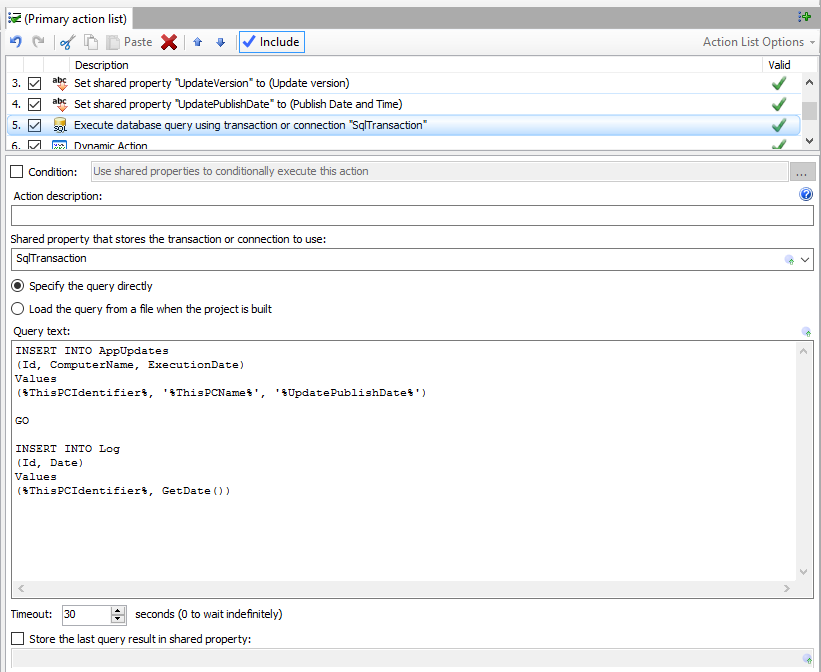
What’s in a GO statement? Quite a bit actually. Contrary to popular belief, GO is not actually part of T-SQL. It is a command recognized by the sqlcmd and osql utilities and the SQL Server Management Studio Code editor. When we created the Run SQL Query update action, we included parsing on GO during the update build process, which allowed users to execute their migration scripts when including them as a .sql file. This works nicely for pure SQL. However, when SQL is inserted into the action editor, it is parsed real-time as the update is executing. In this context, the the SQL was passed directly into a SQLCommand object and executed. GOs don’t fly there. So why wouldn’t one just put their SQL into a .sql file and let the build process parse the GO statements? Shared Property expansions. If you want to use Shared Property information as part of your SQL input, things became difficult. With AppLife Update 5.1, we’ve added GO parsing to the update engine and what was once difficult, is now quite easy.
AppLife Update 5.1 was released today. Some new features added includes:
Improved Run SQL Query Action
The new Run SQL Query action now supports the use of the GO statement in SQL added directly to the action editor. GO has always been supported in linked query files, but not in directly entered SQL text. This is significant as the only place Shared Properties are supported is within SQL entered directly in the action editor.
Pre/Post Build Script Update Version Variable Definition
Pre/Post build scripting now has access to the Update Version being built within the scripts. This is especially useful when local paths include the version being built and scripting around those file paths must take place before or after creating a new update.
New Shared Property Action Options
There are two new options when creating a Shared Property through the Set Shared Property action. Number (double) values can now be created. Also, the Update Publish Date/Time is available to be assigned to a Shared Property.
New Display Property option on the Execute MSI Action
The text displayed to the user during the execution of an MSI using the Execute MSI action is now configurable.
Added API Access to Update Summary Text
Update Summary text from any locale’ can be accessed through the Update Controller API.