Deployment

Maintaining a Previously Deployed Application with AppLife

We’ve written about deploying and maintaining new applications using AppLife, but what about picking up existing applications that have been deployed over the years?  Maybe the application started small, has grown over time but never had a maintenance process built into it.  Or maybe it had a maintenance process from the beginning but is no longer working very well.  Maybe it’s deployed through XCopy deployment or maybe an MSI installed it.  Regardless of circumstance, we’ll show you how to use AppLife to start maintaining that previously deployed application with absolutely no source code integration required.

The Big Picture

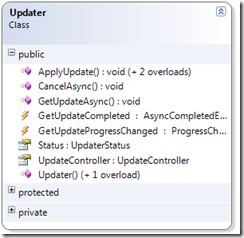
In a nutshell, we’re going to use AppLife Manager, which is a Windows Service application that has been or will be installed on your deployed systems, to orchestrate the discovery, delivery, and execution of AppLife packages that will maintain your installed application.  For AppLife Manager to perform this maintenance duty, it needs to know where the application is installed and what version is locally present.   When AppLife is used in an original deployment, your configuration settings define where and what version gets installed.  When picking up an application that has already been deployed through some other method, AppLife just needs to figure out where the application of interest is installed and what version exists there. Once we accomplish this, maintaining the existing application is pretty much the same as any other AppLife maintained application.

We’re going to create an initial AppLife package that will search for the existing application installation and if it finds it, identify what version is present.  In the example, we’re using the .Net Assembly version of the primary executable to identify the current version stamp.  If the application is not present, we’ll set the version to a value that indicates that the application is not present.  That’s all that this first package will do.  Then we’ll create another package that installs the current version of the application.  At this point, you’ll be able to publish AppLife packages that maintain your deployed application as future versions are created.

Implementing a New Maintenance Process

The first thing we’ll do is create an AppLife Cloud application and configure it as necessary to support the use of AppLife Manager for orchestrating the application maintenance process.  You can create a new application through your AppLife Dashboard Subscription view.  If you are a new subscriber to AppLife, an application is created for you.  To set up the application for maintaining an existing application, we’ll set the Manager Settings like this:

Manager Settings

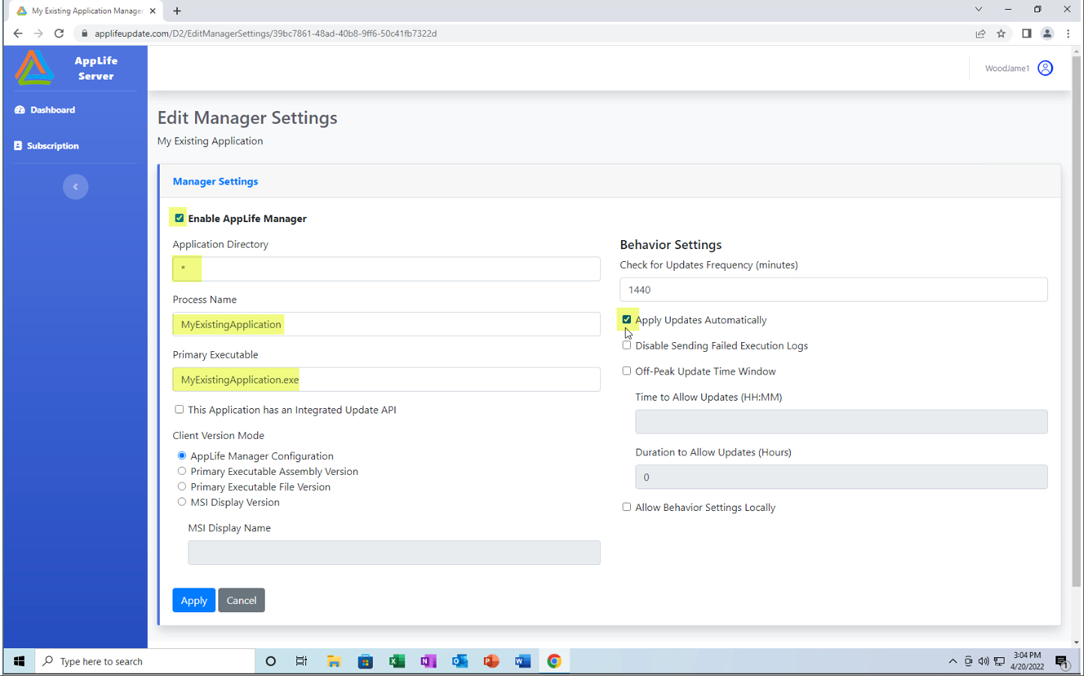
The key setting is the * value for the Application Directory.  This instructs AppLife Manager to ignore the server-based setting and rely on an update process to identify the appropriate application directory.  We’ll set up that update process in the next step.  Here, we’ll also check the box to apply updates automatically and fil in the appropriate process name and primary executable.

Create the Update Package that Searches for Existing Installations

When a new application is created, AppLife Manager sets its version to 0.0.0.0.  The plan is to create an initial update package with a version stamp of 0.1 so that when AppLife Manager initiates this application, it will discover only this update package to 0.1.  Future updates will target version 0.1 and greater.  This 0.1 package will search for the installation that we expect to find and start maintaining.  If the application is not found, we’ll assume its not present and we’ll set up a default installation directory that future updates will use to install the application.  In any event, after the version 0.1 update package executes, AppLife Manager will know the location and version of the existing application installation and be able to maintain it going forward.

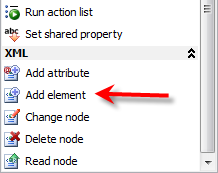
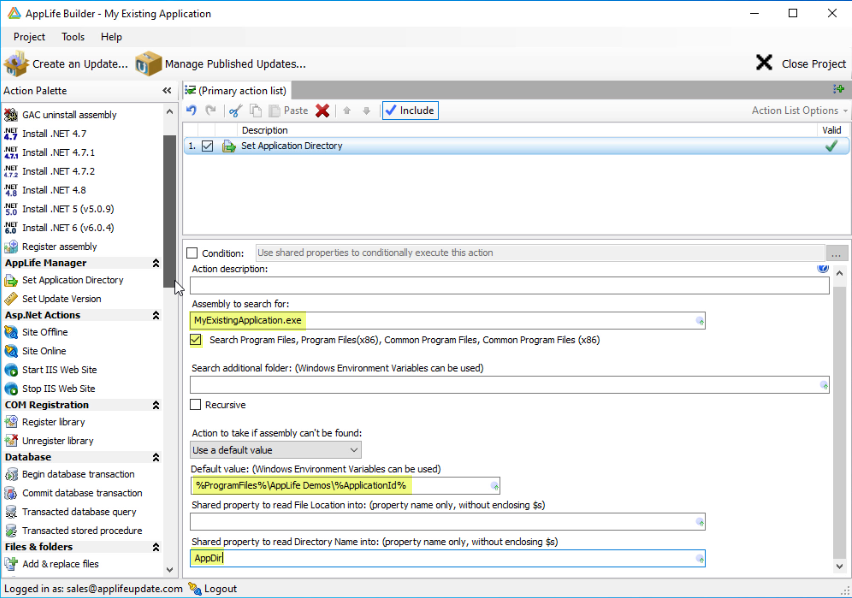
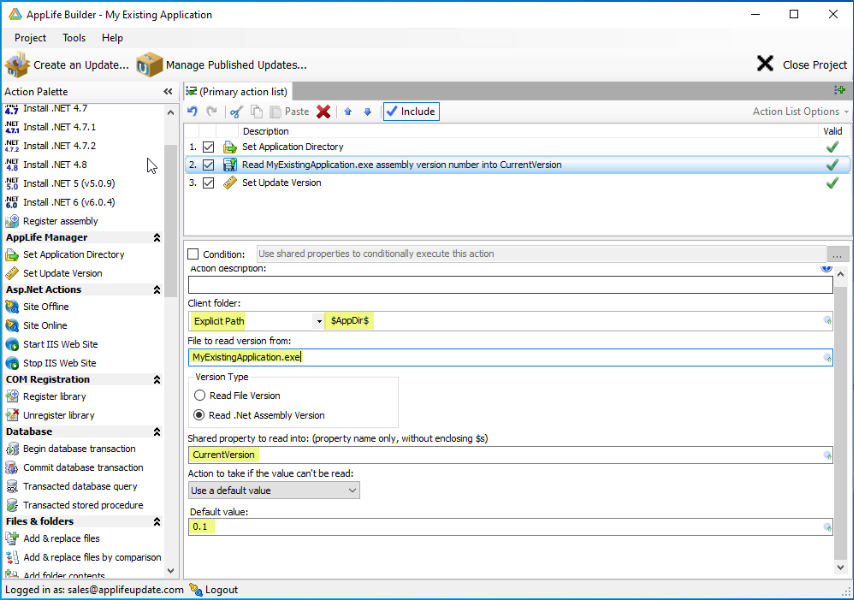
First Action – Set Application Directory

The first action we’ll use is the Set Application Directory action.  This action will search the machine for a designated assembly that will identify the current installation directory.  The action has some configuration options available and should be configured based on where the existing application is expected to be found.  For this example we’ll assume that if we don’t find it in the program files directories it’s not present.  We set the assembly’s name that we’re searching for.  If the file is not found, we’ll set a default path to be used as this applications installation directory.  We’ll use the %ProgramFiles% environment variable.  Whatever directory is set will then be placed into a Shared Property that will be used in following actions.

Search for Existing Application Directory

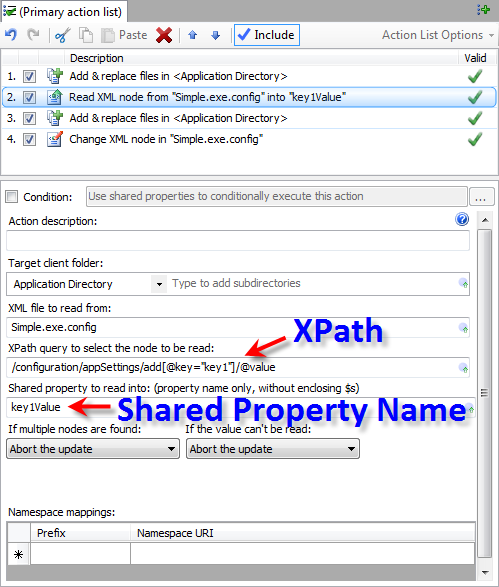
Second Action – Read Version Number

Now that we know where the application is installed, the next step is to determine what application version is installed.  This example will use the .Net assembly version, but its possible that determining the existing version might require something else.  This action will read the assembly version of the defined assembly, and if the assembly can’t be found, we’ll set a default value of 0.1.  The determined version will then be placed in a CurrentVersion Shared Property that will be used in the final action of this update.

Read Existing Version Number

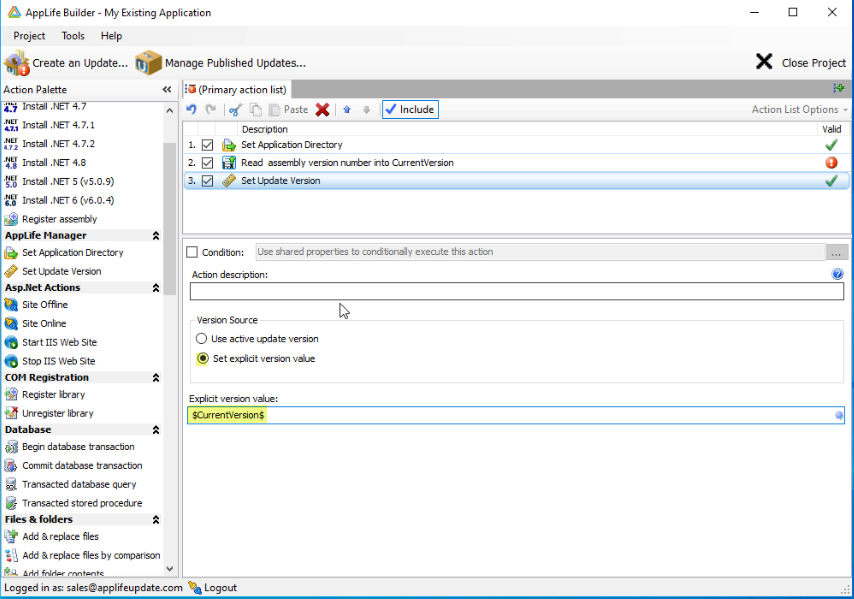
Third Action – Set Update Version

The final action will use the CurrentVersion Shared Property to set the AppLife Manager version stamp for the application.  Set the action to use an explicit version, and then use the shared property determined in the previous action.  When this update gets executed, the version value written here should match the actual version number of the currently installed software.

Set the Version Stamp

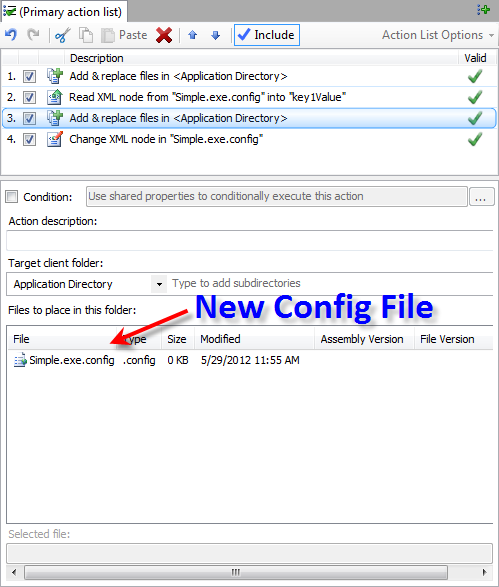
Create the Update Package that will install the Current Version

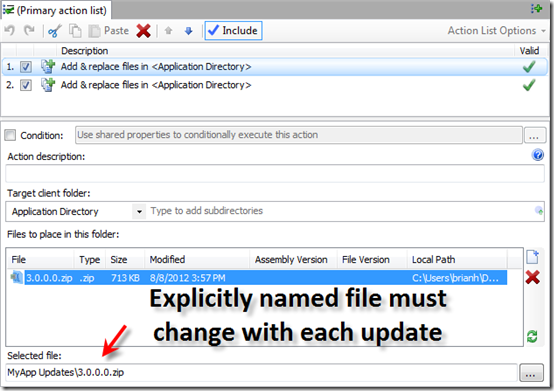
For the machines that had the existing software installed, we’re ready to create update packages that will deploy future versions.  But for the machines that didn’t have the existing application installed, the next update package should perform a full installation, and target version 0.1 and higher.  We’ll create an update package to version 2.0 of My Existing Application.  This package will simply package up the entire installation directory and place it in the designated installation directory.  Non-trivial applications might require more actions, but just about anything is possible.

Install the Latest Version

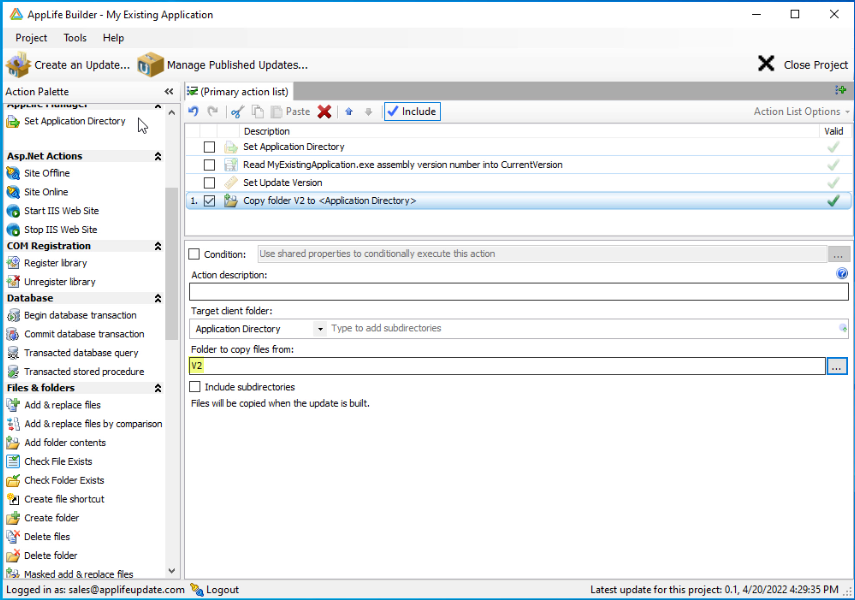
Note that the path to the folder to copy files from is relative to the local working directory that is set up when first creating the application builder profile. The working directory can be changed in the project settings dialog.

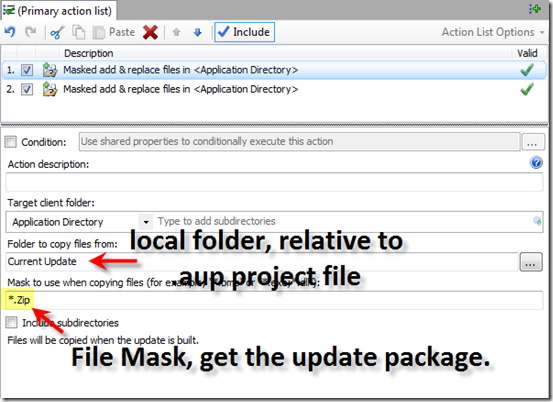
This action simply packages every file in the local directory and places them in the defined target client folder when the update is executed.  This is the application directory discovered or set in the 0.1 update.

In Conclusion

This is the recommended method to start maintaining an application that is already deployed using AppLife.  By using AppLife Manger we avoid any source code integration into the application being maintained. The flexibility that using AppLife packages provides in maintaining deployed software opens the opportunity to use AppLife for application that doesn’t currently have a maintenance process built into it.  AppLife Manager needs only be deployed once on deployed clients and once deployed, can maintain many applications. 

Replicate Updates Locally

In situations where there are many deployed systems located on the same local network combined with a need to minimize bandwidth utilized in retrieving application updates it is advantageous to provide a means to download update packages only once for everyone. With a new feature of AppLife Update 5.0, creating this ability is quite easy.

After an Update Controller checks for and downloads available updates, you can now save the downloaded package(s) and Director.Xml file to a local folder by calling the Update Controllers SaveUpdatesToLocal method.

As an example, let’s modify the C# Simple Quick Start project that ships with AppLife Update to first check a local folder for updates before checking the public location. Any updates downloaded from the public location will be copied locally for other local systems to find. To accomplish this, we’ll add a few Main form variables to hold the Public and Local update locations.

1:  public partial class Form1 : Form {  
2:   private string mPublicUpdatePath = @"http://www.kin…/SaveToLocalExample";  
3:   private string mLocalUpdatePath = @"P:\Updates\SaveToLocalExample";  

This Quick Start uses the UpdateDisplay control to manage the update process.  To integrate with that process, we will use the CheckForUpdateCompleted and the DownloadUpdateCompleted events of the Update Controller.

Basically we are going to initially check the local update folder for updates.  If no updates are found locally, we’ll check the public update folder.  If we find any updates in the public location, we’ll save them locally with the new SaveUpdatesToLocal method.  So here goes.

Modify the Update Controller’s default Update Location to be the local update path, and then attach to the two events.

First, lets handle the CheckForUpdateCompleted event.  This event fires whenever the Update Controller completes an update check.  If the private location was checked, we’ll just switch to the public location and check again.

1:  private void updateController1_CheckForUpdateCompleted  
2:       (object sender, CheckForUpdateCompletedEventArgs e) {  
3:       UpdateController c = sender as UpdateController;  
4:       if(c.UpdateLocation == mLocalUpdatePath) {  
5:            //we checked the local path. If we didnt find any  
6:            //updates, lets check the public path  
7:            c.UpdateLocation = mPublicUpdatePath;  
8:            c.CheckForUpdateAsync();  
9:       }  
10:  }  

And then finally, in the DownloadUpdateCompleted event, we’ll look to see if the update that was just downloaded came from the public location.  If so, we’ll save it to the local folder using the new method.

1:  private void updateController1_DownloadUpdateCompleted  
2:       (object sender, AsyncCompletedEventArgs e) {  
3:       UpdateController c = sender as UpdateController;  
4:       if(c.UpdateLocation == mPublicUpdatePath) {  
5:            //downloaded an update from the public path. Save it locally  
6:            c.SaveUpdatesToLocal(mLocalUpdatePath, false);  
7:       }  
8:  }  

If multiple update packages were downloaded as a chain collection, all of the update packages will be saved by the SaveUpdatesToLocal method.

Using a Pre-Build Script for File Automation

When an application update is built with AppLife Update, you can define a pre-build and post-build batch script to run during the build process. This ability to easily interact with the build process provides, among other things, the means to move files around on the build system before the actions in the action list are built. This allows for accomplishing automation tasks that might otherwise require a custom action builder. Action builders are more powerful, but more technically complicated as well. Creating a pre-build script is easy. In this post, I will demonstrate the use of a pre-build script to remove the necessity of manually modifying an action configuration before building an update.

Hub and Spoke Update Deployment Example

The Hub and Spoke Update Deployment solution lab outlines how AppLife Update can be used to “update” multiple application update servers. This is a part of a process that allows a software publisher using AppLife Update to maintain many remote update servers for their applications. With remote update servers, client systems can check for and retrieve updates from servers that are on their local networks, instead of from a global update server over a wide area network.

The update actions that maintain those remote application update servers simply add two files to the update. The first file is the Director.Xml document, and the second file is the newest update package built for the application. This file is named major.minor.build.revision.zip based on the current version number of the application. The issue here is that the version number always changes, and when a standard Add & Replace Files action is utilized, the action configuration must also change with each new update in order to address the proper update package.

With a little help from the pre-build batch script and using a different update file action, we can remove this requirement to manually modify the update configuration with each update, which makes creating the remote server update a one-step process using the AppLife Make Update tool. Configured this way, the remote server update build can also be easily incorporated into a larger automation process using the Command Line build utility.

The Pre-Build Script

The project pre-build script can be accessed from the project settings dialog, under the build tab. When creating a pre/post build script, there are replacement values that can be inserted into the script. Replacement values provide access to contextual information from the update project. We’ll be taking advantage of the $UpdateVersion$ and $ProjectDirectory$ replacements to accomplish the goal.

The goal of the pre-build script is to empty a working folder, and then add the two files that will be included in the update to the working folder. The two files will be the Director.Xml file and the application update package that matches the designated update version. The script will copy these files from a local folder that represents the primary application update folder, and will be addressed in the script using a relative file path from the current AppLife Update project file location. After the pre-build script runs, there will be a working directory that contains two files. The Director.Xml file and the application update package (a.b.c.d.zip) file that matches the defined update version number. Then, we just need to use an update action to add these files to the update. Here is the script.

Set WorkingPath=$ProjectDirectory$\Current Update

Set AppUpdatePath=$ProjectDirectory$\..\Application Updates

Del %WorkingPath%\*.*

Copy “%AppUpdatePath%\Director.Xml” “%WorkingPath%”

Copy “%AppUpdatePath%\$UpdateVersion$.Zip” “%WorkingPath%”

Using replacements, we have access to the version number of the update currently being built, and we also have access to the path of the .aup AppLife Update project file. We use this information to copy the correct update package from the correct folder.

The Update Actions

With the pre-build script, the files that we want to add to the update is going to be sitting in a folder named Current Update that is a sibling to the AppLife Update .aup project file. Normally, we wouldn’t care which order the files are copied during the update, and the most obvious update action to use would be the Add Folder Content action. This action would simply add both of the files to the update as the update is built, and then write them to the designated client directory as the update engine executes the action on deployed clients. In this case though, we do care about order. We want the update package file copied first, and then the Director.Xml file. Because of this, we’ll use the Masked Add & Replace files action. With this action, we can apply a mask to the files that will be added to the update package. The first action will add the update package, and the second action the Director file. By applying a mask of (*.zip), the update package is added to the update.

To add the Director.Xml file to the update, we could have chosen the Add & Replace Files action, but for consistency we use another Masked Add & Replace action with a mask of *.Xml.

With these two actions in place, the appropriate update package file and the corresponding Director.Xml file is added to the update package and will be placed in the application updates folder on remote update servers. To publish an update, no changes are necessary to the update project. We simply open AppLife Update and walk through the publish wizard. When the update version is defined in the wizard, the correct application update package is automatically included.

Updating Software Operating on Erratic and Unreliable Networks

Download:
Example Project Source Code

When your software operates in an unreliable networking environment, it can be very challenging to automatically maintain your software installation. These environments are quite common. Police cruisers and ambulances use laptops to run software in the field, relying on cellular technology to distribute updates. Traveling salesmen use proprietary laptop business software and are constantly going in and out of network coverage. Medical staff use their mobile pc’s in large medical facilities, where dropping connections in elevators and dead Wi-Fi spots is common place. In scenarios like these, professionals are using software that must be maintained. In today’s professional environments, software maintenance is expected to “just happen”, without interrupting the work of the professionals using the software. Software publishers who create software that operate in environments like these all face the same challenge of maintaining their software without requiring support staff to take possession of the hardware. The AppLife Update Solution provides the answer for many software publishers whose applications operate in environments like this.

With the AppLife Update solution, software publishers create and publish self-contained update packages that migrate an installation from one version to another. These update packages are retrieved by the client software when network connectivity is present. Once the update package is retrieved, network connectivity is no longer required and the update can be applied, performing the work necessary to maintain the deployed installation. As the update package is downloaded, the partial download is cached locally so that any interruption in network connectivity will not require restarting from the beginning.

The flexibility of the AppLife Update solution provides the ability to change the behavior based on known circumstances. When it is known that the software being maintained is going to operate in an unreliable networking environment, it is possible to handle network connectivity errors differently than normal. Normally a network connectivity error would be unexpected and the user would be notified of the situation. Instead, the application can postpone the update retrieval operation for a short period of time and try again. And try again. And try again, until the update retrieval succeeds and can be applied.

Example Implementation

In the example project accompanying this post, the updating functionality is completely automated. The implemented updating process can be described as:

When the application launches, a background update check is performed. If an update(s) is available, the update packages are retrieved in the background and without user interaction. If network connectivity is lost, the retrieval is postponed and continually retried in the background without user interaction until the update is successfully retrieved. Once retrieved the user is prompted to either apply the update now, or when the application is closed. If the user elects to apply the update, the update is applied and the application restarted. If the update is deferred until the application exits, the update is applied as the application exits and the application is not restarted.

The example project contains an Updater class that controls the update check and retrieval process. Inspecting the Updater class, you’ll see that the class maintains an AppLife Update Controller and uses the API methods and events of the update controller to pause and retry as network errors occur. When an update package is successfully downloaded, an event is raised, alerting the primary application that an update is ready to be applied. The implementation code in the primary application is very simple. An Updater class is instantiated and the Update Controller properties are configured. Once configured, the GetUpdateCompleted and GetUpdateProgressChanged events are hooked before calling the GetUpdateAsync method. That’s it. Any updates will be retrieved as the network allows. When the completed event fires, the Updater status is checked and the user is prompted to apply the update now or when the application exits.

Implementation Details

The Updater class is the heart of the implementation. It has a very simple interface:

The Updater class wraps an AppLife Update Controller and exposes a single method that implementing code will call to perform the entire update process.

We want to take a look at the GetUpdateAsyncmethod. This method calls the Update Controller’s CheckForUpdateAsync method and then returns. The update process continues in the CheckForUpdateAsyncCompleted event handler. If an update is present, the DownloadUpdateAsync method is called. When the download completes, the GetUpdateCompleted event is raised. When these asynchronous methods are called, any network errors will cause the completed event to fire, and the event argument’s Error property will indicate the cause of the error. Based on the error information, we can take appropriate action. In this example, we are considering any WebException or IOException to indicate a network error. Your implementation can improve on this, based on environment specifics. At any rate, when a network error is detected, the updater class goes into a wait mode and try’s the check/download again after a period of time. Eventually, the update download is completed, and the GetUpdateCompleted event is raised, triggering the client application to prompt the user.

Of course, the user experience behavior is completely customizable with just basic coding. The AppLife Update Controller performs the heart of the technical challenges involved in this implementation, and the Update Engine is what lets you package up any work that is necessary to maintain and migrate your deployed installations. So I invite you to take a look at the example and evaluate it for suitability in your own environment. Feel free to contact our technical support team with any questions.

Easily Modify .Config Files During an Application Update

The beauty of .Net configuration files (.config) is that they let you easily change the behavior of your application for individual installations. This allows for a great deal of flexibility, especially with service related settings. With this flexibility though, also comes a maintenance challenge. Unlike all of your other application files, configuration files usually can’t be simply replaced during a maintenance update. Doing so would lose any customizations made to support the specific application installation. As your application evolves, it is inevitable that your configuration files will require modification. With AppLife Update, you can easily maintain .Net configuration files without replacing them by modifying the existing files. I’ll cover three different methods that you can use, based on the type and scope of the config file modification that is necessary.

  • Modify the existing config file directly using Xml Update Actions
  • Migrate specific settings from an existing config file to a new config file using Shared Properties and Xml Update Actions
  • Utilize custom .Net code to manipulate the config file during an update

Modify the Existing Config File

Using Xml Update Actions is great for adding elements and updating attributes. As an example, let’s say that we use appSettings in our application and we need to add a new appSettings value in support of a new feature. We can use an Add Xml Element update action to insert a new appSettings value into the existing config file.

This is what the v1 application configuration file might look like:

But for v2, the configuration file might need to look like this:

To migrate version 1 installations to version 2, in addition to replacing the application assemblies we must add a new entry to the appSettings collection. To do this, we’ll use an Add Element update action.

When configuring Xml update actions, XPath expressions are used to reference the specific Xml elements that you are interested in reading and writing. To accomplish our goal, we will use an XPath expression to access the appSettings node, and then add a new element to that node. The config file is located in the Application Directory and is named Simple.exe.config.

The XPath expression is /configuration/appSettings. The element that we are adding is:

<add key=”key2” value=”value2” />

The name of the element is add, and the new element has two attributes, key and value. Add a new Add Element update action to your update project and configure it as below.

With this action in place, the new element will be added to the configuration file when the update is executed.

Another scenario where Xml actions are great is when we need to update a specific attribute. Using a Change Node action, the value of an existing appSettings entry is easily accomplished. For instance, consider the situation where in v3 of our application, we needed the key2 value to be modified to value3. This can be accomplished in a very similar process. Instead of adding an Xml Element, we can use the Change Node update action to modify an existing value. To accomplish this, we need to know the XPath that references the specific value that needs to be changed. In this case, the XPath expression is /configuration/appSettings/add[@key=”key2”]/@value.

Adding a Change Node action configured like this will modify the attribute value to “value3”.

Migrate Existing Values to a new Config File

In some circumstances where there are wholesale changes to a config file that would require extensive modifications to the existing file, it could require less effort to extract specific values that are unique to the installation and migrate them to a new config file. In this scenario we use Xml Actions to read specific information from the existing config file and store that information in Shared Properties. We can then replace the config file with an Add & Replace Files update action, and finally use Xml actions to write the information that we stored into the new config file.

Revisiting the previous example, we’ll take this approach for the necessary modifications. We’ll read and store the value of the key1 appSetting, then replace the config file and modify that value in the newly replaced configuration file.

Reading the existing value, we’ll add and configure a Read Xml Node Action. Using this action, we set the config file name and XPath just as before. We’ll also designate a Shared Property to store the attribute value. Shared Properties are essentially variables that are scoped across the context of the executing updates. They allow for information to be shared between update actions. The Read Xml Node action will assign the string value of the designated attribute to the designated Shared Property.

With the value of the existing attribute stored, we can replace the application configuration file using an Add & Replace Files action.

After this action executes, the application configuration file will be replaced with a new updated version. However, the value of the attribute we are interested in will also have been reset to its default, non-customized value. To complete the update process we need to use the value that we previously stored to change the new configuration file. A Change Xml Node update action will update the attribute value. When using string value Shared Properties, the value of the Shared Property can be expanded using $SharedProperty$ syntax.

The Change Xml Node action restores the value originally set on the specific client and completes the update process.

Utilize .Net Code to Modify an Existing Config File

When using Xml Actions and Shared Properties, we read and write string values to the config file. In some circumstances, it can be beneficial to approach the Xml maintenance process within code, where the Xml can be manipulated in fragments. This too can be easily accomplished during an update using the Dynamic Code Action. A Dynamic Code action allows you to easily create a custom update action, which extends the UpdateAction class and overrides, at a minimum, the Execute and RollbackExecute methods.

With a Dynamic Code action you can use C# or VB.Net code to manipulate the deployed client. Here we use the context parameter to access the information we need to accomplish our goal in code. You can access local directory information as well as the Shared Properties collection. With this information, we load an XmlDocument and manipulate the file within our custom code.

Summary

During software maintenance updates, application configuration files that are uniquely modified for each installation cannot be simply replaced as changes are made to support new versions. These config files must be modified in-place during the maintenance process. Using AppLife Update, application configuration files can be easily maintained throughout the life of the application and we present three different approaches to accomplishing the goal.

Scroll to Top