AppLife Update

Replicate Updates Locally

In situations where there are many deployed systems located on the same local network combined with a need to minimize bandwidth utilized in retrieving application updates it is advantageous to provide a means to download update packages only once for everyone. With a new feature of AppLife Update 5.0, creating this ability is quite easy.

After an Update Controller checks for and downloads available updates, you can now save the downloaded package(s) and Director.Xml file to a local folder by calling the Update Controllers SaveUpdatesToLocal method.

As an example, let’s modify the C# Simple Quick Start project that ships with AppLife Update to first check a local folder for updates before checking the public location. Any updates downloaded from the public location will be copied locally for other local systems to find. To accomplish this, we’ll add a few Main form variables to hold the Public and Local update locations.

1:  public partial class Form1 : Form {  
2:   private string mPublicUpdatePath = @"http://www.kin…/SaveToLocalExample";  
3:   private string mLocalUpdatePath = @"P:\Updates\SaveToLocalExample";  

This Quick Start uses the UpdateDisplay control to manage the update process.  To integrate with that process, we will use the CheckForUpdateCompleted and the DownloadUpdateCompleted events of the Update Controller.

Basically we are going to initially check the local update folder for updates.  If no updates are found locally, we’ll check the public update folder.  If we find any updates in the public location, we’ll save them locally with the new SaveUpdatesToLocal method.  So here goes.

Modify the Update Controller’s default Update Location to be the local update path, and then attach to the two events.

First, lets handle the CheckForUpdateCompleted event.  This event fires whenever the Update Controller completes an update check.  If the private location was checked, we’ll just switch to the public location and check again.

1:  private void updateController1_CheckForUpdateCompleted  
2:       (object sender, CheckForUpdateCompletedEventArgs e) {  
3:       UpdateController c = sender as UpdateController;  
4:       if(c.UpdateLocation == mLocalUpdatePath) {  
5:            //we checked the local path. If we didnt find any  
6:            //updates, lets check the public path  
7:            c.UpdateLocation = mPublicUpdatePath;  
8:            c.CheckForUpdateAsync();  
9:       }  
10:  }  

And then finally, in the DownloadUpdateCompleted event, we’ll look to see if the update that was just downloaded came from the public location.  If so, we’ll save it to the local folder using the new method.

1:  private void updateController1_DownloadUpdateCompleted  
2:       (object sender, AsyncCompletedEventArgs e) {  
3:       UpdateController c = sender as UpdateController;  
4:       if(c.UpdateLocation == mPublicUpdatePath) {  
5:            //downloaded an update from the public path. Save it locally  
6:            c.SaveUpdatesToLocal(mLocalUpdatePath, false);  
7:       }  
8:  }  

If multiple update packages were downloaded as a chain collection, all of the update packages will be saved by the SaveUpdatesToLocal method.

Applying Cached Updates

A new feature of AppLife Update 5.0 allows your applications to easily apply updates that have previously been downloaded by your applications. This is very useful when your application resides on field computers that come and go from your primary network.

All that is required to do to use this feature is to set the Update Controller’s Disconnected NetworkEnableOfflineUpdates property to true. By default, this feature is not enabled. Once set, any updates that get downloaded are made available to the update controller until they are applied. They will be available even if network connectivity is lost.

A common use-case for this feature is when applications are configured to check for and download any updates upon application startup and at certain intervals while operating, but defer the update process until the application is shutdown or restarted. In these situations, the deferred updating process might well take place when the deployed system has been moved away from the network. If the EnableOfflineUpdates property has been set, the update process can proceed whenever it is convenient for the user, regardless of whether or not a network connection is available.

Introducing AppLife Update 5.0

AppLife Update 5.0 was published today and includes many new features.

AppLife Update Server Support

AppLife Server is the most secure and reliable platform to host AppLife Update packages.  With the release of AppLife Update 5.0, App

Enable Cached Update Checking

Previously downloaded but not yet installed updates are now cached locally and can be used to apply an update at a later time even if network connectivity is no longer available.

New Update Actions

Check File Exists

Update Display Version

Install .Net Framework 4.5

Read File/Assembly Version

Custom Update Window Improvements

Support for including IUpdateUI implementation dependency assemblies into the update package.

Save Downloaded Update and Director.Xml Locally

API extensions allow for saving downloaded update packages and corresponding Director.Xml to a local folder.  This extension can be used to implement an updating scheme where multiple local installations can download an update package once and use it multiple times.

Expand Update Possibilities with Manual Versioning

AppLife Update identifies the existence of an update through the use of versioning. The update controller deployed out there on client systems knows the current version that is installed and, after performing an update check, knows the update packages that have been published for the current version. With this information, the process can continue. Most commonly, a deployed client’s current version is determined by the .Net Assembly Version stamp of the host .Net executable. Using an assembly version, the current version is readily available, and when the host executable is replaced, presumably the replacement executable has a new higher assembly version. The AppLife Update solution makes it very easy to use the .Net Assembly Version stamp in a very hands-off way, making it the most common scenario. It is not the only method available though, and looking at versioning a little differently opens up many possibilities.

What’s Possible with Custom Versioning

The thing about using an Assembly Version stamp is that the executable must be rebuilt in order to create an update. There are circumstances where it is favorable to be able to update an application installation without rebuilding the primary executable. Sometimes what you might want to update isn’t even an application at all. AppLife Update can be used to package and automatically deploy updates to all kinds of application sub-systems, such as reporting templates, map files, and other types of document repositories. The ease with which you can package any information, as well as a code process to execute, into an update package and the flexibility available to implement a simple check, retrieve, and apply process using an AppLife Update Controller makes it possible to be very creative with updating application components independently. Versioning is key to any update process using AppLife Update, so here is a simple and effective method for versioning just about any type of update process.

Xml File Versioning

The basic idea behind Xml File Versioning is to place a simple Xml file on the client PC that holds a version stamp. We’ll read that version stamp from the file and set the Update Controller version based on the content so that we can publish updates that target a specific version. Within the update, we’ll use an Xml Update Action to modify that version file contents so that after the update is executed, the version file will then represent a newer version based on the modifications that the update made.

Note: We will use a stand-alone Xml file, however applications that utilize a .config already have an Xml file readily available for versioning sub-components. Adding a new appSettings value to an existing .config file can accomplish the same result.

We’ll need a snippet of Xml to hold a version stamp. A file like this will do just fine:

Filename: Version.Xml

<?xml version=”1.0″ encoding=”utf-8″?>
<version>
<currentVersion value=”1.0.0.0″ />
</version>

Read the Current Version and Setup the Controller

To setup an Update Controller for manual versioning, ensure the UseHostAssemblyVersion property is set to false. With that set, your code can set the Version property based on the content of the Version.Xml file.

1:  private Version getCurrentVersion() {  
2:   Version currentVersion = null;  
3:    using(XmlReader reader = XmlReader.Create("Version.Xml")) {  
4:     reader.ReadToFollowing("currentVersion");  
5:     string versionStr = reader.GetAttribute("value");  
6:     if(!string.IsNullOrEmpty(versionStr)) {  
7:      currentVersion = new Version(versionStr);  
8:     }  
9:    }  
10:   return currentVersion;  
11:  }  

With the version set, you can call CheckForUpdate or CheckForUpdateAsync on the Update Controller and find updates for the current client version.

Applying Updates without Shutting Down the Host Application

When updating sub-systems, it is often not necessary as well as undesirable to shut down the host application. If the update will operate on files that are not locked, or can be unlocked without shutting down the application, your sub-system updating process can operate seamlessly by using a few of the options that are available when applying an update. To accomplish this, pass in a parameter to the ApplyUpdate method. The following options will apply an update without shutting down, without showing an update window (silently), and the method call will wait for the update to complete (synchronously). Any combination of these options can be used.

1:  mUpdateController.ApplyUpdate  
2:  (ApplyUpdateOptions.NoShutdown | ApplyUpdateOptions.NoUpdateWindow |  
3:   ApplyUpdateOptions.WaitForCompletion);  
Updating the Version.Xml file during an Update

Maintaining the Version.Xml file is very easy and once we set it up, we can forget about it. Each update will modify the version file based on the update version that is being executed. We can accomplish this by adding two update actions to the update action list.

  1. Use a Set Shared Property update action to access the current update version value and assign it to a Shared Property.
  2. Use a Change Xml Node update action to modify the Version.Xml file on the client to match the current update version.

Action 1

Action 2

That’s it. Precede these two actions with the update actions that perform the necessary work on the client and proceed to publish updates that your application can find and seamlessly apply. An Update Controller and manual versioning opens the door for many creative updating scenarios utilizing the power and flexibility of the AppLife Update engine.

Application Update Customization using Custom Data

When publishing updates for applications, it is often helpful to implement rules that can be applied on an update-by-update basis. With AppLife Update, the custom data field provides this opportunity.

clip_image001

With each update, you can specify a custom data string to go with the update. This value is then available to your application after an update check has been performed. Your application can interrogate the value and control additional logic based on the information. As an example, when creating updates for AppLife Update, we use this field to know whether or not the update requires Visual Studio to be closed. If it does, we add a RequiresVSClosed property to the custom data field.


Accessing the Custom Data in Your Application

After an update check, the update controller has a CurrentUpdate property that holds an UpdateInformation object. This object has a CustomData property that holds, you guessed it, the Custom Data string that you specify when publishing the update.

Code Snippet

if(updateController1.CheckForUpdate()) {

string customData =updateController1.CurrentUpdate.CustomData;

}


Changing Custom Data after Publication

Custom Data can be modified after an update has been published without having to re-build the update package itself. To modify custom data, you can Manage Published Updates…

From the Manage Published Updates dialog the Custom Data string can be modified and then published.

clip_image002

A Class to Parse Name/Value Pairs

A common approach to be able to provide multiple pieces of information through the custom data string is to use a name/value pair syntax, and then extract this information within your application code. To help with this, here is a class that will parse a custom data field using a name=value; syntax.

AppUpdateCustomData.cs and AppUpdateCustomData.vb

Using this class, you can easily extract and use multi-value custom data strings in your applications.

clip_image003

Using the AppUpdateCustomData class:

Code Snippet

1:  if(updateController1.CheckForUpdate()) {  
2:    Kjs.AppLife.Update.AppUpdateCustomData customData = newKjs.AppLife.Update.AppUpdateCustomData(updateController1.CurrentUpdate.CustomData);  
3:   string myValue1;  
4:   string myValue2;  
5:   if(customData.DataTable.ContainsKey("MyName1")) {  
6:  myValue1 = customData.DataTable["MyName1"];  
7:   }  
8:   if(customData.DataTable.ContainsKey("MyName2")) {  
9:   myValue2 = customData.DataTable["MyName2"];  
10:   }  
11:  }  

In conclusion, the Custom Data field provides the means for update publishers to assign information to individual update packages that applications can use to control application update behavior.

Using a Pre-Build Script for File Automation

When an application update is built with AppLife Update, you can define a pre-build and post-build batch script to run during the build process. This ability to easily interact with the build process provides, among other things, the means to move files around on the build system before the actions in the action list are built. This allows for accomplishing automation tasks that might otherwise require a custom action builder. Action builders are more powerful, but more technically complicated as well. Creating a pre-build script is easy. In this post, I will demonstrate the use of a pre-build script to remove the necessity of manually modifying an action configuration before building an update.

Hub and Spoke Update Deployment Example

The Hub and Spoke Update Deployment solution lab outlines how AppLife Update can be used to “update” multiple application update servers. This is a part of a process that allows a software publisher using AppLife Update to maintain many remote update servers for their applications. With remote update servers, client systems can check for and retrieve updates from servers that are on their local networks, instead of from a global update server over a wide area network.

The update actions that maintain those remote application update servers simply add two files to the update. The first file is the Director.Xml document, and the second file is the newest update package built for the application. This file is named major.minor.build.revision.zip based on the current version number of the application. The issue here is that the version number always changes, and when a standard Add & Replace Files action is utilized, the action configuration must also change with each new update in order to address the proper update package.

With a little help from the pre-build batch script and using a different update file action, we can remove this requirement to manually modify the update configuration with each update, which makes creating the remote server update a one-step process using the AppLife Make Update tool. Configured this way, the remote server update build can also be easily incorporated into a larger automation process using the Command Line build utility.

The Pre-Build Script

The project pre-build script can be accessed from the project settings dialog, under the build tab. When creating a pre/post build script, there are replacement values that can be inserted into the script. Replacement values provide access to contextual information from the update project. We’ll be taking advantage of the $UpdateVersion$ and $ProjectDirectory$ replacements to accomplish the goal.

The goal of the pre-build script is to empty a working folder, and then add the two files that will be included in the update to the working folder. The two files will be the Director.Xml file and the application update package that matches the designated update version. The script will copy these files from a local folder that represents the primary application update folder, and will be addressed in the script using a relative file path from the current AppLife Update project file location. After the pre-build script runs, there will be a working directory that contains two files. The Director.Xml file and the application update package (a.b.c.d.zip) file that matches the defined update version number. Then, we just need to use an update action to add these files to the update. Here is the script.

Set WorkingPath=$ProjectDirectory$\Current Update

Set AppUpdatePath=$ProjectDirectory$\..\Application Updates

Del %WorkingPath%\*.*

Copy “%AppUpdatePath%\Director.Xml” “%WorkingPath%”

Copy “%AppUpdatePath%\$UpdateVersion$.Zip” “%WorkingPath%”

Using replacements, we have access to the version number of the update currently being built, and we also have access to the path of the .aup AppLife Update project file. We use this information to copy the correct update package from the correct folder.

The Update Actions

With the pre-build script, the files that we want to add to the update is going to be sitting in a folder named Current Update that is a sibling to the AppLife Update .aup project file. Normally, we wouldn’t care which order the files are copied during the update, and the most obvious update action to use would be the Add Folder Content action. This action would simply add both of the files to the update as the update is built, and then write them to the designated client directory as the update engine executes the action on deployed clients. In this case though, we do care about order. We want the update package file copied first, and then the Director.Xml file. Because of this, we’ll use the Masked Add & Replace files action. With this action, we can apply a mask to the files that will be added to the update package. The first action will add the update package, and the second action the Director file. By applying a mask of (*.zip), the update package is added to the update.

To add the Director.Xml file to the update, we could have chosen the Add & Replace Files action, but for consistency we use another Masked Add & Replace action with a mask of *.Xml.

With these two actions in place, the appropriate update package file and the corresponding Director.Xml file is added to the update package and will be placed in the application updates folder on remote update servers. To publish an update, no changes are necessary to the update project. We simply open AppLife Update and walk through the publish wizard. When the update version is defined in the wizard, the correct application update package is automatically included.

Enabling .Net 3.5 on Windows 8 During an Application Update

In Windows 8, the .Net Framework 3.5 is not installed by default, however Windows 8 includes a Feature on Demand (FoD) option for the earlier frameworks.

clip_image001

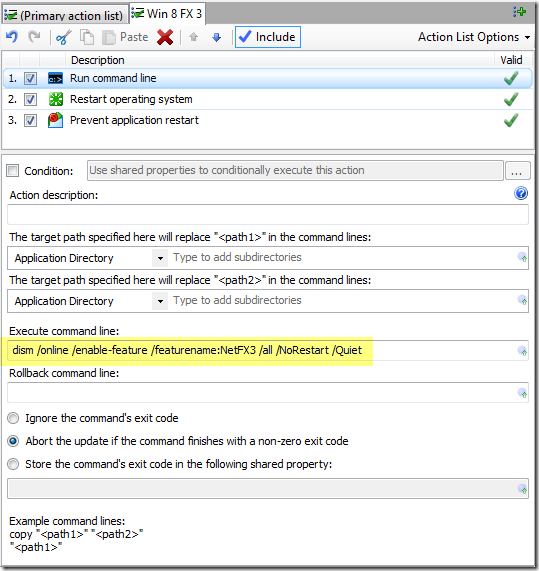
We can enable this feature during an application update by using the Deployment Image Servicing and Management utility (dism). During an application update, we’ll execute the following command line:

dism /online /enable-feature /featurename:NetFX3 /all /NoRestart /Quiet

We can use a Run Command Line update action to perform the work. We just need to ensure that the update has elevated permissions. If you are already configured for update elevation, either by use of the AppLife Update Windows service or by the UAC, this is already taken care of. If however, your normal updates are not elevated, then you must explicitly set this update to elevate via the UAC when you publish the update.

Configuring the Update

To accomplish the goal, we’ll create an action list and name it Win 8 FX 3. In this action list, we’ll add:

  • Run Command Line action
  • Restart Operating System action
  • Prevent application restart action
Run Command Line

This action will run the dism command. This command requires an operating system restart, so we’ll explicitly command not to restart, and then let the update take care of this using a Restart Operating System action.

Note that this action takes some time to complete.

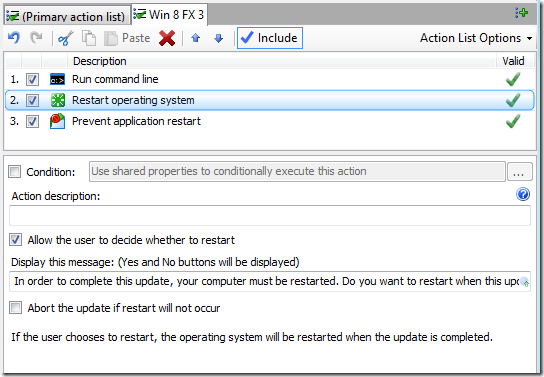
Restart Operating System

This command will prompt the user that a restart is required.

Prevent Application Restart

If the host application will ordinarily restart after the update completes, we can suppress this knowing that the operating system must be restarted to complete the update. Depending on the host configuration, this action might or might not be necessary.

Conditionally Execute the Action List

We only want to run this action list if the host operating system is Windows 8 and the .Net Framework 3.5 is not already installed. So from the primary action list, we’ll detect the OS version and .Net Framework 3.5 install state, and then run the Win 8 FX 3 action list only when necessary. To detect the OS version, we use a Read Registry Value action to read and assign the OS version to a Shared Property we’ll name WinVersion.

To detect the .Net Framework install state, we’ll inspect another registry key.  Note that the dismtool can retrieve information on Windows features using the Get command, however using that approach would require code to parse the command return information.Reading directly from the registry doesn’t require any parsing code.

These shared properties can then be used as a condition to run the Win 8 FX 3 action list.

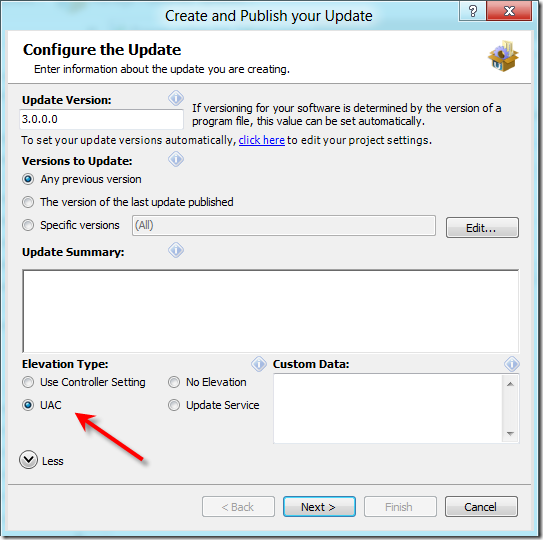
That completes the configuration of the update. Now all we need to do is ensure that the update will run elevated, if your application isn’t already set up to ensure this. When publishing, we can set this update to use the UAC for permissions elevation.

Ensure Elevation for this Update

The host for this update must be capable of running on the .Net 4.0 framework, as this will be available on Windows 8 out of the box. After running this update, executables that target the .Net 2.0 through 3.5 framework will be able to run on the deployed system.

Accessing Local Directories during an Application Update

Most application files reside in the installation directory, referred to within AppLife Update as the Application Directory. The AppLife Update execution engine determines the Application Directory from the physical location of the executable that launches the update. When any of the file related update actions are added to an update action list, the default directory that is targeted is the Application Directory.

This is most often the location where files need to be added or replaced during an application update. Accessing paths relative to the Application Directory can be accomplished using the subdirectories property.

And navigating up the directory tree…

In addition to the Application Directory, you can target any of the well-known named folder locations as well, such as the current user’s profile directories.

Using an Explicit Path

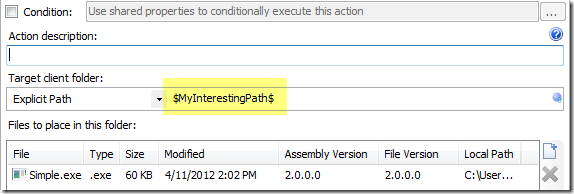
You’ll notice in the list of directories, there is an Explicit Path option. This option lets you specify the entire path to use for the file action. At first glance, this feature doesn’t look all that useful, but when combined with Shared Properties, it becomes a very nice feature.

Expanding Shared Properties in Place

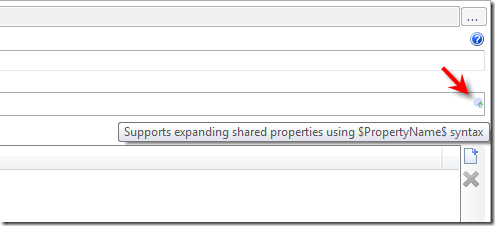
Shared Properties can be used in many action properties. Most of the properties of built-in actions have the ability to expand a Shared Property in place. These properties are adorned with a blue icon indicating their support of this feature. A Shared Property is inserted using $$ delimiters, and during update execution, the value of the designated Shared Property is inserted in-place of the delimiter.

So for file actions, we can use a Shared Property to target an explicit folder, which opens up lots of possibilities because Shared Property values can be passed in from the host application, set by other update actions that can read from a database, the registry, xml config files, or custom actions running your own code.

An Example–MaintainingOfficeTemplates

Say your application installs templates for Microsoft Office and you need to maintain those templates during an application update. There is a default location for Office templates however this location is user configurable, so it could be different on every system. The default template location is located in the current user’s roaming application directory.

CurrentUserRoamingAppDataFolder\Microsoft\Templates

If the user has specified a custom template location, we can find this path in the registry.

HKEY_CURRENT_USER\Software\Microsoft\Office\14.0\Common\General – UserTemplates

One caveat is that if the user has not specified a custom location, this registry key is not present. So in order to target the correct folder, we’ll need to read the user configured location from the registry, and then use that location with an Add & Replace files action. If the registry value is not present, we’ll also set the default value of this shared property to the correct default location by expanding another Shared Property.

Action 1 – Add a Set Shared Property action and set a Shared Property to the current user’s local roaming AppData folder path. We’ll use this to set the default value in the next action.

Action 2 – Add a Read Registry Value action to get the User Configured template directory from the registry and assign the value to a new Shared Property. If the value doesn’t exist, we’ll set the default value with the path identified in action 1.

Action 3 – Add an Add & Replace Files action and use an explicit path to target the correct templates folder.

Using Shared Properties and explicit paths, we can easily access and maintain files and assemblies in any local directory that our application uses.

Conditionally Perform Update Tasks using Shared Properties

In order to maintain an installed software application on different hardware and operating environments, it is sometimes necessary to perform update actions based on the conditions at the local site or system. An example of this is when your application uses both 64 bit and 32 bit assemblies. Your installer places the appropriate assembly during initial installation, but in order to maintain that installation during updates we might need to take different action based on the local architecture. Another example might be maintaining different configurations, such as a Dev, QA, or Production installations. We might want to place debug symbols on a dev update, but not in production. Or we might set specific configuration settings differently, based on the environment. With AppLife Update, we can use information from the local installation to conditionally control the actions taken during the application update. We accomplish this by defining and setting Shared Properties based on the local system information and then using those Shared Properties to conditionally execute update actions.

Shared Properties

The AppLife Update engine execution context hosts a collection of name/value pairs, and this collection is named the Shared Properties collection. Shared Properties can be accessed by any Update Action in the update action list, hence the name Shared Properties.

Shared Properties can be defined and set in a many different ways. The initial collection of shared properties can be passed into the update context from the host application. The ApplyUpdate method of the Update Controller has an overload that takes an IDictionary object of string values. The contents of this object are used to populate the collection of Shared Properties.

1:  Dictionary<string, string> sharedProperties = new Dictionary<string, string>();  
2:  sharedProperties.Add("MyData1", mMyData1);  
3:  this.updateController1.ApplyUpdate(ApplyUpdateOptions.None, sharedProperties);  

If you are using the built-in user experience controls, your code doesn’t call the ApplyUpdatemethod directly. All of the user experience controls have a property called InitialSharedProperties that can be used to add values to prior to applying an update.

1:  updateDisplay1.InitialSharedProperties.Add("MyData1", mMyData1);  

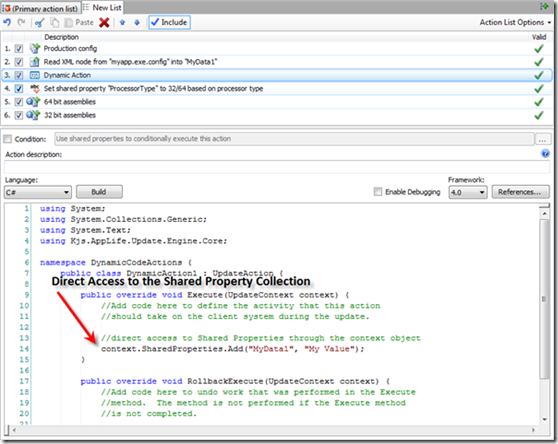
Many of the built-in update actions that read information can set shared properties. The Database actions can read query results into a shared property. The Read Registry Value action, Read Xml Node action, and the Set Shared Property action can all set shared property values. Custom actions, most easily created using the C#/VB.Net dynamic code action, can access the Shared Properties collection directly through the context parameter.

It’s worth noting that while most of the actions read and write string values to the Shared Properties collection, custom actions can set and access any object data.

Conditional Updating Based on Shared Properties

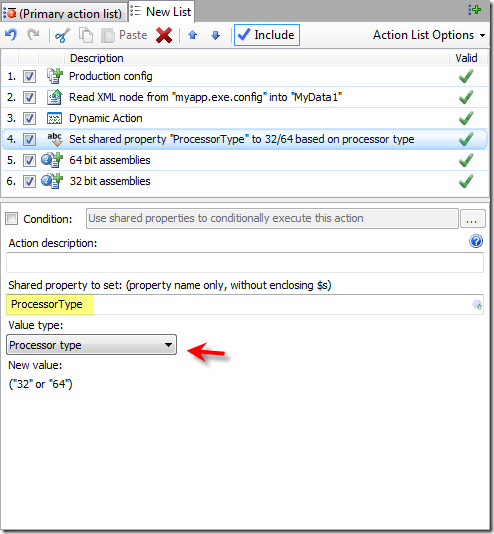
Say we want to replace 64 bit or 32 bit assemblies, depending on the architecture of the system being updated. To accomplish this, we’ll add two Add & Replace files actions to our update action list, and then conditionally execute each action based on the value of a Shared Property. We can define the Shared Property with a Set Shared Property action. Processor type is one of the values that are available to set using this action. We’ll name the Shared Property ProcessorType.

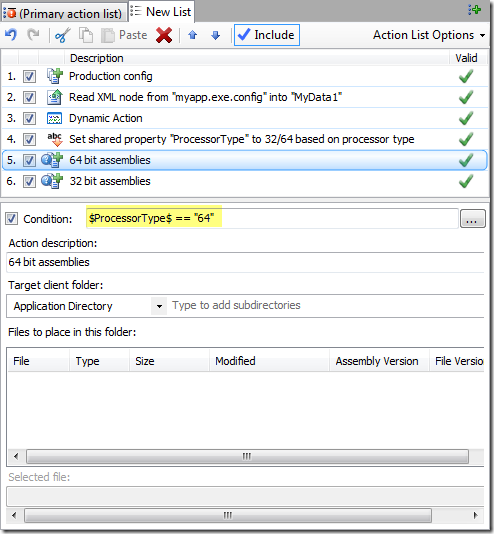
After the action executes, the Shared Property named ProcessorType will contain a value of either 32 or 64, based on the current processor architecture. We can now use this value in the Conditional Statement of the two file actions.

This action will only be executed if the value of the ProcessorType Shared Property is “64”. The conditional for the 32 bit assemblies is obviously “32”. By using a Shared Property and conditional statements, we can use local system information to control the execution of the update.

Updating Software Operating on Erratic and Unreliable Networks

Download:
Example Project Source Code

When your software operates in an unreliable networking environment, it can be very challenging to automatically maintain your software installation. These environments are quite common. Police cruisers and ambulances use laptops to run software in the field, relying on cellular technology to distribute updates. Traveling salesmen use proprietary laptop business software and are constantly going in and out of network coverage. Medical staff use their mobile pc’s in large medical facilities, where dropping connections in elevators and dead Wi-Fi spots is common place. In scenarios like these, professionals are using software that must be maintained. In today’s professional environments, software maintenance is expected to “just happen”, without interrupting the work of the professionals using the software. Software publishers who create software that operate in environments like these all face the same challenge of maintaining their software without requiring support staff to take possession of the hardware. The AppLife Update Solution provides the answer for many software publishers whose applications operate in environments like this.

With the AppLife Update solution, software publishers create and publish self-contained update packages that migrate an installation from one version to another. These update packages are retrieved by the client software when network connectivity is present. Once the update package is retrieved, network connectivity is no longer required and the update can be applied, performing the work necessary to maintain the deployed installation. As the update package is downloaded, the partial download is cached locally so that any interruption in network connectivity will not require restarting from the beginning.

The flexibility of the AppLife Update solution provides the ability to change the behavior based on known circumstances. When it is known that the software being maintained is going to operate in an unreliable networking environment, it is possible to handle network connectivity errors differently than normal. Normally a network connectivity error would be unexpected and the user would be notified of the situation. Instead, the application can postpone the update retrieval operation for a short period of time and try again. And try again. And try again, until the update retrieval succeeds and can be applied.

Example Implementation

In the example project accompanying this post, the updating functionality is completely automated. The implemented updating process can be described as:

When the application launches, a background update check is performed. If an update(s) is available, the update packages are retrieved in the background and without user interaction. If network connectivity is lost, the retrieval is postponed and continually retried in the background without user interaction until the update is successfully retrieved. Once retrieved the user is prompted to either apply the update now, or when the application is closed. If the user elects to apply the update, the update is applied and the application restarted. If the update is deferred until the application exits, the update is applied as the application exits and the application is not restarted.

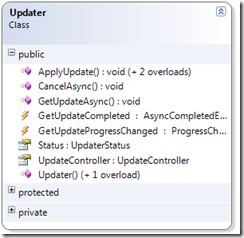
The example project contains an Updater class that controls the update check and retrieval process. Inspecting the Updater class, you’ll see that the class maintains an AppLife Update Controller and uses the API methods and events of the update controller to pause and retry as network errors occur. When an update package is successfully downloaded, an event is raised, alerting the primary application that an update is ready to be applied. The implementation code in the primary application is very simple. An Updater class is instantiated and the Update Controller properties are configured. Once configured, the GetUpdateCompleted and GetUpdateProgressChanged events are hooked before calling the GetUpdateAsync method. That’s it. Any updates will be retrieved as the network allows. When the completed event fires, the Updater status is checked and the user is prompted to apply the update now or when the application exits.

Implementation Details

The Updater class is the heart of the implementation. It has a very simple interface:

The Updater class wraps an AppLife Update Controller and exposes a single method that implementing code will call to perform the entire update process.

We want to take a look at the GetUpdateAsyncmethod. This method calls the Update Controller’s CheckForUpdateAsync method and then returns. The update process continues in the CheckForUpdateAsyncCompleted event handler. If an update is present, the DownloadUpdateAsync method is called. When the download completes, the GetUpdateCompleted event is raised. When these asynchronous methods are called, any network errors will cause the completed event to fire, and the event argument’s Error property will indicate the cause of the error. Based on the error information, we can take appropriate action. In this example, we are considering any WebException or IOException to indicate a network error. Your implementation can improve on this, based on environment specifics. At any rate, when a network error is detected, the updater class goes into a wait mode and try’s the check/download again after a period of time. Eventually, the update download is completed, and the GetUpdateCompleted event is raised, triggering the client application to prompt the user.

Of course, the user experience behavior is completely customizable with just basic coding. The AppLife Update Controller performs the heart of the technical challenges involved in this implementation, and the Update Engine is what lets you package up any work that is necessary to maintain and migrate your deployed installations. So I invite you to take a look at the example and evaluate it for suitability in your own environment. Feel free to contact our technical support team with any questions.

Scroll to Top