Customizing the Application Updating User Interface
For many software teams who integrate a commercial application updating solution, the user experience that comes out of the box is perfectly acceptable. But for others, it’s one of the major barriers preventing solution adoption. The ability to customize the user experience is a differentiator for AppLife Update over competing options. We provide turn-key visual controls and user interfaces for an application updating process right out of the box, just like the others. Where we are different, is that we also provide the ability for you, the integrator, to completely customize the end-user updating experience. We’re not talking about changing the background color, or adding an image. We’re talking complete customization. In this post, I’ll walk through implementing a facelift customization of the AppLife update engine user interface.
The Built-In User Interface
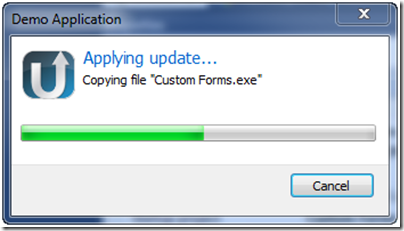
As an update is executing on a deployed client, the image above is what the end-user sees. The window title and the image displayed are easily customizable through simple project property settings. It’s also just as trivial to silently update and not show any interface at all through update implementation code:
this.mUpdateController.ApplyUpdate(ApplyUpdateOptions.NoUpdateWindow);
Replacing the Built-In User Experience
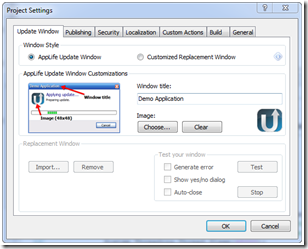
Notice on the project settings tab above, the option to use a Customized Replacement Window.
This is what lets us give this user experience a real face lift. As an update is being executed and the AppLife Update engine is executing, there is a defined contract, or interface, that the visual window adheres to. Let’s introduce this interface.
Meet the IUpdateUI interface.
Any class that implements the IUpdateUI interface located in the Kjs.AppLife.Update.Engine.Core.dll assembly can replace the built-in window. This interface is quite simple. It has five methods and four events.
Methods – These methods are called by the update engine as the update is executed.
- Open
Displays, or initializes, the user interface. - Close
Closes the user interface. This method will not always be called by the update engine. The update engine will call this method after the Finishmethod, only if the host application code initiated the update with the AutoClose option. Close is also called immediately after the Finishmethod if an error occurs during the update. Otherwise it is expected that the user interface remain open until the user closes it. - Finish
Called by the update engine to notify the update user interface that the update has finished and is allowed to be closed. The user interface should not be allowed to be closed before this method is called. - Update
This method is called repeatedly as progress is made during the update process. The method is called in order to refresh the user interface. Method parameters provide information about the current state of the update process. - ShowYesNoPrompt
Display the designated message and prompt the user for a yes or no answer. This method is used by built-in action, such as the Restart Operating System action.
Events – These events are raised by the customized update interface to communicate with the update engine.
- Closed
Raise this event when the UI has been closed. This event must be raised for the Update Engine to complete the update and shutdown.
- RequestCancel
Raise this event when the user desires to cancel an executing update. The cancel request is confirmed by the update engine through a Finishmethod call. The result parameter will be set to Cancelled. - RequestPause
Raise this event when the user desires to pause the executing update. The pause request is confirmed by the update engine through an update method call. The uiState parameter will be set to Paused. - RequestResume
Raise this event when a paused update should be resumed. The resume request is confirmed by the update engine through an updatemethod call. The uiState parameter will be set to Updating.
That’s the interface that we must implement in order to replace the built-in updating window. You can use Windows Form, a WPF Window, or you can even use a communications proxy class that knows how to marshal the updating process information to a supervisory application, such as an update manager. For this walk through we’ll create a Windows Form replacement.
- Create a new Windows Forms project. Make sure to target the same .Net Framework version as your host application. Name the project MyCustomUpdatingForm.
- Add a reference to the assembly Kjs.AppLife.Update.Engine.Core.dll. If AppLife Update is installed on your development computer, this assembly will be in the .NET list.

- View the code on Form1 and extend this form to implement the Kjs.AppLife.Update.Engine.Core.IUpdateUI interface.
public partial class Form1 : Form, IUpdateUI { ... } - Design and layout your update user experience. As the update progresses, there are text messages and percent completion updates that you can use in the design. You can design anything you like. This is your form. For simplicity, this walkthrough will use a label and a progress bar in a much smaller form factor than the built-in updating window.
Add a label near the top of the form and name it lblMessage. Then set AutoSize to false, AutoEllipse to true, and anchor to Top, Left, Right.
Next add a progress bar below the label. Size it to fill the width of the window and set its Anchor property to Top, Left, Right.
Finally, add a cancel button below the progress bar and name it btnCancel.

- Implement Interface Methods
Open. In this method, we’ll simply show the form.
1:   public void Open(Kjs.AppLife.Update.Engine.Core.UpdateUIContext context) {
2:     this.Show();
3:   }
Close. The Form base class already implements a Close method that will close the form. We do want to interact with the form close logic to prevent the form from closing before the update engine calls the Finish method. To accomplish this, we’ll override the OnClosing method and check a member variable that we’ll add. This member variable will be used to signal that the Finished method has been called. We’ll also keep the update interface open in the event of an error to show the user information about the error.
 private bool mCanClose;
   2: private bool mError;
   3:
   4: protected override void OnClosing(CancelEventArgs e) {
   5:   base.OnClosing(e);
   6:
   7:   if(!mCanClose) {
   8:     e.Cancel = true;
   9:     if(mError == true) {
  10:       mCanClose = true;
  11:     }
  12:   }
  13: }
Finish. After the Finish method is called, the user interface can be closed. This is signaled by setting the mCanClose member variable to true. Then, if the update did not fail, the form is closed. If the update did fail, the exception message is shown on the form.
 1: public void Finish(Kjs.AppLife.Update.Engine.Core.UpdateResult result,
   2:   string description, Exception updateError) {
   3:
   4:   if(updateError == null) {
   5:     mCanClose = true;
   6:     Close();
   7:   } else {
   8:     lblMessage.Text = result.ToString();
   9:     progressBar1.Visible = false;
  10:     btnCancel.Enabled = false;
  11:     lblMessage.AutoSize = true;
  12:     lblMessage.Text = "Error: " + updateError.Message;
  13:     mError = true;
  14:   }
  15: }
Update. Update the progress bar and message label.
   1: public void Update(Kjs.AppLife.Update.Engine.Core.UpdateUIState uiState,
   2:  Kjs.AppLife.Update.Engine.Core.UpdateState updateState,
   3:  string description, int progressValue, int progressMaximum) {
   4:
   5:   progressBar1.Maximum = progressMaximum;
   6:   progressBar1.Value = progressValue;
   7:
   8:   lblMessage.Text = description;
   9: }
ShowYesNoPrompt. The simplest method is to show a message box.
   1: public YesNoResponse ShowYesNoPrompt(string message) {
   2:   YesNoResponse result = YesNoResponse.No;
   3:   if(DialogResult.Yes == MessageBox.Show(this,
   4:                message, "Update",
   5:                MessageBoxButtons.YesNo,
   6:                MessageBoxIcon.Question)) {
   7:     result = YesNoResponse.Yes;
   8:   }
   9:
  10:   return result;
  11: }
6. Implement Cancel by raising the RequestCancel event when the Cancel button is clicked.
 private void btnCancel_Click(object sender, EventArgs e) {
   if(RequestCancel != null) {
     RequestCancel(this, EventArgs.Empty);
   }
 }
7. Implement the Closed event. This event informs the update engine that the user interface has closed. A Windows Form class raises a Closed event when the form is closed, so we don’t need to implement the event in this example.
Testing the New User Interface
With the basics of the interface implemented, we can build the project and then test our form using Make Update. Open your AppLife Update project file and then navigate to the project settings dialog.
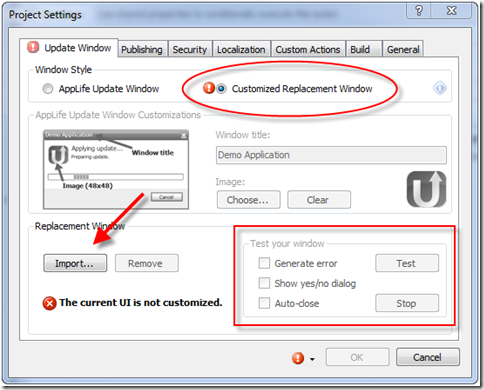
On the Update Window tab, we can import the assembly that includes our new replacement window. The imported assembly must have only one class that implements the IUpdateUIinterface. The assembly is imported into the update project and will be included in any new update packages built by this update project. This dialog also provides a tester for replacement windows. Once imported, clicking the Test button will launch a test process.

In conclusion, by using the IUpdateUI interface you have complete control over the look and feel of your updating user experience. If your application demands strong product branding or a specific look and feel, you can easily fulfill your requirements with AppLife Update.