AppLife Update

Easily Modify .Config Files During an Application Update

The beauty of .Net configuration files (.config) is that they let you easily change the behavior of your application for individual installations. This allows for a great deal of flexibility, especially with service related settings. With this flexibility though, also comes a maintenance challenge. Unlike all of your other application files, configuration files usually can’t be simply replaced during a maintenance update. Doing so would lose any customizations made to support the specific application installation. As your application evolves, it is inevitable that your configuration files will require modification. With AppLife Update, you can easily maintain .Net configuration files without replacing them by modifying the existing files. I’ll cover three different methods that you can use, based on the type and scope of the config file modification that is necessary.

  • Modify the existing config file directly using Xml Update Actions
  • Migrate specific settings from an existing config file to a new config file using Shared Properties and Xml Update Actions
  • Utilize custom .Net code to manipulate the config file during an update

Modify the Existing Config File

Using Xml Update Actions is great for adding elements and updating attributes. As an example, let’s say that we use appSettings in our application and we need to add a new appSettings value in support of a new feature. We can use an Add Xml Element update action to insert a new appSettings value into the existing config file.

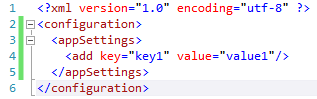
This is what the v1 application configuration file might look like:

But for v2, the configuration file might need to look like this:

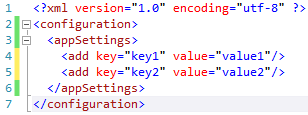
To migrate version 1 installations to version 2, in addition to replacing the application assemblies we must add a new entry to the appSettings collection. To do this, we’ll use an Add Element update action.

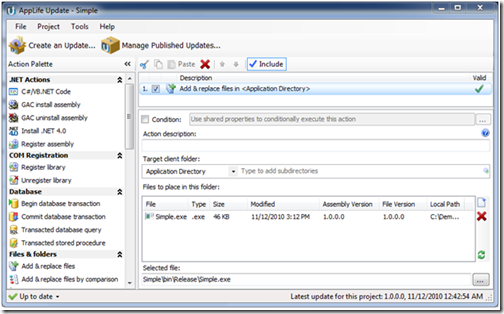
When configuring Xml update actions, XPath expressions are used to reference the specific Xml elements that you are interested in reading and writing. To accomplish our goal, we will use an XPath expression to access the appSettings node, and then add a new element to that node. The config file is located in the Application Directory and is named Simple.exe.config.

The XPath expression is /configuration/appSettings. The element that we are adding is:

<add key=”key2” value=”value2” />

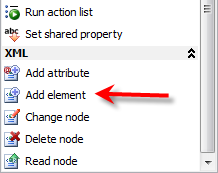
The name of the element is add, and the new element has two attributes, key and value. Add a new Add Element update action to your update project and configure it as below.

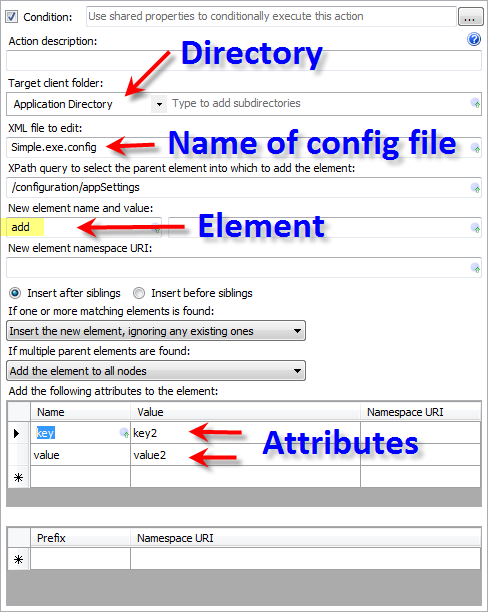
With this action in place, the new element will be added to the configuration file when the update is executed.

Another scenario where Xml actions are great is when we need to update a specific attribute. Using a Change Node action, the value of an existing appSettings entry is easily accomplished. For instance, consider the situation where in v3 of our application, we needed the key2 value to be modified to value3. This can be accomplished in a very similar process. Instead of adding an Xml Element, we can use the Change Node update action to modify an existing value. To accomplish this, we need to know the XPath that references the specific value that needs to be changed. In this case, the XPath expression is /configuration/appSettings/add[@key=”key2”]/@value.

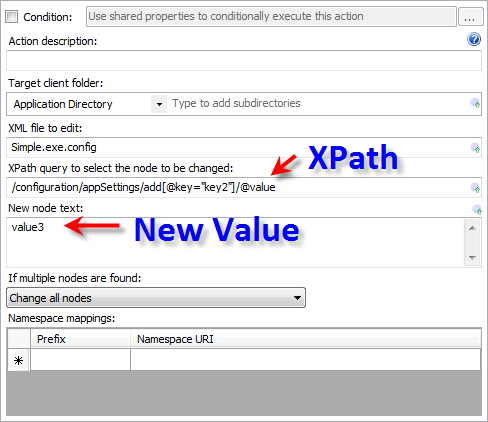
Adding a Change Node action configured like this will modify the attribute value to “value3”.

Migrate Existing Values to a new Config File

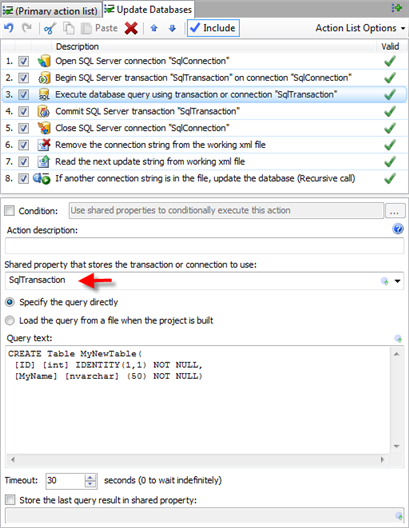
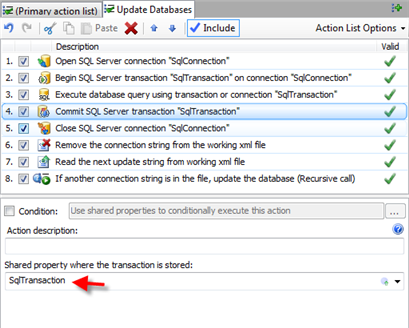
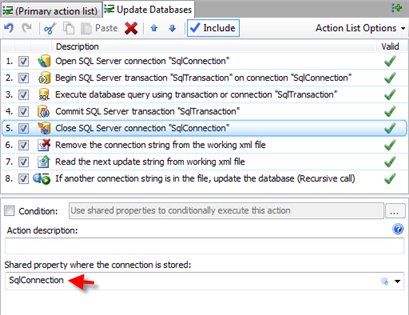
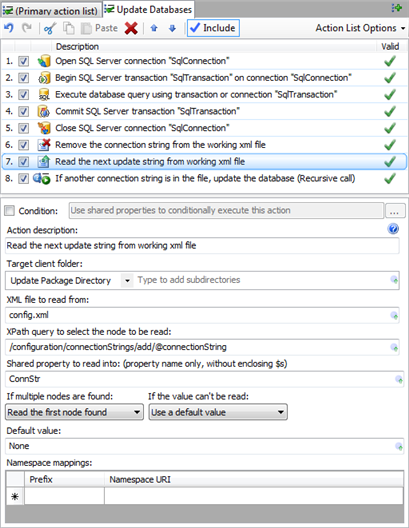
In some circumstances where there are wholesale changes to a config file that would require extensive modifications to the existing file, it could require less effort to extract specific values that are unique to the installation and migrate them to a new config file. In this scenario we use Xml Actions to read specific information from the existing config file and store that information in Shared Properties. We can then replace the config file with an Add & Replace Files update action, and finally use Xml actions to write the information that we stored into the new config file.

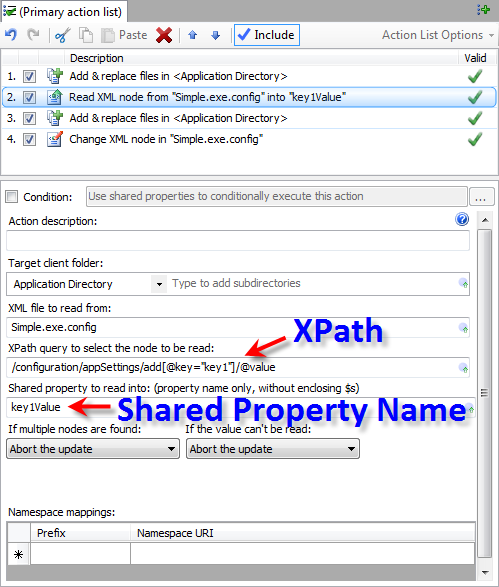
Revisiting the previous example, we’ll take this approach for the necessary modifications. We’ll read and store the value of the key1 appSetting, then replace the config file and modify that value in the newly replaced configuration file.

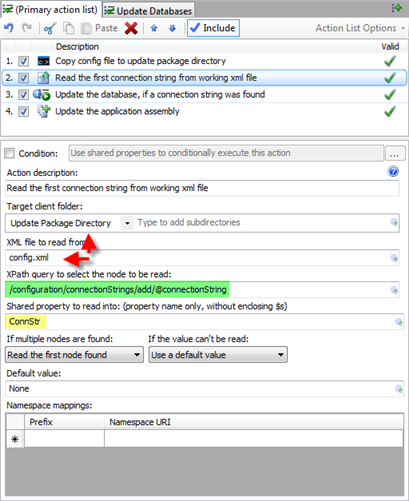
Reading the existing value, we’ll add and configure a Read Xml Node Action. Using this action, we set the config file name and XPath just as before. We’ll also designate a Shared Property to store the attribute value. Shared Properties are essentially variables that are scoped across the context of the executing updates. They allow for information to be shared between update actions. The Read Xml Node action will assign the string value of the designated attribute to the designated Shared Property.

With the value of the existing attribute stored, we can replace the application configuration file using an Add & Replace Files action.

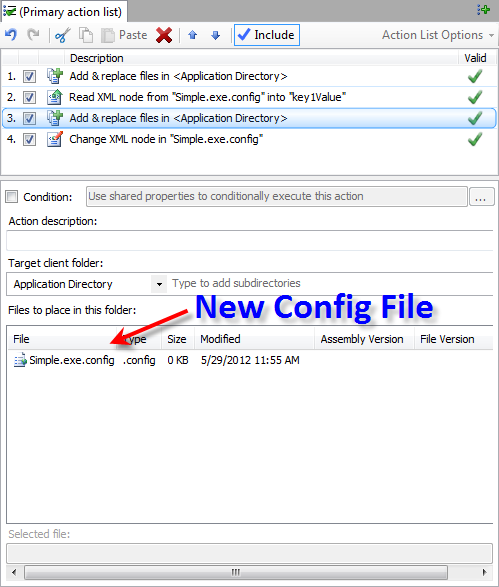
After this action executes, the application configuration file will be replaced with a new updated version. However, the value of the attribute we are interested in will also have been reset to its default, non-customized value. To complete the update process we need to use the value that we previously stored to change the new configuration file. A Change Xml Node update action will update the attribute value. When using string value Shared Properties, the value of the Shared Property can be expanded using $SharedProperty$ syntax.

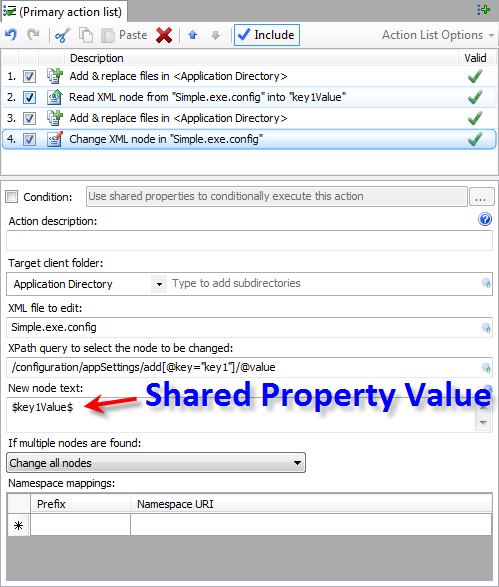
The Change Xml Node action restores the value originally set on the specific client and completes the update process.

Utilize .Net Code to Modify an Existing Config File

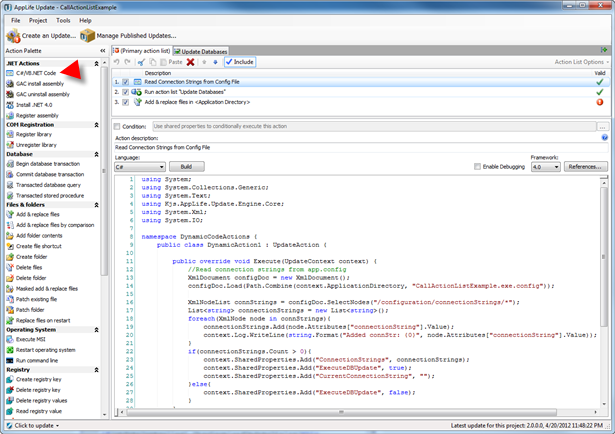
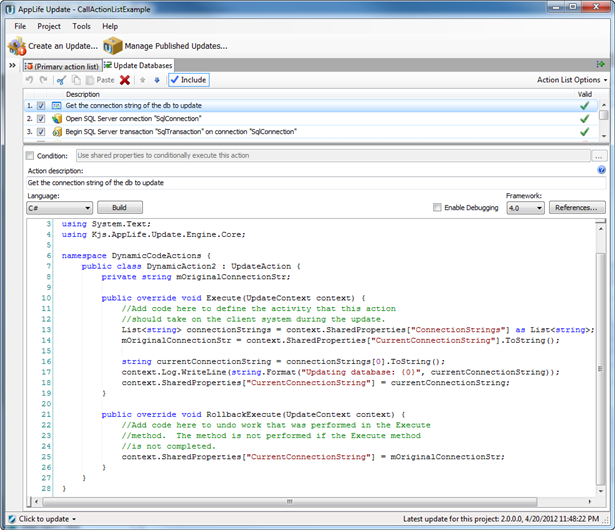
When using Xml Actions and Shared Properties, we read and write string values to the config file. In some circumstances, it can be beneficial to approach the Xml maintenance process within code, where the Xml can be manipulated in fragments. This too can be easily accomplished during an update using the Dynamic Code Action. A Dynamic Code action allows you to easily create a custom update action, which extends the UpdateAction class and overrides, at a minimum, the Execute and RollbackExecute methods.

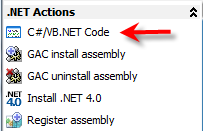
With a Dynamic Code action you can use C# or VB.Net code to manipulate the deployed client. Here we use the context parameter to access the information we need to accomplish our goal in code. You can access local directory information as well as the Shared Properties collection. With this information, we load an XmlDocument and manipulate the file within our custom code.

Summary

During software maintenance updates, application configuration files that are uniquely modified for each installation cannot be simply replaced as changes are made to support new versions. These config files must be modified in-place during the maintenance process. Using AppLife Update, application configuration files can be easily maintained throughout the life of the application and we present three different approaches to accomplishing the goal.

Updating a Windows Service

For applications that deploy a Windows Service, updating the installed service can present a maintenance challenge. This is a scenario where integrating AppLife Update makes a difficult task extremely easy to accomplish. Using AppLife Update actions, a Windows Service can be updated in three easy steps.

  1. Stop the Service using a Stop Service update action.
  2. Replace the Service assemblies using one of the available file replacement actions.
  3. Restart the Service using a Start Service update action.

Tada! Big maintenance challenge accomplished.

An Example

The release of AppLife Update 4.5 included a few very small changes to our AppLife Update Windows Service. Specifically, in previous versions, if the Windows Application Event Log was full and not configured to replace old events, our service would not apply an update.  Here’s how to update a service using AppLife.

Stop the Service

To stop the service, we need to know the service name. If you don’t already know the name of the service you are updating, it can be found in the Windows Service Manager.

Add a Stop Service action to your AppLife package. Set the Service to Stop property to the name of your service. In this case, the service name is KjsUpdateService2.

Replace the Service Assemblies

Use an Add & Replace files on Restart action to update the assemblies. The AppLife Update Windows service is initially deployed using an MSI merge module, and is always installed to the Common Files Folder\AppLifeUpdateService2 folder. To update the service, we’ll select the Common Program Files (x86) client folder and set the appropriate sub-directory, and then add the two assemblies that constitute the service. Choosing the x86 variant of the Common Program Files folder will ensure we target the x86 common files folder on x64 operating systems. Using the non x86 Common Program Files directory targets the x64 folder on 64-bit operating systems. On x86 operating systems, there is only one common program files directory, and either variant will target the correct folder.

Note: When updating most Windows Services, even when a service updates itself, the service assemblies can be replaced immediately, without deferring to a restart. The AppLife Update service core assembly houses a class used to marshal information between the User Interface process and the service started worker process. For this reason, even though the service is successfully stopped, a lock is still being maintained on the core service assembly while the update is executed. Because this lock is not released until the update completes, the file replacement is deferred until restart. We do not need to force an operating system restart, as the previous update service can be restarted and function properly until the system is restarted. If a restart were necessary, we could include a Restart Operating System action to accomplish this.

The service assemblies ship with AppLife Update already embedded into the AppLifeUpdateService.msm merge module. After an installation, the assemblies will be in the common program files folder and can be extracted from there. After this action executes, the Windows Service will be updated. Now we just need to restart the service.

Restarting the Service

The service is restarted by adding a Start Service update action. The action is configured by defining the name of the service to restart. In this case it is again, KjsUpdateService2.

That’s it! Windows Service update completed.

But My Service is My Application?

This example assumes an existing update process exists and can be utilized to update the Windows Service. This is usually an installed application that utilizes the Windows Service, and can take responsibility for updating it. A stand-alone Windows Service can become “Self Updating” just as easily by integrating an update process using the AppLife API. There is one point to make in this scenario. When applying an update, you want to use the option to instruct the update controller not to shut down the host application (the service). The Stop Service update action performs a proper service shutdown through the use of the Windows Service Control Manager, and is the recommended method to use when stopping a service for an update.

Using AppLife Manager is also an excellent option for deploying and maintaining Windows Services.  AppLife Manager is turn-key and requires zero code integration.

Using Callable Action Lists Part II

In my previous post I used a callable action list along with Xml Update Actions to read all of the database connection strings identified in an app.config file, then iterate and update each one of the databases during an application update. The approach I took to accomplish the goal only used built-in Update Actions that are available to me in the Actions Palette. I purposefully chose not to use dynamic code actions (custom update actions) to make a point of what we can accomplish without resorting to writing our own code. However, what can be accomplished with a little custom code is extremely powerful, so now I’m going to revisit the objective, removing the intent of relying only on built-in actions.

Identifying the Databases to Update

In this scenario, the local databases that need to be updated during our application update are listed in the application configuration file. This is very convenient, especially when I want to use built-in actions to find the information. But what if the databases were not so conveniently discoverable? What if you first had to connect to a database server and search through all of the databases on the server for a specific naming convention? What if the databases were passed into the update process from the host application? Using a dynamic code action, scenarios like this can be easily handled.

Custom Update Actions and Shared Properties

The feature duo that makes what might initially sound difficult to accomplish during an application update magically easy using AppLife Update are Custom Actions and Shared Properties. Custom Actions are simply classes that inherit from an UpdateAction base class and implements at a minimum, an Execute method and a Rollback method. Shared Properties are a collection of objects that are scoped to the context of the update and can be accessed from any update action.

For our purposes, we want a custom update action that will read the list of databases from an application configuration file. The C#/VB.NET Code action lets me write this custom action directly within the update creation software.

Note:  Custom Actions can also be created in Visual Studio and compiled to an assembly.  Custom Action assemblies can be added to an update project through the Project..Settings dialog, or added the Custom Actions folder located within the AppLife Update install directory.

Here is the code:

Code Snippet

1:  using System;  
2:  using System.Collections.Generic;  
3:  using System.Text;  
4:  using Kjs.AppLife.Update.Engine.Core;  
5:  using System.Xml;  
6:  using System.IO;  
7:  namespace DynamicCodeActions {  
8:    public class DynamicAction1 : UpdateAction {  
9:      public override void Execute(UpdateContext context) {  
10:        //Read connection strings from app.config  
11:        XmlDocument configDoc = new XmlDocument();  
12:        configDoc.Load(Path.Combine(context.ApplicationDirectory, "CallActionListExample.exe.config"));  
13:        XmlNodeList connStrings = configDoc.SelectNodes("/configuration/connectionStrings/*");  
14:        List<string> connectionStrings = new List<string>();  
15:        foreach(XmlNode node in connStrings) {  
16:          connectionStrings.Add(node.Attributes["connectionString"].Value);  
17:          context.Log.WriteLine(string.Format("Added connStr: {0}", node.Attributes["connectionString"].Value));  
18:        }  
19:        if(connectionStrings.Count > 0) {  
20:          context.SharedProperties.Add("ConnectionStrings", connectionStrings);  
21:          context.SharedProperties.Add("ExecuteDBUpdate", true);  
22:          context.SharedProperties.Add("CurrentConnectionString", "");  
23:        } else {  
24:          context.SharedProperties.Add("ExecuteDBUpdate", false);  
25:        }  
26:      }  
27:      public override void RollbackExecute(UpdateContext context) {  
28:        //Add code here to undo work that was performed in the Execute  
29:        //method. The method is not performed if the Execute method  
30:        //is not completed.  
31:        context.SharedProperties.Remove("ConnectionStrings");  
32:        context.SharedProperties.Remove("ExecuteDBUpdate");  
33:      }  
34:    }  
35:  }  

Notice that through the context parameter, the code can access the Shared Properties collection as well as other properties, such as the physical path to the host application. This code simply opens the application configuration file and reads the database connection strings. These strings are then added to a generic List of strings, and that List is added to the Shared Properties collection. If the list is not empty, another Shared Property is added that will be used in a conditional statement.

Manipulating the List from other Actions

With the list of database connection strings in the Shared Properties collection, we can call the recursive callable update action list to update the databases. This in-memory list takes the place of the copied app.config file used in the original post. From within the Update Databases action list, we can read and manipulate the Shared Properties collection with other custom update actions.

Read the Next Connection String

Remove the Item after the Database is Updated

Conclusion

Using Update Actions and Shared Properties during an application update allows you to very easily accomplish complicated processing on deployed clients. The C# / VB.NET update action lets you add your own code logic to your update, and using Shared Properties, your code can easily interact with built-in actions as well as other custom actions.

Download Example AppLife Update Project

Using Callable Action Lists to Update Multiple Databases During a Client Update

The recently released AppLife Update 4.5 includes many new features, one of which is the ability to create independent, callable action lists. By combining callable action lists with Shared Properties and applying conditional statements to update actions we can more easily accomplish advanced updating activity. One scenario which we can use to demonstrate this functionality is when an application uses multiple local databases. In order to update the installed application, all of the databases that are present must be updated. In this scenario an update will need to be able to:

  1. Identify all of the databases that are present.
  2. Iterate each of the local databases, applying the necessary change script to each one.
  3. Update the application assemblies.

For this example, the list of databases will be discovered by inspecting the application configuration file. Each database connection string is listed in the connectionStrings segment of the configuration file. For each of the listed databases, we’ll connect to the database, start a transaction, run a SQL script, commit the transaction and close the connection.

Note that all of the update actions and logic is packaged into a single, stand-alone update package. The update process embedded into the application discovers the new update, downloads it, and then initiates it. Once initiated, the Update Engine executes the update actions that perform the work. This example focuses completely on the update actions. No mention is made of the update process integrated into the application.

Identify and Manage the Local Database List

To read the databases that are present and manage the list as the databases are updated, I am going to read an item from the connectionStrings configuration element, update the database identified within it, and then remove the element from the configuration file. Using this method, I can accomplish all of the work using built-in update actions. This is not the only option available. Using Dynamic Code Actions offers more flexibility and an alternative approach. I’ll perform the same work using Dynamic Code actions in my next blog post.

Now, I mentioned that as we update the databases I am going to remove the element from the config file. We don’t want to modify the actual application configuration file so the first thing that I am going to do is copy the config file to the working update directory. This is a directory created by the update engine and it is deleted when the update ends. I’ll accomplish this by using a Run command line update action. This action includes a helper feature that allows us to use common directories to define two path variables. The Application Directory is the physical path of the application that launched the update. This is where the application configuration file resides. The Update Package Directory is the physical path to the temporary working directory that is created for this update by the update engine. I define <path1> to be the path to the application configuration file, and I define <path2> to be the path of my copy of the config file. I’ll call it config.xml. With the two paths specified, I’ll use them in the actual command line that copies the config file:

copy “<path1>” “<path2>”

To read the entries in the config file, I’ll use a Read Xml Node action. To use this action we specify an Xml file to read, define an XPath expression to identify the node value we are interested in, and then provide a name of a Shared Property to hold the string value of the Xml Node. The Shared Property can then be accessed and used by other actions as well as in conditional statements. I’ll be doing both with this Shared Property.

Here is what the config file section looks like:

<configuration>

<connectionStrings>

<add name=”Db1″ connectionString=”Data Source=.\SQLEXPRESS;Initial Catalog=TestDb1;Integrated Security=True”/>

<add name=”Db2″ connectionString=”Data Source=.\SQLEXPRESS;Initial Catalog=TestDb2;Integrated Security=True”/>

</connectionStrings>

</configuration>

I am interested in the connectionString, so my XPath expression is /configuration/connectionStrings/add/@connectionString

If multiple nodes are found, the action is configured to read the first node, and if no node is present a default value of None is assigned. We’ll use this in a conditional statement. If a node is present, a Shared Property with a key of ConnStr will be populated with a local database connection string. Next we’ll use a callable action list to update this database using SQL Server update actions, remove the connection string from our working config file, and recursively call itself until all of the databases represented in the config file are updated. If the ConnStr Shared Property does not equal the value “None”, we call the action list.

Update the Database

The databases I am updating are SQL Server databases. Therefore I am using the SQL Server Update Actions that are also new to AppLife Update 4.5. Note that there are separate provider-Independent database actions available that can be used for updating any type of database. Using the SQL Server Actions, for each database we are going to:

  1. Open a Database Connection. I’ll configure the action to place the database in single-user mode.
  2. Begin a SQL Server Transaction.
  3. Execute a database query.
  4. Commit the SQL Server transaction
  5. Close the SQL Connection

To open the connection, I set the connection string directly, and then use the ConnStr Shared Property we already defined. For many built-in actions, you can use Shared Properties that are strings by using a $SharedPropertyKey$ syntax. Wherever this is used, the Shared Property string value is expanded in-line during update execution. Notice that the connection itself is added to the Shared Properties collection using the defined key. Here the key is named SqlConection. We’ll use this Shared Property in the other database actions.

With a SQL Connection open, I’ll start a transaction using the Begin SQL Server Transactionaction. To use this action we specify the connection to use and provide a Shared Property key name for the transaction. The transaction Isolation Level can also be specified. If the update fails, this transaction will be rolled back automatically unless the transaction is committed by a Commit SQL Server transaction action.

With the transaction started, it can be used by one or more Run SQL Server query actions. In this example, I’ll just add a table.

Next, I’ll commit the SQL transaction and close the database connection. Taking this approach means that should any of the database updates fail, the database changes made in all previously updated databases would not be rolled back because they have already been committed. I chose this approach for simplicity, however the update could be refactored to maintain all transactions open until all of the databases have been updated, then iterate the transactions and commit each one. Using this alternate approach, should any SQL query fail, all databases would roll back their changes.

Closing the connection by specifying the Shared Property key…

Remove the Database from the Working Xml File

With the designated database updated, I am going to remove the connection string from the working Xml file using a Delete Xml Node action. To use this action, I specify the Xml file and as XPath expression identifying the node of interest, just like we did when defining the connection string. The node we are interested in is the connection string entry with the attribute value that matches the connection string of the database that we just updated.

With the node removed from the working file, we’ll again use a Read Xml Node action to read the next connection string in the file. If there is another connection string available, we’ll assign it to the ConnStr Shared Property. Otherwise, just like before, if no connection strings are left the value of the Shared Property will be set to “None”.

And now as long as the value of the ConnStr Shared property is not “None” we’ll call this same action list again, updating the next database in the list.

This process is repeated for all of the databases identified in the connectionStringsconfiguration element.

Replace the Application Assemblies

To complete this update, I’ll use an Add & Replace Files action to replace the main application executable.

Summary

By using the new callable action list feature and the Shared Properties collection, we are able to read the list of local databases from the application configuration file and iteratively update each one. The new features of AppLife Update 4.5 provide more power and flexibility while maintaining the robust, transactable operation of the AppLife updating engine. In a follow-up blog post, I’ll use Dynamic Code actions and custom C# code instead of Xml Actions to read the connection strings and use a collection object instead of a temporary file to manage the databases.

Download Example Project

View Execution Log

Terminal Services Application Updating

The AppLife Update solution is a perfect fit for maintaining applications that operate in multi-user terminal services environments. In a terminal services installation, there are likely many users simultaneously running your application. Application maintenance solutions must account for the fact that there can be multiple instances of an application running at one time as any running instance will maintain a lock on files and assemblies that must be replaced during an update process. The AppLife Update Solution ensures that all running instances of an application are shutdown prior to starting an update, and this is accomplished through a built-in Inter-process communications (IPC) feature. The IPC employed within AppLife Update communicates across all users and will shut down all instances of an application running in a terminal services environment, making the solution a perfect fit for maintaining terminal services hosted applications.

Out of the box, AppLife Update will shut down all instances of an application and allow you to update a terminal services application. There is however some customizations that can be applied to an application that is known to be targeting terminal services that will improve the users application updating experience.


Terminal Services Application Updating with AppLife Update

User Experience Customizations

The AppLife Update API provides an opportunity for the integrating developer to interact with the IPC process and update initiation (starting) procedure. We can use this opportunity to improve the user experience. For the instance that initiated the update, we’ll display an indeterminate progress dialog as all instances are being shut down, and for the non-initiating instances, we’ll display an informative dialog for a short period of time indicating that the application is about to be closed for maintenance. Further enhancements could allow terminal services users to cancel the update process, or perform additional work before the shutdown.


Code Snippet

1:  private void checkForUpdatesToolStripMenuItem_Click_1(object sender,  
2:        EventArgs e) {  
3:      if(updateController1.ShowCheckForUpdateDialog(this,  
4:        ErrorDisplayLevel.ShowExceptionMessage) == DialogResult.OK) {  
5:        if(updateController1.ShowDownloadUpdateDialog(this,  
6:          ErrorDisplayLevel.ShowExceptionMessage) == DialogResult.OK) {  
7:          //Launch the update from another thread  
8:          //To better accomodate terminal services  
9:          //installations, the UI will remain  
10:          //responsive as all of the other  
11:          //instances of the application are closed.  
12:          BackgroundWorker worker = new BackgroundWorker();  
13:          worker.DoWork += new DoWorkEventHandler(worker_DoWork);  
14:          worker.RunWorkerAsync(updateController1);  
15:          ApplicationUpdateInitiatedDialog dlg =  
16:          new ApplicationUpdateInitiatedDialog(true);  
17:          dlg.ShowDialog(this);  
18:        }  
19:      }  
20:    }  
21:    private void worker_DoWork(object sender, DoWorkEventArgs e) {  
22:      //Since the ApplyUpdate method call is a  
23:      //blocking call, and we want the UI to remain  
24:      //response as the user waits for all instances  
25:      //to close, we'll initiate the update on a  
26:      //background thread.  
27:      UpdateController controller = e.Argument as UpdateController;  
28:      if(controller != null) {  
29:        controller.ApplyUpdate(ApplyUpdateOptions.AutoClose);  
30:      }  
31:    }  
32:    private void updateController1_UpdateStarting(object sender,  
33:        UpdateStartingEventArgs e) {  
34:      //An update has been an initated and this  
35:      //application will shutdown. This dialog will  
36:      //inform any other users that the application  
37:      //is about to shutdown on them. Showing this  
38:      //dialog is import for Terminal Services  
39:      //installations. Note: It is possible to  
40:      //allow other users to cancel the ongoing  
41:      //update process  
42:      //This dialog is shown for 5 seconds  
43:      //before it is closed automatically  
44:      if(!e.IsInitiatingController) {  
45:        ApplicationUpdateInitiatedDialog dlg =  
46:      new ApplicationUpdateInitiatedDialog(false);  
47:        dlg.ShowDialog(this);  
48:      }  
49:    }  
50:  }  


Prevent Users from Restarting During the Update

During the actual update, the application files must be unlocked, and remain unlocked throughout the process. If a terminal services users attempts to start the application using their application shortcuts, the application assemblies could become locked and prevent the update form succeeding. To prevent this, we’ll make the first action taken during the update be to rename/remove the launching executable. If the launching executable is to be replaced during the update process, we’ll perform this action as the last step of the update. By taking this action, terminal services users will not be able to launch the application during the update process from existing shortcuts.

Download Terminal Services Example Project

No IT Needed

When deploying custom software applications at the enterprise level it is almost always necessary to coordinate the release of maintenance updates with each customer’s IT department. This is sometimes required for QA and software validation, but most often it’s because the IT department holds the responsibility of pushing software updates out to the individual PCs.

For you, the software vendor, you need maintenance patches to be installed quickly, sometimes very quickly, to ensure optimal user experience. For them, the IT dept, your software maintenance patch is just another of many tasks in the work queue. It won’t help to plead with them how important your release is. They support all departments, and every department thinks their needs are greater than the other guys, so they’ve heard it all before. This leaves you, the software vendor, potentially way down on the IT task queue. Fortunately for you, AppLife Update provides the tools to keep your deployed applications maintained without relying on the IT guy.

What are those tools, you ask? Why it’s the AppLife Update solution, consisting of:

  • Update Controller
    This .Net control integrates into your application to manage discovery, download, and initiation of your maintenance updates.
  • Update Permissions Elevation Windows Service
    This Windows Service deploys with your application and securely applies your updates under the privileges of the local system account. Using the service your application, running under a limited rights user, can still maintain your installation without administrative support.
    **Initial deployment requires administrative privileges.
  • Update Engine
    The update engine is downloaded by the Update Controller and performs the update on the deployed client. The update engine can execute the Windows Installer packages that you are already creating to update your software. In addition, it can do so much more. There are many built-in update actions to help you maintain your deployed software, and you can even write your own update actions in C# or Vb.Net

With these tools, and a day’s time, you can cast away those IT guy ties and take control of your application maintenance requirements, saving you and your customer time and money.

Implementing a Silent Updating Process

For many applications, it is not desirable to leave the decision of whether or not to update an application to the end-user. In fact, it is sometimes desirable to craft an updating process that operates silently, with no user interaction at all. AppLife Update makes it very easy to implement such an update process. In this blog post, I’ll walk through implementing a silent updating process.

The Process

When our demo application starts up, we’ll check for updates asynchronously in the background. If an update is available, we’ll asynchronously download the update in the background. To make the process the least intrusive to the user, our process won’t take any action when the download completes. Since the downloaded update package is cached locally as it downloads, it will be available the next time the application is restarted. Upon application startup, we’ll check to see if an update is fully downloaded and if so, go ahead and apply the update. If the update is not yet fully downloaded, the download will pick up where it left off.

Handling Unexpected Errors

Many things can go wrong as we check for and download updates over a network, and since our process is being performed silently, we’ll need to handle any errors that occur and decide what to do about it.

We’ll also need to be able to identify errors during the silent update execution. When an update is applied, our application is shutdown so that the application assemblies can be replaced. When the update process finishes, the application is restarted automatically. During startup, we’ll look at the results of the last update to see if any errors occurred. If any errors occurred, we can inform the user or send an administrative notice to support.

Now that we have a plan, we can go forward with implementation.

Implementation

With the desired behavior identified, we’ll implement this updating process using AppLife Update. To start, we’ll create a new Windows Forms application and add an Update Controller to the main form from the AppLife Update toolbox palette.

The Update Controller application programming interface (API) will provide all of the functionality we need to accomplish our identified update process. Once the update controller is added to your form, go ahead and set up a new project using the control smart tag. This will create an AppLife Update project that you’ll use to create and publish updates for your application.

Note: The Update Controller does not need to reside on a form. You can create an Update Controller and configure it programmatically in any .Net application.

Now that we have an Update Controller in the application and a project setup, we’ll implement our desired update process.

Checking For Updates

To check for updates, we’ll use the CheckForUpdateAsync method on the Update Controller. This check is performed asynchronously, and when the check completes, the CheckForUpdateCompleted event is raised.

   1: using Kjs.AppLife.Update.Controller;  
   2:    
   3:    
   4: public Form1() {  
   5:   InitializeComponent();  
   6:    
   7:   //check for updates  
   8:   updateController1.CheckForUpdateCompleted +=   
   9:    new CheckForUpdateCompletedEventHandler(  
  10:      updateController1_CheckForUpdateCompleted);  
  11:   updateController1.CheckForUpdateAsync();  
  12: }  
  13:    
  14: void updateController1_CheckForUpdateCompleted(object sender,  
  15:   CheckForUpdateCompletedEventArgs e) {  
  16:   if(e.Result == true) {   
  17:     //An update is availabe  
  18:    
  19:   }  
  20: }  

After the check completes, we can check to see if the update is already downloaded by inspecting the IsDownloaded property of the update. If the update is downloaded, we can go ahead and apply the update. If it is not, we’ll initiate the download. The download will pick up from where any previous instance left off. When the download process completes, the DownloadUpdateCompleted event will be raised. We won’t take any action when the download completes, but we will use this event for error handling later. We are not showing download progress in this implementation, but there is also a DownloadUpdateProgressChanged event to monitor download progress.

 1: public Form1() {  
   2:   InitializeComponent();  
   3:    
   4:   //check for updates  
   5:   updateController1.CheckForUpdateCompleted +=   
   6:    new CheckForUpdateCompletedEventHandler(  
   7:     updateController1_CheckForUpdateCompleted);  
   8:   updateController1.DownloadUpdateCompleted +=  
   9:     new AsyncCompletedEventHandler(  
  10:     updateController1_DownloadUpdateCompleted);  
  11:   updateController1.CheckForUpdateAsync();  
  12: }  
  13:    
  14: void updateController1_DownloadUpdateCompleted(object sender,  
  15:    AsyncCompletedEventArgs e) {  
  16:   //Download completed. Ready to apply on next startup.  
  17: }  
  18:    
  19: void updateController1_CheckForUpdateCompleted(object sender,  
  20:    CheckForUpdateCompletedEventArgs e) {  
  21:   if(e.Result == true) {   
  22:     //An update is available  
  23:     if(updateController1.CurrentUpdate.IsDownloaded == true) {  
  24:       //the update is already downloaded, go ahead and apply it.  
  25:     } else {   
  26:       //start the download  
  27:       updateController1.DownloadUpdateAsync();  
  28:     }  
  29:   }  
  30: }  

Applying the Update

With the update downloaded, we can apply the update. We want to apply the update silently, so we’ll pass in a parameter that prevents the update window from being displayed. This method call will close the application, launch the update process, and restart after the update completes.

   1: void updateController1_CheckForUpdateCompleted(object sender,   
   2:    CheckForUpdateCompletedEventArgs e) {  
   3:   if(e.Result == true) {   
   4:     //An update is availabe  
   5:     if(updateController1.CurrentUpdate.IsDownloaded == true) {  
   6:       //the update is already downloaded, go ahead and apply it.  
   7:       updateController1.ApplyUpdate(ApplyUpdateOptions.NoUpdateWindow);  
   8:     } else {   
   9:       //start the download  
  10:       updateController1.DownloadUpdateAsync();  
  11:     }  
  12:   }  

That’s it! We have implemented a silent update process, and in a perfect world we’d be done. But we don’t live in a perfect world, and unexpected events occur. Since this process is completely silent to the user, we’ll need to prepare for error conditions programmatically and take appropriate actions.

Error Handling

Handling errors that occur during the update check and download process is straightforward. The asynchronous event handlers can check for errors that occurred and look at the specifics of the error to aid in determining how to handle the error. If you are using the http protocol for updating, the inner exception is probably a WebException class, which provides additional error information. For instance, this information could be used to ignore connectivity errors. For this demonstration, we’ll display a message box if any errors occur during the update check or download process.

   1: void updateController1_DownloadUpdateCompleted(object sender,  
   2:    AsyncCompletedEventArgs e) {  
   3:   //Download completed. Ready to apply on next startup.  
   4:   if(e.Error != null) {  
   5:     //An error occurred.  
   6:     if(e.Error is DownloadException) {  
   7:       //A download exception is thrown when something unexpected happens.  
   8:       //The InnerException property will hold the exception that occurred.  
   9:       string errorMsg = "";  
  10:       if(e.Error.InnerException != null) {  
  11:         errorMsg = e.Error.InnerException.Message;  
  12:       } else {  
  13:         errorMsg = e.Error.Message;  
  14:       }  
  15:       MessageBox.Show(  
  16:        string.Format("An error occurred downloading an update: {0}",  
  17:         errorMsg));  
  18:     }  
  19:   }  
  20: }  
  21:    
  22: void updateController1_CheckForUpdateCompleted(object sender,  
  23:    CheckForUpdateCompletedEventArgs e) {  
  24:   if(e.Error != null) {  
  25:     //An error occurred.  
  26:     if(e.Error is DownloadException) {   
  27:       //A download exception is thrown when something unexpected happens.  
  28:       //The InnerException property will hold the exception that occurred.  
  29:       string errorMsg = "";  
  30:       if(e.Error.InnerException != null){  
  31:         errorMsg = e.Error.InnerException.Message;  
  32:       }else{  
  33:         errorMsg = e.Error.Message;  
  34:       }  
  35:       MessageBox.Show(  
  36:      string.Format("An error occurred checking for updates: {0}",  
  37:        errorMsg));   
  38:     }  
  39:   }  
  40:        …  
  41:   

Detecting a Failed Update Execution

As an update is executed, the application being updated is shutdown. When an update is executed with a user interface, any errors that occur would be presented to the user through the visual updating interface. Since we are applying this update silently, we will need to inform the user of any errors that occur another way. After the update completes, the application is restarted. We can use methods of the Update Controller to easily investigate the results of the last update that was applied. We’ll use this method to look up what happened, and inform the user of any errors that occurred.

   1: InitializeComponent();  
   2:    
   3:   //check for updates  
   4:   updateController1.CheckForUpdateCompleted +=   
   5:    new CheckForUpdateCompletedEventHandler(  
   6:     updateController1_CheckForUpdateCompleted);  
   7:   updateController1.DownloadUpdateCompleted +=   
   8:    new AsyncCompletedEventHandler(  
   9:     updateController1_DownloadUpdateCompleted);  
  10:     
  11:   //Read last update results  
  12:   LastUpdate lastUpdate = updateController1.ReadLastUpdateInformation();  
  13:   if(lastUpdate != null &&  
  14:    lastUpdate.Result == UpdateResult.Failure &&   
  15:    lastUpdate.StartingVersion == updateController1.Version) {  
  16:     //An update failed. Prompt the user.  
  17:     if(MessageBox.Show(string.Format(  
  18:    "An unexpected error occurred while silently applying an update:  
  19:   {0}\n\nWould you like to retry the update?",  
  20:     lastUpdate.ErrorText), "Update Error", MessageBoxButtons.YesNo) ==   
  21:     DialogResult.Yes) {   
  22:       //launch an interactive update  
  23:       updateController1.UpdateInteractive(this);  
  24:     }  
  25:   } else {   
  26:     updateController1.CheckForUpdateAsync();  
  27:   }  

Conclusion

Using the AppLife Update API, you can quickly and easily implement a non-interactive silent updating process that can be used in any .Net application. The application checks for, and downloads updates asynchronously. When the application launches and an update has been fully downloaded in a previous session, the update is applied silently. If any errors occur, the user is notified. The example can be easily extended and improved as necessary to fit specific updating requirements.

How to Hide the Error When Out of Network Range

All of the visual updating controls that ship with AppLife Update show an error icon and message whenever an update check fails.  Sometimes though this isn’t the most desirable behavior.  For instance, if your application runs on a laptop that is frequently moving in and out of network coverage.  In a situation like this, an update check failure is expected and you probably don’t want to display a concerning error icon to your end user.

To address this, we can look at the results of an update check and check to see why the error occurred.  If the issue is a network connection error, and we expect spotty network connectivity, we can choose to hide the control, instead of displaying an error to the user.

By listening for the CheckForUpdateCompleted event of the Update Controller, information about the error can be inspected and we can hide the control if a connectivity issue is discovered.

   1: private void updateController1_CheckForUpdateCompleted(object sender,  
   2:    Kjs.AppLife.Update.Controller.CheckForUpdateCompletedEventArgs e) {  
   3:   if(e.Error != null &&  
   4:     e.Error.InnerException != null &&  
   5:     e.Error.InnerException is WebException) {  
   6:     WebException ex = e.Error.InnerException as WebException;  
   7:     if(ex.Status == WebExceptionStatus.NameResolutionFailure ||  
   8:       ex.Status == WebExceptionStatus.ConnectFailure) {  
   9:     //There is connectivity issue.   
  10:     //Hide the update control, instead of showing an error.  
  11:       this.updateDisplay1.Visible = false;  
  12:     }  
  13:   }  
  14: }  

Another Alternative

It might be more preferable to display the control but show that no updates are available. We can accomplish this as well by including with the application a Director.Xml file that contains no updates.  Just copy the Director.Xml file from your publish location and remove all Versionnodes. With this file present, instead of hiding the control, we can change the update location to the local application path and initiate another update check.  This time no updates will be found and the control will indicate this.

   1: Kjs.AppLife.Update.Controller.CheckForUpdateCompletedEventArgs e) {  
   2: if(e.Error != null &&  
   3:   e.Error.InnerException != null &&  
   4:   e.Error.InnerException is WebException) {  
   5:   WebException ex = e.Error.InnerException as WebException;  
   6:   if(ex.Status == WebExceptionStatus.NameResolutionFailure ||  
   7:     ex.Status == WebExceptionStatus.ConnectFailure) {  
   8:     //There is connectivity issue.   
   9:     //Start an update check that will not find an update.  
  10:     string appDir = Path.GetDirectoryName(Application.ExecutablePath);  
  11:     this.updateController1.UpdateLocation = appDir;  
  12:     this.updateController1.CheckForUpdateAsync();  
  13:   }  
  14: }  

With no network connectivity, this is what is displayed to the user.

These techniques can be used with any of the visual updating controls and provides a method

Customizing the Application Updating User Interface

For many software teams who integrate a commercial application updating solution, the user experience that comes out of the box is perfectly acceptable. But for others, it’s one of the major barriers preventing solution adoption. The ability to customize the user experience is a differentiator for AppLife Update over competing options. We provide turn-key visual controls and user interfaces for an application updating process right out of the box, just like the others. Where we are different, is that we also provide the ability for you, the integrator, to completely customize the end-user updating experience. We’re not talking about changing the background color, or adding an image. We’re talking complete customization. In this post, I’ll walk through implementing a facelift customization of the AppLife update engine user interface.

The Built-In User Interface

As an update is executing on a deployed client, the image above is what the end-user sees. The window title and the image displayed are easily customizable through simple project property settings. It’s also just as trivial to silently update and not show any interface at all through update implementation code:

this.mUpdateController.ApplyUpdate(ApplyUpdateOptions.NoUpdateWindow);

Replacing the Built-In User Experience

Notice on the project settings tab above, the option to use a Customized Replacement Window.

This is what lets us give this user experience a real face lift. As an update is being executed and the AppLife Update engine is executing, there is a defined contract, or interface, that the visual window adheres to. Let’s introduce this interface.

Meet the IUpdateUI interface.

Any class that implements the IUpdateUI interface located in the Kjs.AppLife.Update.Engine.Core.dll assembly can replace the built-in window. This interface is quite simple. It has five methods and four events.

Methods – These methods are called by the update engine as the update is executed.

  • Open
    Displays, or initializes, the user interface.
  • Close
    Closes the user interface. This method will not always be called by the update engine. The update engine will call this method after the Finishmethod, only if the host application code initiated the update with the AutoClose option. Close is also called immediately after the Finishmethod if an error occurs during the update. Otherwise it is expected that the user interface remain open until the user closes it.
  • Finish
    Called by the update engine to notify the update user interface that the update has finished and is allowed to be closed. The user interface should not be allowed to be closed before this method is called.
  • Update
    This method is called repeatedly as progress is made during the update process. The method is called in order to refresh the user interface. Method parameters provide information about the current state of the update process.
  • ShowYesNoPrompt
    Display the designated message and prompt the user for a yes or no answer. This method is used by built-in action, such as the Restart Operating System action.

Events – These events are raised by the customized update interface to communicate with the update engine.

  • Closed
    Raise this event when the UI has been closed. This event must be raised for the Update Engine to complete the update and shutdown.
  • RequestCancel
    Raise this event when the user desires to cancel an executing update. The cancel request is confirmed by the update engine through a Finishmethod call. The result parameter will be set to Cancelled.
  • RequestPause
    Raise this event when the user desires to pause the executing update. The pause request is confirmed by the update engine through an update method call. The uiState parameter will be set to Paused.
  • RequestResume
    Raise this event when a paused update should be resumed. The resume request is confirmed by the update engine through an updatemethod call. The uiState parameter will be set to Updating.

That’s the interface that we must implement in order to replace the built-in updating window. You can use Windows Form, a WPF Window, or you can even use a communications proxy class that knows how to marshal the updating process information to a supervisory application, such as an update manager. For this walk through we’ll create a Windows Form replacement.

  1. Create a new Windows Forms project. Make sure to target the same .Net Framework version as your host application. Name the project MyCustomUpdatingForm.
  2. Add a reference to the assembly Kjs.AppLife.Update.Engine.Core.dll. If AppLife Update is installed on your development computer, this assembly will be in the .NET list.
    image
  3. View the code on Form1 and extend this form to implement the Kjs.AppLife.Update.Engine.Core.IUpdateUI interface.
       public partial class Form1 : Form, IUpdateUI {  
       ...  
       }  
    
  4. Design and layout your update user experience. As the update progresses, there are text messages and percent completion updates that you can use in the design. You can design anything you like. This is your form. For simplicity, this walkthrough will use a label and a progress bar in a much smaller form factor than the built-in updating window.
    Add a label near the top of the form and name it lblMessage. Then set AutoSize to false, AutoEllipse to true, and anchor to Top, Left, Right.
    Next add a progress bar below the label. Size it to fill the width of the window and set its Anchor property to Top, Left, Right.
    Finally, add a cancel button below the progress bar and name it btnCancel.
    image
  5. Implement Interface Methods

Open. In this method, we’ll simply show the form.

1:   public void Open(Kjs.AppLife.Update.Engine.Core.UpdateUIContext context) {  
2:     this.Show();  
3:   }  

Close. The Form base class already implements a Close method that will close the form. We do want to interact with the form close logic to prevent the form from closing before the update engine calls the Finish method. To accomplish this, we’ll override the OnClosing method and check a member variable that we’ll add. This member variable will be used to signal that the Finished method has been called. We’ll also keep the update interface open in the event of an error to show the user information about the error.

 private bool mCanClose;  
   2: private bool mError;  
   3:   
   4: protected override void OnClosing(CancelEventArgs e) {  
   5:   base.OnClosing(e);  
   6:   
   7:   if(!mCanClose) {  
   8:     e.Cancel = true;  
   9:     if(mError == true) {  
  10:       mCanClose = true;  
  11:     }  
  12:   }  
  13: }  

Finish. After the Finish method is called, the user interface can be closed. This is signaled by setting the mCanClose member variable to true. Then, if the update did not fail, the form is closed. If the update did fail, the exception message is shown on the form.

 1: public void Finish(Kjs.AppLife.Update.Engine.Core.UpdateResult result,   
   2:   string description, Exception updateError) {  
   3:   
   4:   if(updateError == null) {  
   5:     mCanClose = true;  
   6:     Close();  
   7:   } else {  
   8:     lblMessage.Text = result.ToString();  
   9:     progressBar1.Visible = false;  
  10:     btnCancel.Enabled = false;  
  11:     lblMessage.AutoSize = true;  
  12:     lblMessage.Text = "Error: " + updateError.Message;  
  13:     mError = true;  
  14:   }  
  15: }  

Update. Update the progress bar and message label.

   1: public void Update(Kjs.AppLife.Update.Engine.Core.UpdateUIState uiState,  
   2:  Kjs.AppLife.Update.Engine.Core.UpdateState updateState,   
   3:  string description, int progressValue, int progressMaximum) {  
   4:   
   5:   progressBar1.Maximum = progressMaximum;  
   6:   progressBar1.Value = progressValue;  
   7:   
   8:   lblMessage.Text = description;  
   9: }  

ShowYesNoPrompt. The simplest method is to show a message box.

   1: public YesNoResponse ShowYesNoPrompt(string message) {  
   2:   YesNoResponse result = YesNoResponse.No;  
   3:   if(DialogResult.Yes == MessageBox.Show(this,  
   4:                message, "Update",   
   5:                MessageBoxButtons.YesNo,  
   6:                MessageBoxIcon.Question)) {  
   7:     result = YesNoResponse.Yes;  
   8:   }  
   9:   
  10:   return result;  
  11: }  

6.  Implement Cancel by raising the RequestCancel event when the Cancel button is clicked.

 private void btnCancel_Click(object sender, EventArgs e) {  
   if(RequestCancel != null) {  
     RequestCancel(this, EventArgs.Empty);  
   }  
 }  

7. Implement the Closed event. This event informs the update engine that the user interface has closed. A Windows Form class raises a Closed event when the form is closed, so we don’t need to implement the event in this example.

Testing the New User Interface

With the basics of the interface implemented, we can build the project and then test our form using Make Update. Open your AppLife Update project file and then navigate to the project settings dialog.

On the Update Window tab, we can import the assembly that includes our new replacement window. The imported assembly must have only one class that implements the IUpdateUIinterface. The assembly is imported into the update project and will be included in any new update packages built by this update project. This dialog also provides a tester for replacement windows. Once imported, clicking the Test button will launch a test process.

In conclusion, by using the IUpdateUI interface you have complete control over the look and feel of your updating user experience. If your application demands strong product branding or a specific look and feel, you can easily fulfill your requirements with AppLife Update.

Build and Publish Software Updates from Visual Studio

So you’ve got AppLife Update integrated into your application. That was easy enough. You’ve got your AppLife Update project set up to build and publish updates from Make Update as you release software versions. To make the process of building your updates even easier, I’ll show you how to integrate update building and publishing directly into your Visual Studio project build process.

AppLife Update ships with an MSBuild task that we can use within a Visual Studio project file to build and publish updates as part of the Visual Studio build process. Using this, we’ll add a new Release with Update build configuration to a Visual Studio project. When this build configuration is chosen, an application update will be built and published as the Visual Studio project builds.

Start by extracting the Simple C# Quick Start project. This will give us a common project to work from.

Step 1 – Create a new build configuration.

From the Visual Studio build menu, select the Configuration Manager.

Create a new build configuration and call it Release with Update. Select to copy settings from the existing Release configuration. We’ll modify the project to build and publish an update when this configuration is built.

Step 2 – Modify the Visual Studio Project File

From the Visual Studio project menu, select to Unload Project. With the project unloaded, you can edit it within Visual Studio by selecting the Simple project node from the Solution Explorer and from the context menu, select to Edit Simple.csproj. With the Visual Studio project file open in the editor, scroll to the bottom and you will see two commented out Target elements. Uncomment the AfterBuild target and add a UsingTask element that references the assembly that houses the BuildUpdate MSBuild task. This assembly is located in the AppLife Update install directory.

Inside the AfterBuild target, add a BuildUpdate task. Set the Condition attribute to execute only when the newly created build configuration is used. Details on the attributes of this task are available in the MSBuildTask ReadMe.rtf file located in the same folder.


Step 3 – Modify the aup project file to use the Release with Update output folder

The Add & Replace files action should look at the Release folder for its files. Add a path relative to the aup project file.

Simple\bin\Release\Simple.exe

That’s it!

Now, whenever you want to publish an update, you can select the Release with Update build configuration and build the project.

Visual Studio Build Output

Parting Thoughts

Build a test update out of Visual Studio, or build to a test update location. Both options are just as easy. This prevents an inadvertent build from being available to end users, and provides a built in updating testing mechanism.

To build a test update, set the TestOnly attribute to true. For clients to see test updates, they must have a specific application setting in their app.config file.

To publish to a specific test update location, you can name the publish location in Make Update project settings, then change the PublishLocations attribute value to match this update location.

Scroll to Top